Removing Cylinder drive sprocket
I appreciate this subject has been covered before but I would appreciate any further advice given the sprocket on my Morrison mower is proving so stubborn.
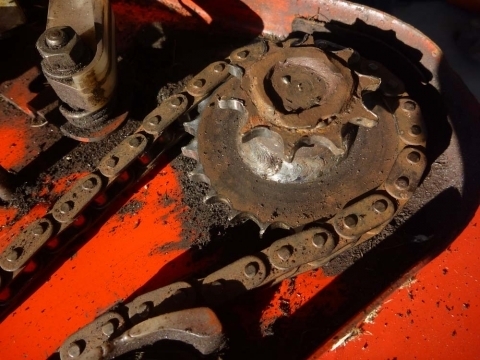
I made myself a chain wrench type tool (copying a Wristpin design) comprising a piece of steel tubing and a length of chain (1/2" pitch) which fits the small, raised sprocket at the end of the cylinder. I also fitted a jubilee clip at the sprocket end of the tube to form a fulcrum. The chain was wound round the sprocket with ends fed back up inside the tube and an allen key inserted through the links where they emerged from the end of the tube to hold it tight. The mower cylinder blades were jammed with pieces of wood and I applied heat via a hot air gun to the sprocket. I then pushed down on the tool with the machin upside down on the floor, attempting to turn the socket in a clockwise direction. Unfortunately the consequence was that the chain broke at the split link (where I had joined two pieces together) before the sprocket moved. (picture of sprocket below)
It occurs to me that I would have more leverage if I used my chain wrench tool on the larger diameter sprocket below the one I had used - but this one is recessed into the mower chain casing and I can't see how I could access it. I suppose I could try to fabricate a tool from a steel bar with pins that locate into the sprocket but the loading on them would (I think) cause them to bend.
Does anyone have any further thoughts? For example, should I attempt to get the sprocket much hotter to get it to budge?
Forums

You should have removed the
You should have removed the chain before trying to remove the sprocket, bit late now I know ;-)
You shouldn't need heat to remove the sprocket, I never did. Lets be honest here, that sprocket is like the famous Norwegian blue parrot, it is defunct, dead etc and you need a new one, so stop messing about and use a large pair of stilsons

Heat or no heat I am
Heat or no heat I am suspicious of the run of weld around the outer face of the smaller sprocket, it looks as though it could be welded to the shaft.
it looks as though it could
it looks as though it could be welded to the shaft.
I had the same thought. I hope that isn't the case.
it looks as though it could
it looks as though it could be welded to the shaft.
There's certainly what appears to be some fairly crude non original welding on the face of the sprocket but would the shaft have actually extended that far? It would normally be expected that the sprocket assembly would have a threaded boss screwed to the cylinder shaft, the end of which would be considerably inset from that outer face. Some indication of this may perhaps be gained by looking at the relationship of the shaft and sprocket on the owner's other machine which had the rear roller problem.
Many thanks for the further
Many thanks for the further comments which I have only just seen. First I should explain that the photo is not of the sprocket I was attempting to remove but one taken earlier of another identical machine. I was "practising" on this other machine when I ran into the problem described above. And I did remove the chain from the lower sprocket before attempting removal.
As I explained to Wristpin, I now own 3 Morrison mowers all of which seem to use the same cylinder drive sprocket so I can post a photo of each to get your views on whether it is possible that one has been welded to the shaft. (I am away so can't send them immediately.) My recollection is that each looks to have some weld material on the top of the smaller sprocket. I have also found that you can buy a replacement sprocket set (23 teeth on larger, 10 on smaller) from a Masport (ie Morrison) spares outlet in Australia. This part is described as having a left hand thread which makes me think that Wristpin's assumption on the original design is right. The price is around 60 Aus dollars.
Subject to any advice when you've seen my 3 photos, I think my best bet will be to use a large stillson on the sprocket (with chain protecting the sprocket teeth) plus heat. I am keen to find a way to remove this component because (a) I want to replace/swap the sprocket on at least one of my mowers, and (b) I need to remove the cylinder on my latest acquisition to refurbish it properly.
Thanks again for all the helpful suggestions.
The Morrison machines are
The Morrison machines are based on Ransome machines and so you need to remove the sprocket in a similar way to removing a drive sprocket from a Marquis cylinder. The sprocket assembly does have a left hand thread, so you need to block the cylinder with something solid and then turn the sprocket clockwise. Once the sprocket starts turning, it should then turn freely, you shouldn't need heat, I never did and I must have removed hundreds of these in my working life, you just need enough leverage to get the thing to move.
OK, so here are 3 pairs of
OK, so here are 3 pairs of photos showing the cylinder drive sprockets on each of my 3 Morrison machines. The red ones are from the "Olympic 400" model, the green ones from the larger "Olympic 500". All the sprockets have 10 teeth on the smaller and 23 on the larger.
Sprocket on Mower 1 (machine which had a faulty rear roller and is now running):


Sprocket on Mower 2 (more or less identical to the machine above and for which I still have more work to do):


Sprocket from Machine 3 (with larger engine and wider cylinder which I want to restore):


I am afraid that the sprocket on Machine 3 was damaged when foolishly I tried to remove it with a wrench that engaged on the teeth (this was after the home made chain wrench I had made failed). I now realise I need to protect the teeth with some chain links wrapped around them and will use a newly acquired large stillson.
To me all 3 sprockets appear of similar construction - i.e. with clear evidence of weld metal around the smaller sprocket. This gives me hope that none of them have had their sprockets welded onto the cylinder shaft so they should all be capable of being unscrewed. I would welcome confirmation that this conclusion is sound.
Assuming you agree, I am not sure whether or not to apply heat to assist removal? And is it better to apply steady pressure or to give the stillson a few blows with a lump hammer? If I damage the sprocket (or if it is damaged too badly already) I think I may be able to buy a replacement although it may have to come from Australia! The spare is described as "Genuine Masport Sprocket Assembly-10/23 Lh Thread Rm 004298, 032006" with the photo below (10 tooth wheel hidden behind large one):

Thanks for your continued help on this project!
As per my earlier post I
As per my earlier post I think that it is unlikely that the sprocket is welded to the shaft. I don't think that smiting the Stillsons with a lump hammer is the way to go and unless you have a really good heat source such as oxy acetylene or oxy propane I doubt that you will get useful heat into the sprocket. You don't mention the size of the Stillsons, but a really meaty 26" one plus a bit of pipe slipped over it is not unknown in this workshop - shusssh! Get the machine well anchored and give a good steady push . Wear gloves in case it yields in a hurry.
Thanks Wristpin. Stillson is
Thanks Wristpin. Stillson is a really meaty 24" handle model. Will follow your advice.
Success! My new "meaty"
Success! My new "meaty" stillson applied on top of a piece of chain engaged around the small sprocket did the job remarkably easily after all my previously abortive efforts. I had machine on its back using handles to prevent rotation, wood blocks between the cylinder blades, and without any heat. Then put my weight downwards towards the floor on 24" stillson and hey presto.
Many thanks for all the helpful advice. I have learnt a lot about this particular operation.
I now have the combined cylinder/blade assembly removed and my next task is to remove a rather stubborn cutting "set screw" without doing it damage. Now I have much better access, I am soaking it in oil and will probably try heat on the metal block into which it screws and use caution over how much torque to apply.
Yes, with that mass of
Yes, with that mass of sprocket a hot air gun will not be sufficient.