Mower Restoration
Mower Restoration
Mower preservation and restoration is one of the main aims of the club. It is also the reason that many people enjoy collecting and displaying old lawn mowers. In this section we offer some general advice on how to go about restoring a hand mower.
We chose a 100 year old Ransomes Patent Chain Automaton but most of the general advice would apply to any machine including hand and motor mowers. The main difference, of course, is the engine. We will be adding some general information about engine restoration in due course. In the meantime, we suggest that if the engine runs the best option is to leave well alone.
Planning Your Restoration
Planning Your Restoration
Successful restorations result from careful planning and preparation. Even the simplest projects can benefit from a little forethought. More complex projects can take many months and by taking notes and photographs before you start and as you go along you can help a great deal in the long run. This section provides basic advice about planning and preparing your restoration project.
Before You Start
Before You Start
Here is the machine we are going to restore. This 14" Ransomes Patent Chain Automaton was made around 1905. When the machine was found it was rusty and very little of the original paintwork remained. The front wooden rollers were almost rotted away, the chain was missing and the bottom blade was badly corroded. For these reasons the decision was made to restore the mower.
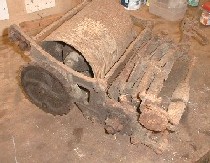
A bit of thinking and planning before you start will make the restoration easier.
TO RESTORE OR NOT
This is one of the big questions to ask yourself before you contemplate a restoration project. The decision is completely up to you but here are a few pointers.
WHY RESTORE?
Many collectors like to restore their mowers to original condition. This is fun and rewarding because you are helping to save something from the past for future generations.
TAKE SOME PHOTOS
Take some photographs of the mower before you start. These will be a useful reference when you reassemble any bits that have been taken apart. In particular, take images of intricate assemblies. Digital cameras simplify this but any basic camera will do.
MAKE SOME NOTES
Make notes of any unusual features that may not show up very easily on your images. For example, some nuts will have washers and others will not. Making a note of these before you start is better than trying to guess days, weeks or even months later.
CHECK FOR COLOURS
Getting the final colours right will make all the difference to a successful restoration and you need to decide what they are before you start. Queries about colours are often received by the club and we have compiled some basic guidelines.
Make a note of which parts are painted which colour.
CHOOSE SOME TOOLS
You do not need any specialist equipment to restore an old mower but a few basic tools will be very useful.
BE PATIENT
There is a temptation to get cracking before you have thought it all through. If something is taking a little longer than you expected or a few nuts and bolts are seized, take a break. When you come back everything will seem a little easier.
Now you have decided to restore the mower, taken some images, noted any special details and checked the colours you are ready to start.
Restore Or Not?
Restore Or Not?
TO RESTORE OR NOT?
Deciding to restore or not is one of the big questions to ask yourself before you contemplate a restoration project. The decision is completely up to you but here are a few pointers.
Most collectors will draw a distinction between preservation and restoration.
Preservation means to maintain the item in its present condition and prevent further deterioration.
Restoration means to return the item to its original condition, as it was when it was first manufactured.
The Ransomes Patent Chain Automaton covered in this section was very rusty and had very little original paint, hence the decision to restore.
WHEN NOT TO RESTORE
Mowers in genuinely original condition can be just as interesting (and often more valuable) to other collectors than those that have been restored.
If the majority of the following statements are true then leaving the mower in unrestored condition may be the best choice:
- the mower is complete
- the mower is in working order
- the paintwork is largely intact (over 50%, say) and original
- the mower is worth more in original condition
- the mower has some historic significance that means it is more interesting and/or valuable in original condition
WHEN TO RESTORE
If any of the following are true then restoration may be a better option:
- the mower is damaged
- parts are missing
- it has previously been repainted with the wrong colours or modern paint
- most of the original paint is missing and the metal is rusty
Bear in mind that any restoration work may lead to replacement of original parts and paint with modern equivalents.
For some people this is reason enough to leave the machine in its original condition and concentrate instead on conservation.
Many museums, as a matter of policy, choose to preserve rather than restore.
Project Stages
Project Stages
Most restoration projects can be broken down into separate sections from initial dismantling through to final reassembly and finishing. It is often possible to carry out some of these stages, on different parts or sub-assemblies of the mower, at the same time. For simplicity we will assume each section is completed before moving on to the next.
- Dismantling & Inspection
- Cleaning
- Painting
- Replacing Parts
- Reassembly
- Finishing
Cleaning Mowers
Cleaning Mowers
RUST REMOVAL
Rust is always a problem with steel or cast iron. You will need to remove it before you can repaint the mower.
Rust can be removed using a wire brush. Glass paper, sanding blocks and wire/steel wool are also useful. These all create dust so work in a well ventilated area if possible and wear a face mask to prevent breathing it in.
A wire brush wheel in a power hand drill can cut a lot of the effort out but can create even more dust. As with all power tools, take care and wear appropriate protection.
If you have access to shot blasting equipment this can make cleaning the components a lot easier. Shot blasting can clean the metal right back to a bare and clean surface. In reality it is not necessary to go this far.
Special chemicals can also be used to remove rust but there is no substitute for hard work with a wire brush.
You should be aiming for a surface free of loose rust and paint.
PAINT REMOVAL
Even the rustiest machines will have some paint deposits on them.
There is a good case to be made for leaving original paint on the mower even if you are going to paint over it. In this way the original paint will be preserved for future inspection by historians, industrial archaeologists and enthusiasts may be able to use as yet unforeseen techniques to learn about the materials and skills of the past.
If you do decide to remove the paint, scraping is one of the simplest and best techniques, particularly for small areas. Scraping is also useful for larger areas but additional methods may be required. Paint stripper is useful. The water soluble, semi-gelatinous types are the best as they are easy to use and can be washed off afterwards.
Brush the stripper over the parts and leave for 15-30 minutes, using the time to work on other bits.
Once the paint is softened it can be removed more easily by scraping or wire brushing. A second or even third application is sometimes required.
Wipe cleaned parts with a rag soaked in white spirit to remove any stripper residues and leave to dry.
Remove remaining rust as previously described.
DEGREASING
Some parts of the mower may be covered in oil or grease deposits. These need to be removed before the parts can be painted.
Heavy deposits can be scraped or wire brushed. After this, use special degreasing fluid to remove the remainder. Water washable is best.
For heavy deposits, soak parts in diesel oil followed by a final clean using degreaser.
When the parts are clean, remove any paint or rust as previously described.
If the parts will not require final painting (chains for example) store them safely until the mower is reassembled. A light coating of oil will help prevent new rust forming and will stop the components seizing while you work on the rest of the mower.
Rust forms quickly on bare iron and steel. When the parts are clean give them a coat of priming paint as soon as possible.
You are now ready to paint the mower.
Inspection & Dismantling
Inspection & Dismantling
It is easier to restore a mower if you dismantle it and work on each part separately.
You can then clean each part, put right any problems and repaint it before reassembly.
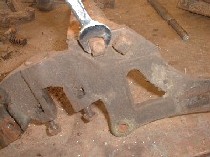
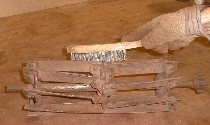
Here, the bottom blade is being removed from one of the side frames.
Most nuts and bolts should be reasonably easy to remove.
However, with old machinery, there is a good chance that some will be difficult to remove. Causes might include:
- parts corroded/rusted together
- damaged threads on nuts and/or bolts
- threads blocked by paint and/or rust
- components are out of shape
A closer look should reveal the cause of the problem.
SEIZED PARTS
Seized parts can present a potential problem. You need to free the part but you will not want to cause any unnecessary damage.
If you are having problems removing a seized part, be patient. There will be a great temptation to force a spanner or to hit the offending part with a hammer or some other tool get something to move. We have all been there and we have all probably regretted the ensuing damage.
Most problems can be solved by removing excess rust and paint from threads and by applying lubricating or penetrating oil.
For advice on some other common problems, see the special section on freeing seized parts.
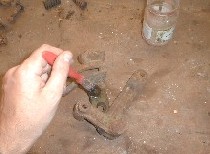
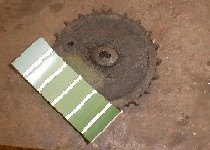
On the Patent Chain Automaton the most serious problem was that the large sprocket on the rear roller was seized on to its shaft. The only way to get it off was to drill out the small metal key that holds the sprocket on to the shaft. A new key will be needed later.
The bottom blade was rusted beyond repair and will need replacing later. The holes on the sole plate for the mounting screws will need to be drilled out and retapped.
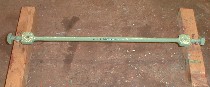
INSPECTION
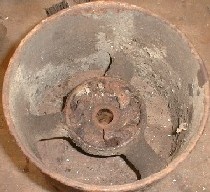
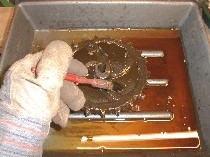
As you dismantle the mower, make a note of how the parts fit together and where any loose items such as springs and washers are placed. This image shows the rear roller and the location of the teeth that engage with the pawl on the main axle to drive the mechanism of the mower.
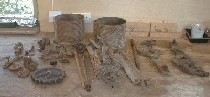
It is worth taking a photo of the components after you have finished dismantling the mower as a record.
Keep small items such as nuts and bolts in temporary containers. This prevent them becoming lost or rolling off the work space. Plastic trays for supermarket fruit and vegetables are ideal.
Painting & Finishing
Painting & Finishing
PREPARATION
Painting is perhaps the most important stage of the restoration. It provides protection against corrosion and can give the mower that original look and feel that most collectors want to achieve.
The secret of good painting is preparation. When you have cleaned the parts and removed excess oil, grease and paint as described in the previous section you will be ready to start applying paint.
It is worth reading about choosing the right colours and where to find the right paint before you start.
Everyone has an opinion about the right way to paint old machinery. The method suggested here is suitable for virtually any old mower and does not require any special equipment.
All the paints can be applied by brush for simplicity. If you prefer to use a spray gun the general principles still apply.
USEFUL TIPS
Apply costs of paint thinly while making sure the item is properly covered. This will help prevent drips and runs in the paint. Some people like to rub down the paint between coats but this is not necessary unless the paint has been applied too thickly or has run and then dried to leave a mark. It is normally better to brush these runs out before the paint dries.
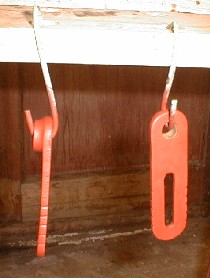
Cut up old wire coat hangers into various lengths and bend them into elongated S shaped hooks. These can be used to hang items up after painting while they dry. They can also be used during painting to support the item and prevent paint getting onto hands and gloves.
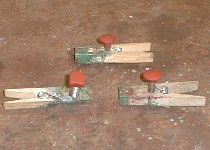
Small items such as nuts and bolts can be held in clothes pegs during painting and drying.
Make some jigs using pieces of wood and nails to support cumbersome items such as cutting cylinders.
Clean brushes out after use as directed on the paint tin. There is nothing worse than having to clean a brush before you can use it!
Wear gloves if only to keep messy paint off your hands.
PRIMING
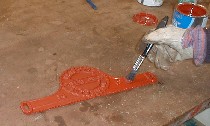
Priming prepares the metal surface for additional coats of paint. Any good quality red-oxide type primer will provide the necessary "key" for further coats and give good protection against corrosion.
There is no need to use any of the extra special primers with additional anti-corrosion chemicals. These tend to be more expensive, harder to apply because they are more viscous and leave a thicker coat which is more prone to chipping.
Before you start decide if there are any areas that really do not need paint. For example, there is no need to apply paint in holes where shafts or bolts will pass. If you do paint them you will only need to clean them out afterwards.
Two thin coats of primer is more than adequate. Apply the paint with the brush as thinly as possible while making sure to cover the whole surface. Pay particular attention to working the paint into any pits in the metal surface and into any ridges and undulations, for example around cast lettering or other features.
Leave the parts to dry over night between each coat.
UNDERCOAT
Undercoat provides a suitable foundation for the final colour. It also provides a boundary between the primer and top coat so that fewer applications of the final colour are required.
One coat of undercoat is normally all that is required. A neutral colour such as grey is suitable for a wide range of greens and reds most often used for the final coats.

TOPCOAT
The topcoat provides the final colour of the mower. Most people use modern gloss paints because these are readily available. For older machines an "eggshell" type of paint may give a more authentic finish. It is really up to personal preference.
The coverage of modern paints is good enough that two thin coats of gloss is all that is required.
As with primer and undercoat, apply the paint sparingly while making sure to cover the entire surface. Leave to dry well between coats.
That is all there is to it. Some people add layers and layers of paint, rubbing carefully down between each, and then boast about their efforts. This is unnecessary. Even our two plus one plus two coats of primer, undercoat and gloss is much more than the original machines would have had but at least it provides a good standard of finish.
FINISHING
The final job when painting is to pick out any raised lettering. This is where you paint the lettering in a different colour to make it stand out.
It was often done on older mowers where manufacturer and model names are cast into handles, scraper plates or name badges.
Not all mowers had the lettering picked out but it should be possible to see if yours did during the inspection before you started the restoration. If there is evidence of a colour then you should use the same one when picking out.
If there is no evidence of picking out, there is no reason why you should not do it anyway. Popular colours include red, yellow and gold.
With care and a little practice it is perfectly possible to get good results using a small artists' brush. Some colours can also be applied using "painting pens" that can be bought in hobby and craft shops.
Special Sections
Special Sections
There are many general considerations that can be applied to most restoration projects. These may not be specific to a particular restoration so we have included them in a separate section.
Choosing Paint
Choosing Paint
THE RIGHT COLOUR
Identifying and selecting the right colour will make all the difference to a successful restoration. You will need to decide what they are before you start. It will be too late once you have stripped off all the original paint.
Even mowers that are rusty usually have some original paint. This can often be found underneath chain covers or on the inside or inner faces of parts that are rusty on the outside.
These small patches of paint can be used to check the colour you will need later during the restoration.
HOW MUCH?
250ml is normally enough to give a hand mower a couple of coats of paint with enough left over for touching-up chips and scratches. 500ml is often more than enough for motor mowers.
FINDING THE PAINT
Most paint manufacturers produce colour cards that illustrate their range of products. These have a limited choice of colours but if you are lucky you will find one that matches your mower.
In most cases, for a true match, you will need to get the paint mixed specially. many shops can mix paint to match items supplied by you. Take part of the mower with paint on to the shop and they will try and match it.
Another approach is to use paint manufacturers' colour cards to match the colour you need. These cards have a code number that suppliers use to produce the colour.
Specially mixed paint costs about the same as off-the-shelf or ready-mixed products but the big advantage is that you can always get very close to the correct colour.
NOTES ON OLD PAINT
Be aware that the paint used on many old machines deteriorates over time. The paint may oxidise through exposure to the air or become stained by oil or grease deposits. These effects can change the chemical composition of the paint. This means that it may be difficult to obtain an accurate match. However, experience shows that this is not a major problem and it often possible to match very closely to the correct original colour.
In the past, paint manufacturers were unable to produce consistent colours from batch to batch during the manufacturing process. Mower manufacturers were also less concerned about using exactly the same colour for all their products. This means that shade or colour of otherwise identical machines can vary.
Because of this, it can be argued, there is no such thing as "the correct colour" for any particular old mower. This is why the Old Lawnmower Club generally recommends matching colours for each machine, particularly older or less common models.
Modern chemicals and pigments ensure that today's paints are more durable than those from yesteryear. They are also more glossy. Older mowers often appear to have a semi gloss finish that can be replicated by modern "eggshell" type finishes. Some of this dullness may be caused by weathering of the original paint surface. Eggshell paints can give an attractive finish but are not as durable as paints specifically designed for exterior use.
Freeing Seized Parts
Freeing Seized Parts
THE BASICS
Be patient if you are having problems removing a seized part. A little time spent thinking about a problem now is better than making time later to fix something broken in the heat of the moment.
Most seized parts can be freed easily without any special tools.
Removing rust and other deposits from exposed threads by wire brushing makes it easier to remove nuts.
Apply lubricating or penetrating oil to help free seized parts. It is amazing how well this works.
For really stubborn parts, immersion in diesel oil can often work wonders, especially if you leave it for a few days.
Sometimes it may be necessary to drill out a thread or cut off a bolt head. This is a last resort and you will need to take care to work on something that can be replaced relatively easily later on. Remember, nuts and bolts are easier to replace than other parts of the mower.
SPECIAL TOOLS
Impact screwdrivers can be a useful tool. These are designed to turn the nut or bolt a fraction of a turn suddenly and with additional force. They should be used carefully but can often free seemingly seized parts.
Gear pullers can be helpful for removing sprockets or gear wheels that are stuck on their shaft. Ideally the pulling force should be applied as close to the central shaft as possible to avoid placing undue stress on the outer extremeties of components. There is a potential problem with spoked or open sprockets found on many early hand mowers. It is very easy to apply too much force with these tools and break the sprocket so proceed with care. Try not to apply force to the outer rim of these.
Drifts and tapered cold chisels can be used to apply force behind a sprocket or gear wheel, again as close to the shaft as possible, to "push" it off the shaft.
USING HEAT
Applying heat to the seized components often helps to free them. This is a specialised task, particularly for larger or heavier items, and the best advice is to ask someone who knows what they are doing to help.
Many local blacksmiths, metalworkers or welders will have the correct tools and will be happy to help for a small fee.
Small parts can often be freed simply by placing them in the base of an open fire or bonfire and leaving them for an hour or two to heat up. Make sure the parts have cooled down before you handle them afterwards.
Do not force cooling by immersing parts in water as this is potentially dangerous and may cause damage.
Tools
Tools
BASIC TOOLKIT
It always helps to have the right tools and very few are needed to restore most mowers.
This is not a definitive list. Nor is it designed to cover all eventualities. But it does illustrate the sorts of tools that will be useful.
TOOLS
- spanners to dismantle and reassemble mower
- screwdrivers
- pliers or mole grips
- workbench or table
- vice to hold parts
- old jam or pickle jars for small amounts of paint stripper, degreaser or white spirit to clean components and tools
CLEANING/PREPARATION
- wire brushes to clean off loose paint and rust
- glass paper or sanding blocks to clean off loose paint and rust
- old paint brushes for stripping and cleaning parts
- old chisels and scrapers to remove old paint and oil deposits
- paint stripper (water soluble)
- degreasing agent (water soluble)
- supply of old rags to wipe and dry parts and tools
STORING ITEMS
- small plastics tubs to hold and store small parts
- larger boxes to keep parts when not working on them
FINISHING
- good quality paint brushes for painting
- artists' brush for touching in lettering and fine detail
- clothes pegs to hold parts while they are drying
- wire hooks to suspend parts while they are drying
- white spirit/brush cleaner
- dust pan and brush for cleaning up
PROTECTION
- gloves to protect hands
- goggles to protect eyes
- old clothes or overalls to protect clothing
- face mask to prevent breathing in dust