First ever Restoration - Suffolk Super Colt - Lots of questions!
Hello all, I've been browsing the site more and more recently - mainly from search results while googling for information. After giving up cycling recently due to health problems i needed something to help pass the time and something to fettle with! I've always carried out servicing and repairs on my own cars and bikes, learning along the way and reading up about things i didn't know how to do, and like to think I’m mechanically competent.
There has always been something about engines that has intrigued me, and so i decided to see if I could strip down and refurbish a lawnmower. One came up nearby on the bay, a 'Suffolk Colt' which was advertised as spares / repairs due to 'No Spark - suspected coil'. I figured it was worth a punt and would be a good learning experience even if i can't manage to get it running. Looking online, Colt's didn't seem to quite match the look of my mower, which led me to discover it's actually a 'Super Colt'.
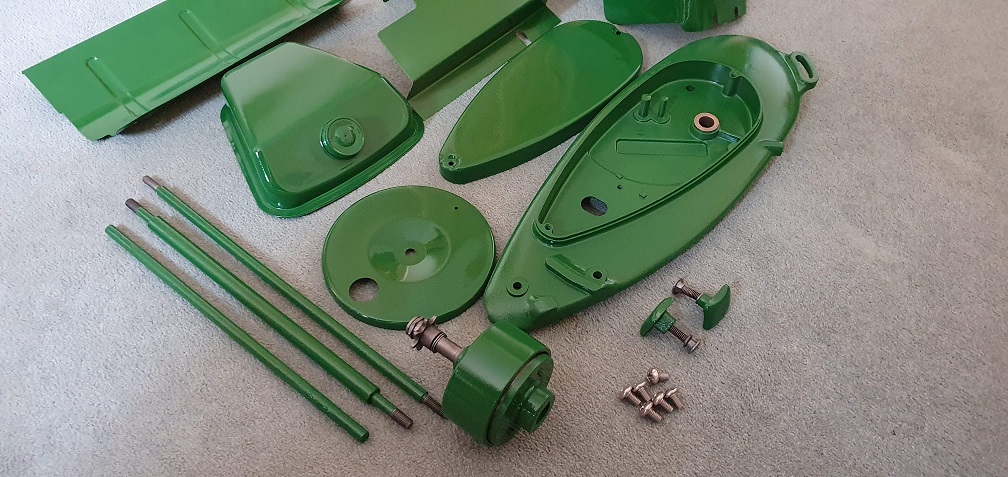
What started off as a simple 'Let's find out why it's not sparking' quickly resulted into a complete strip down of the entire mower and lastly the engine!! Taking plenty of pictures along the way, and bagging up nuts and bolts with labels so as not to forget what went where, I've now stripped the entire thing down so that I'm left with the engine block, and an exhaust that is well and truly welded to the block - thankfully it doesn't appear damaged, just rusty, so It can stay where it is (frustratingly for my OCD).
I'm going to test the waters here to make sure I can upload pictures properly, and once I can, I'll post up a few pictures I've taken during the strip down. I've come across quite a few things I’d really appreciate some advice with so anyone interested in looking/reading can hopefully help me out - which I’m hoping will help others out in future who are thinking of tackling the same sort of project.
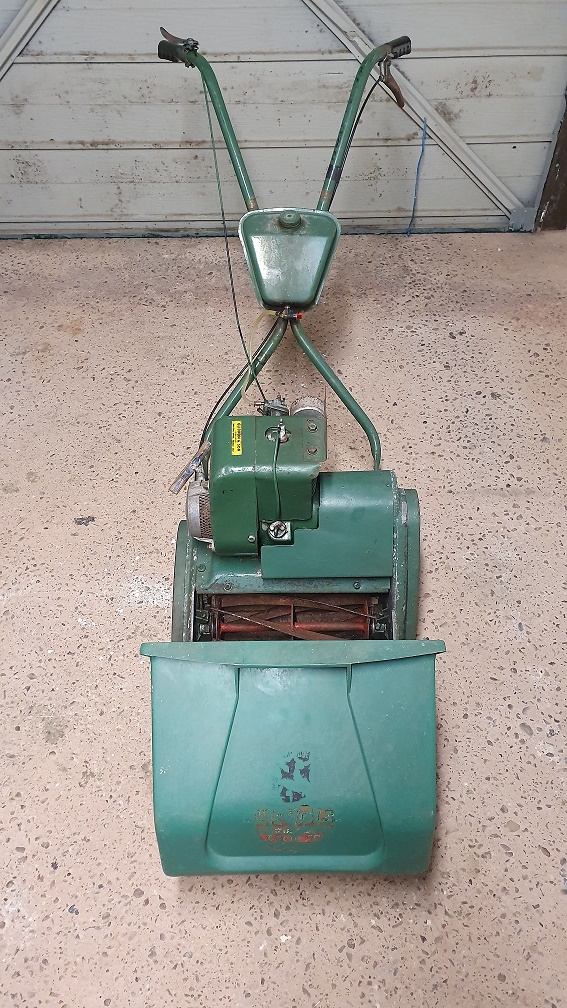
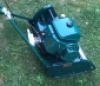
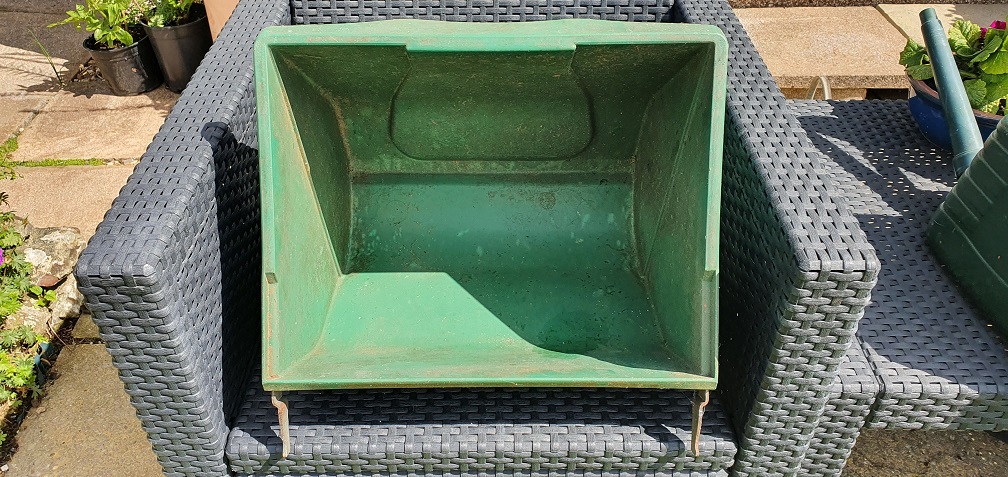
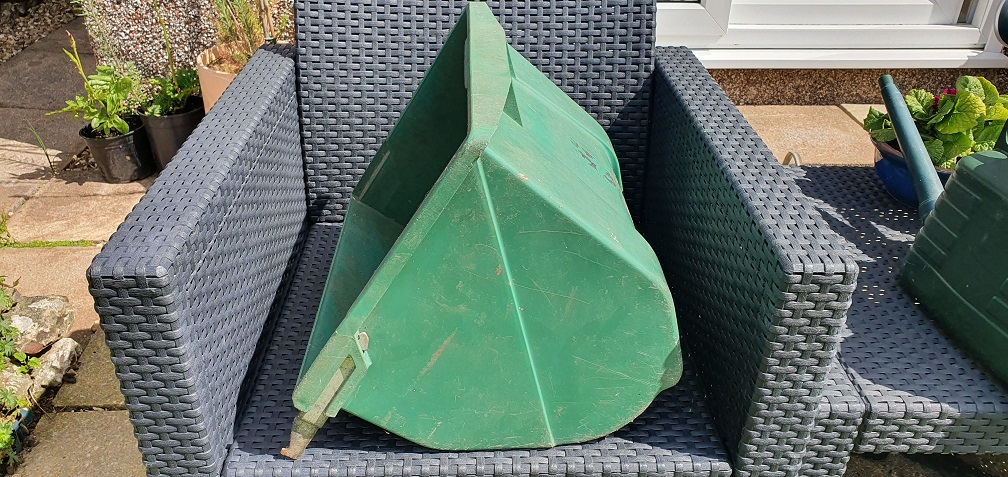
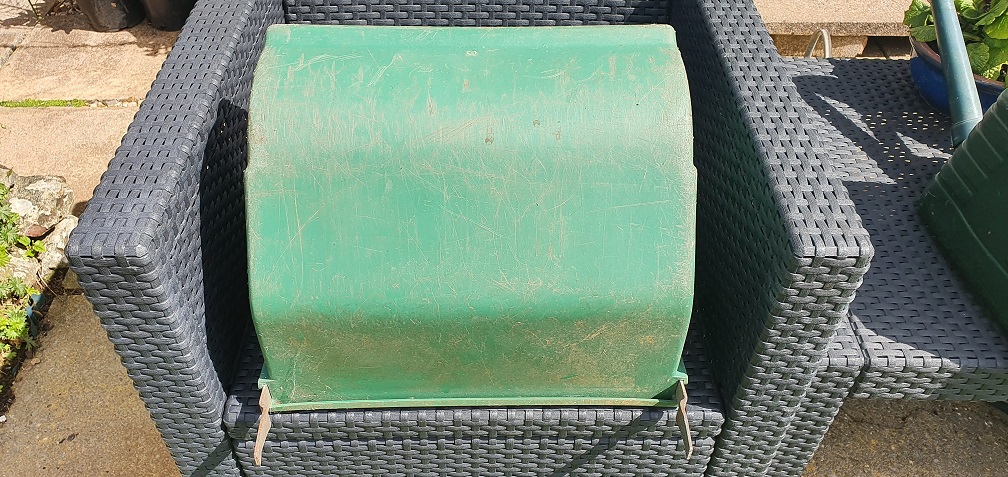
Here is a Picture of the mower after collecting it
Forums
Thanks Clive - sounds like we
Thanks Clive - sounds like we will be seeing some progress soon on your super colt! I don't suppose you could upload a picture showing the correct angle of the ignition stop could you please? I'd like to get my one straightened out and then bent to the correct approx. shape before painting it - it's looks a bit sorry for itself currently...

Sorry, I meant to say that I
Sorry, I meant to say that I used a company online called www.accu.co.uk for my replacement machine screws - they have a good range on there if you need anything similar ;)
Thanks for the info ref the

 Thank you for the info' ref the source of the set screws..
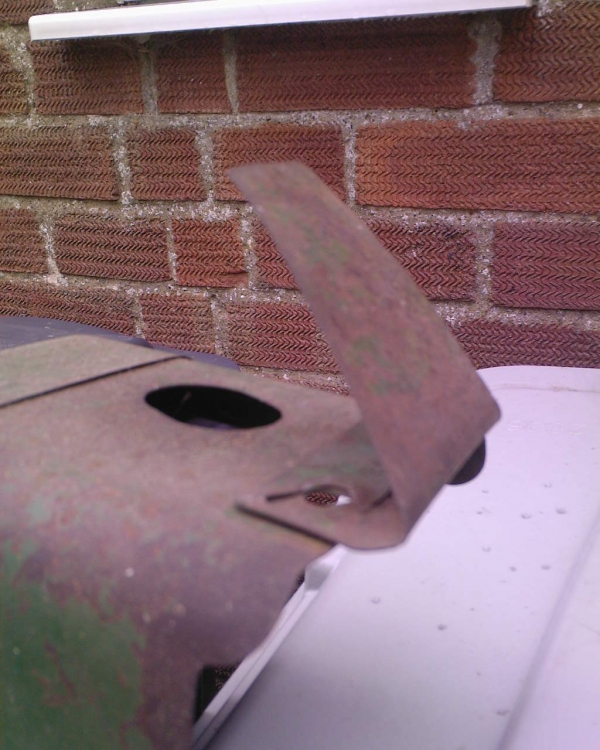
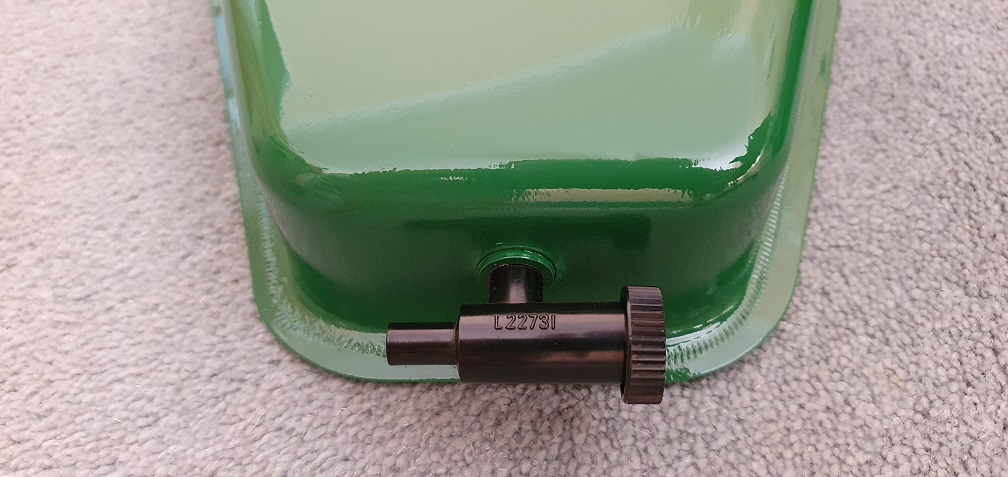
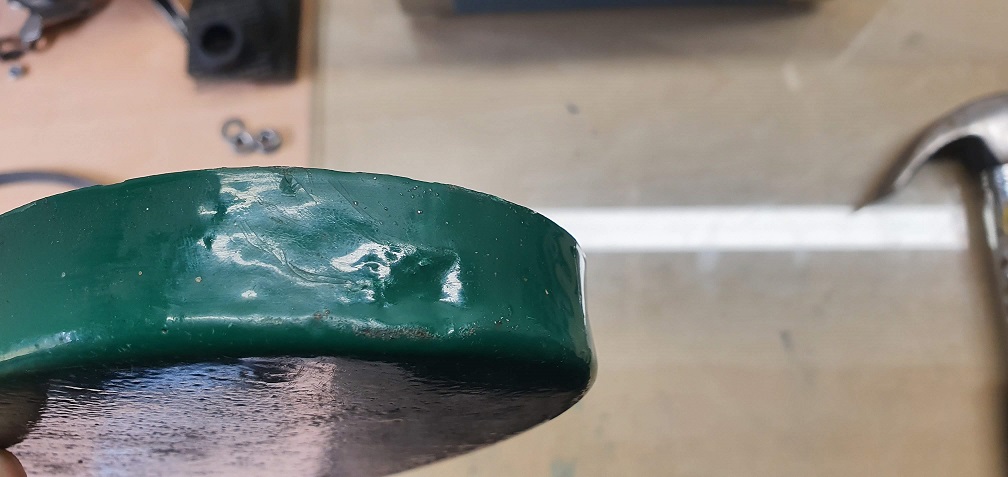
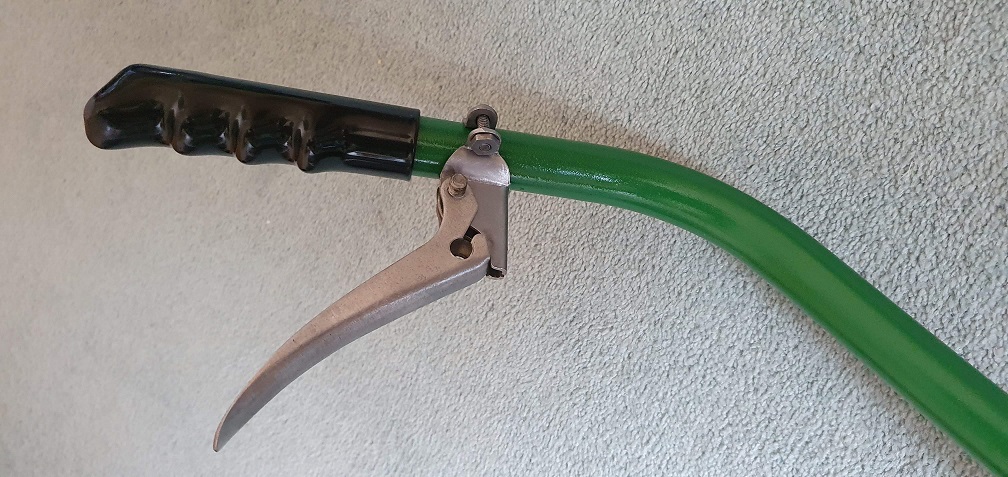
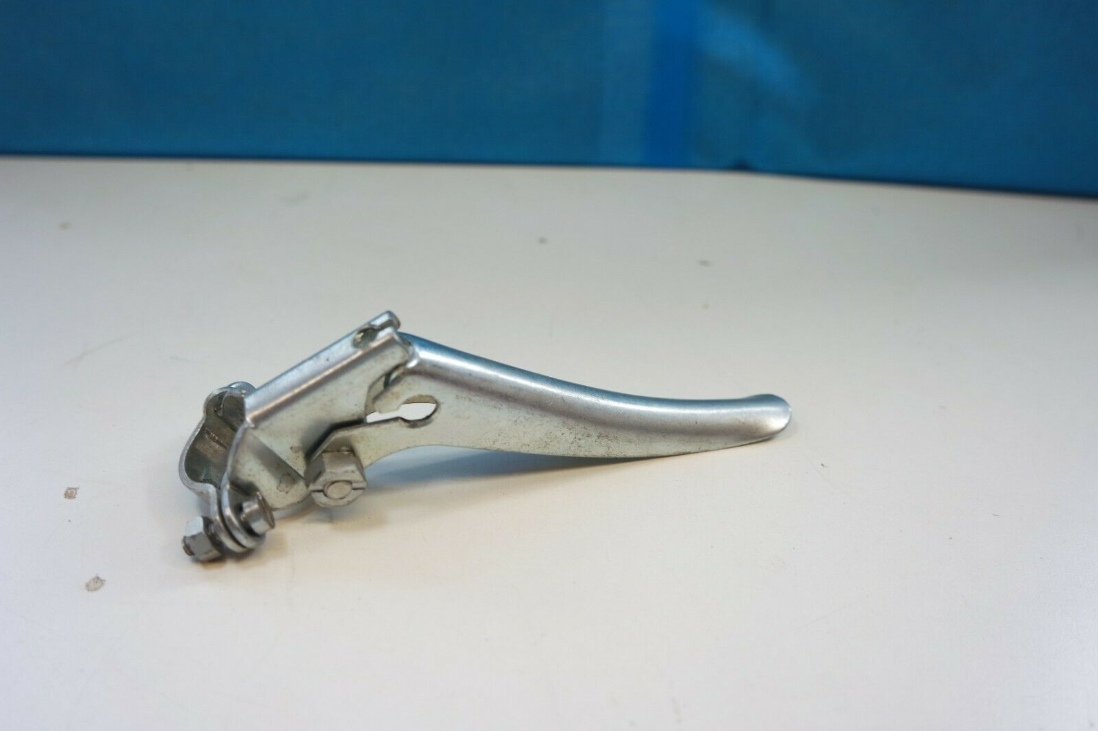
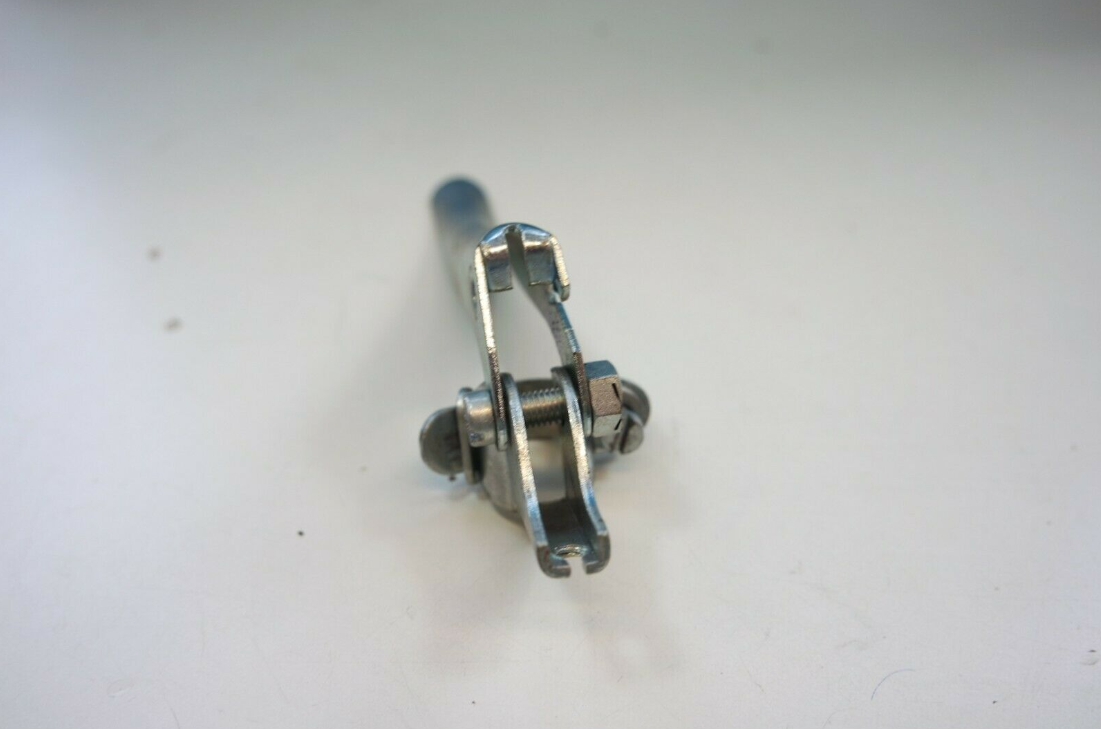
Here's the, heritage Samsung D900 phone, photos of the stop contact....mine had been bent down.! no doubt some time in storage, with plug out..?..So had to quickly set it back right to how I remember them. They often got bent up to ease access to the plug.!! Either way, this has slightly compromised the otherwise nice curved roll of the at the base of the angle...
C.
Great, thanks for the picture
Great, thanks for the picture Clive! It does seem to have a very slight 'arc' to it rather than being straight so I'll see if I can get my one similar somehow before painting...
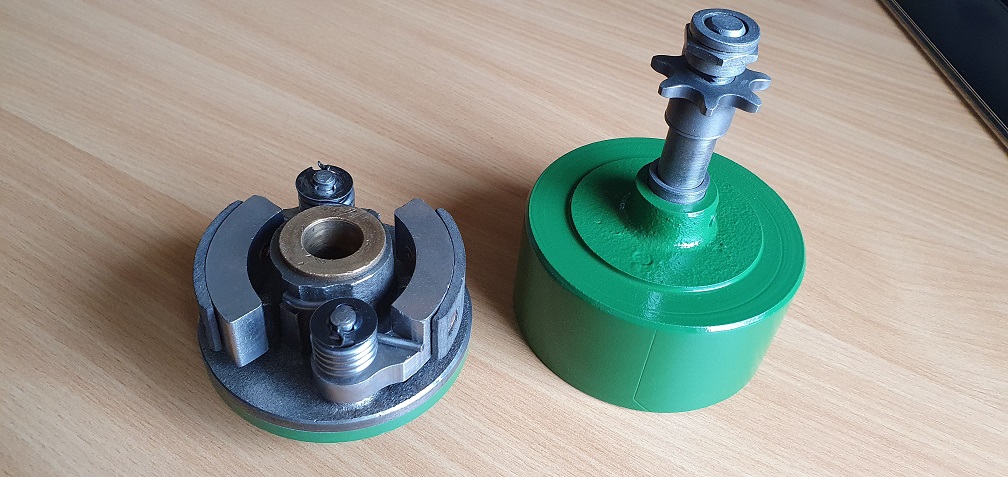
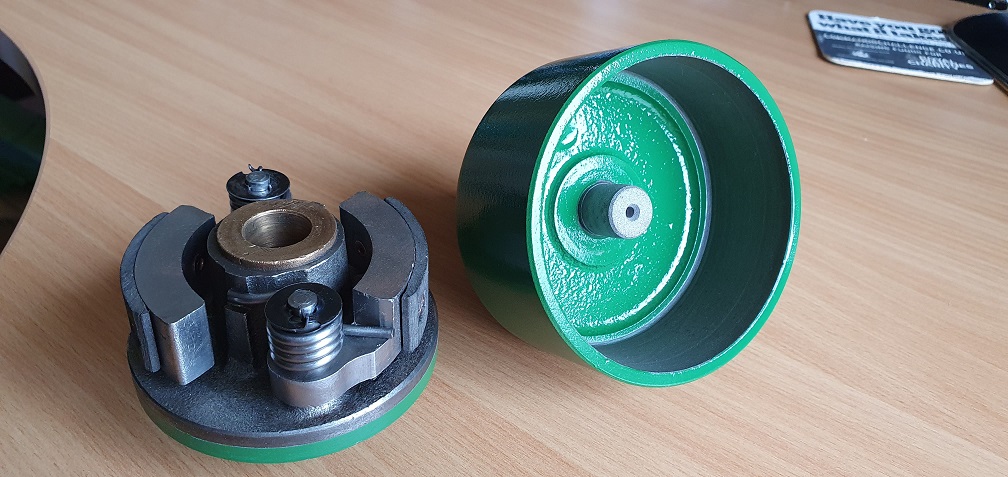
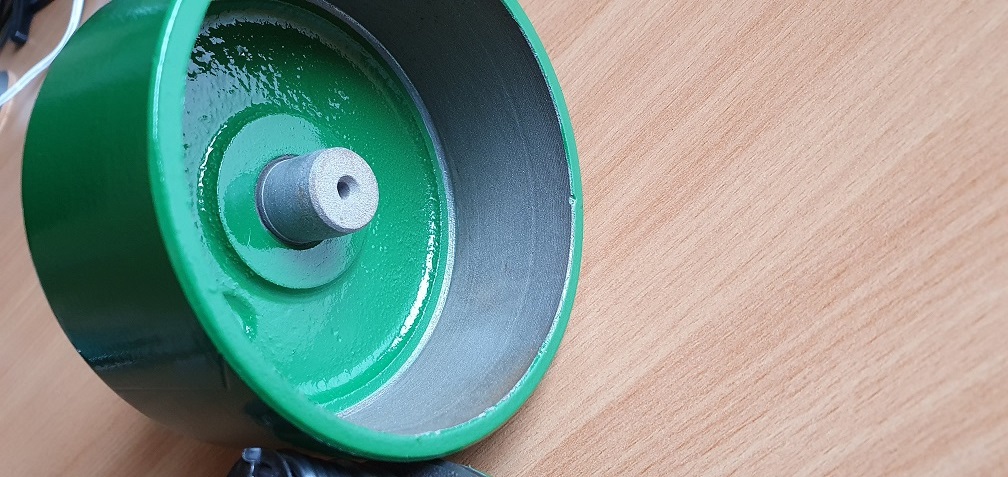
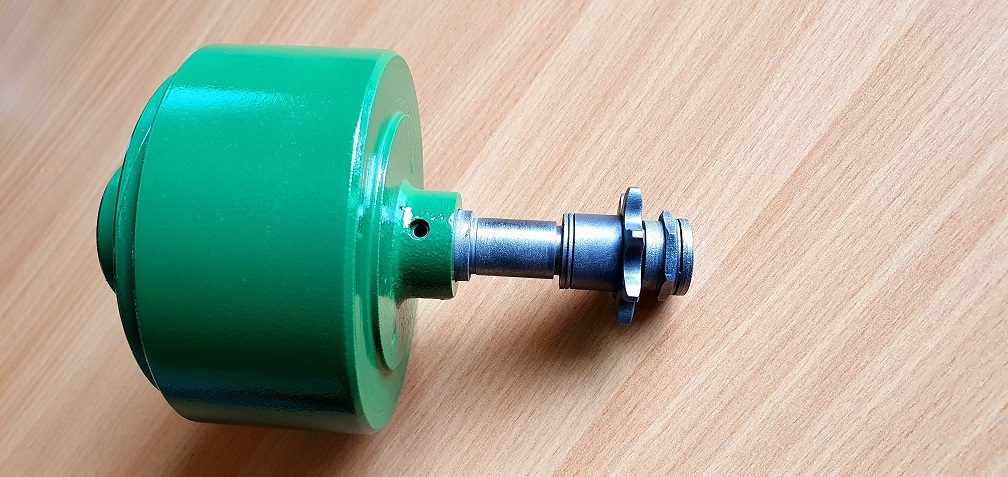
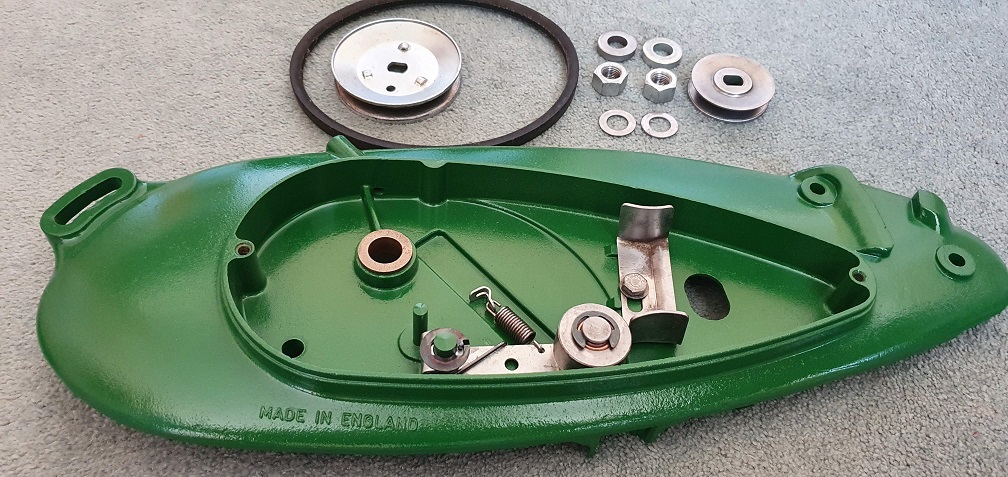
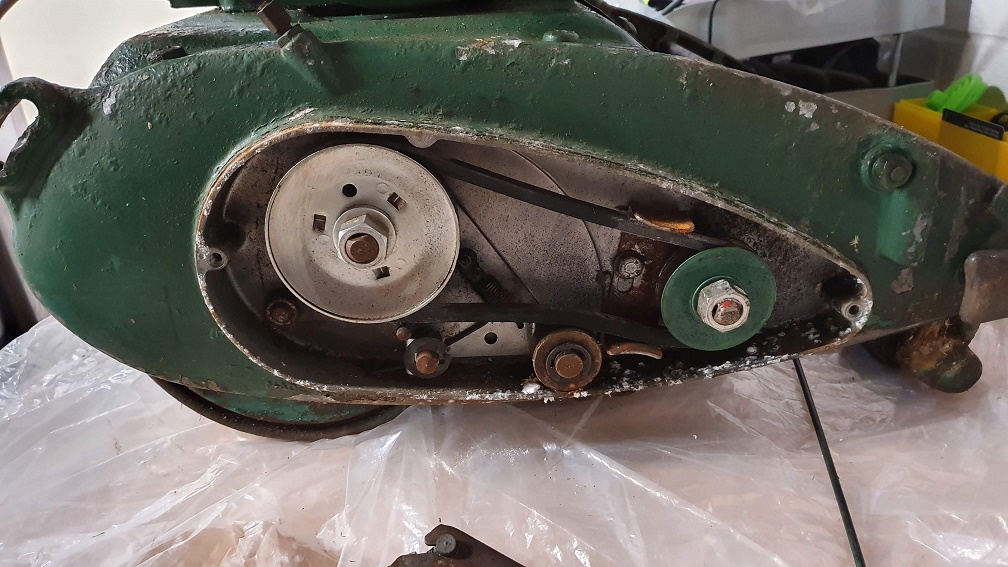
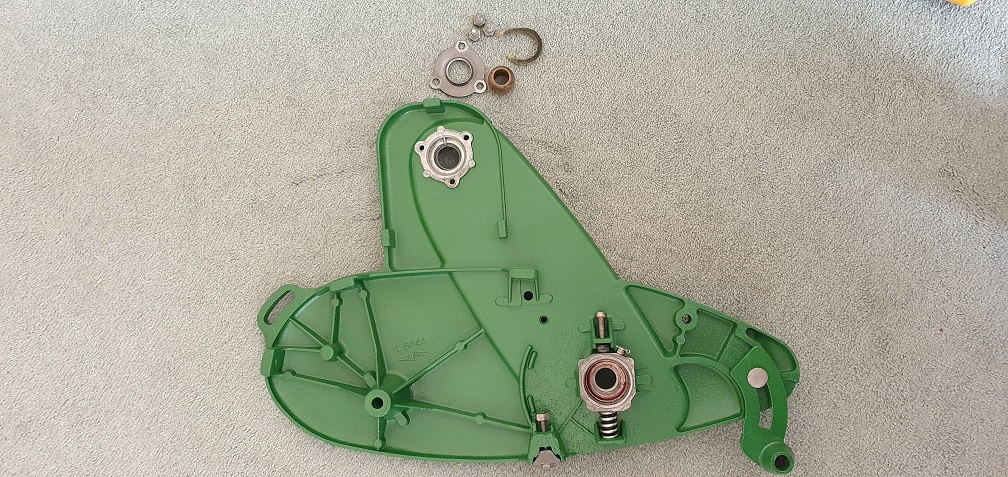
Clutch drum is finished now so that's the complete clutch assembly ready

Looks really good! Really
Looks really good! Really good reuse of "carrier straps?" (snelbinders in Dutch)! I was puzzled how you where able to miss the nice white wall with the green... :)
Thanks Henno! Ah the
Thanks Henno! Ah the snelbinders, commonly referred to here as bungee cords, have been sat in my garage for a while not being used, and with the small holes in most panels, they seemed a good way of suspending the parts to spray them and leave them drying.
I actually sprayed the parts outdoors in a temporary cardboard spraying booth and then took them into the garage to hang up and dry, which is why the white wall is still white :)
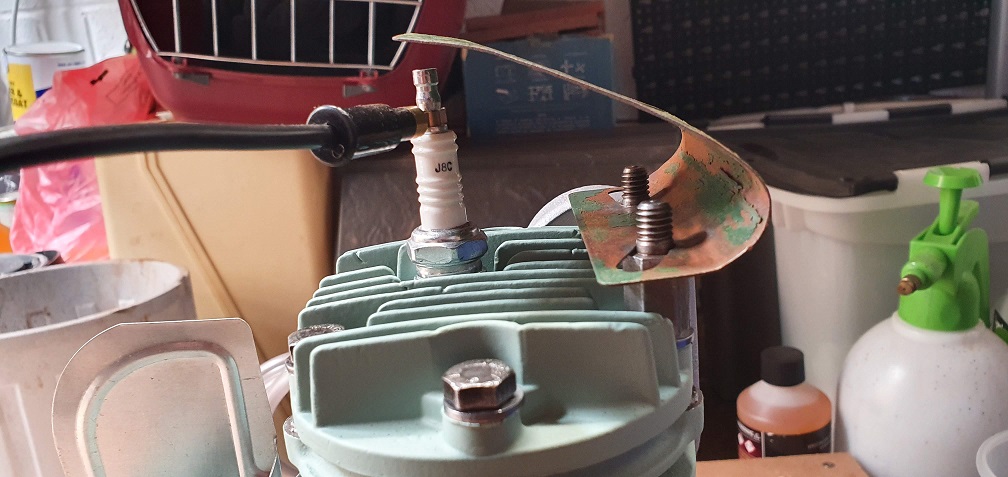
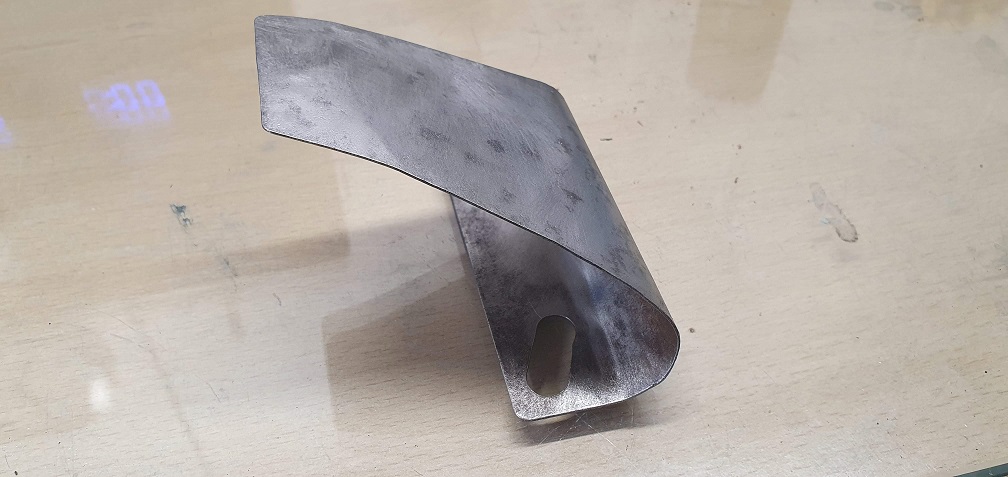
After a couple of attempts at
After a couple of attempts at getting the curve right, I managed to get the stop plate shaped in such a way that the top sits above the spark plug ready to touch and ground it
Then in the electrolysis bath to remove the rust and a good clean up
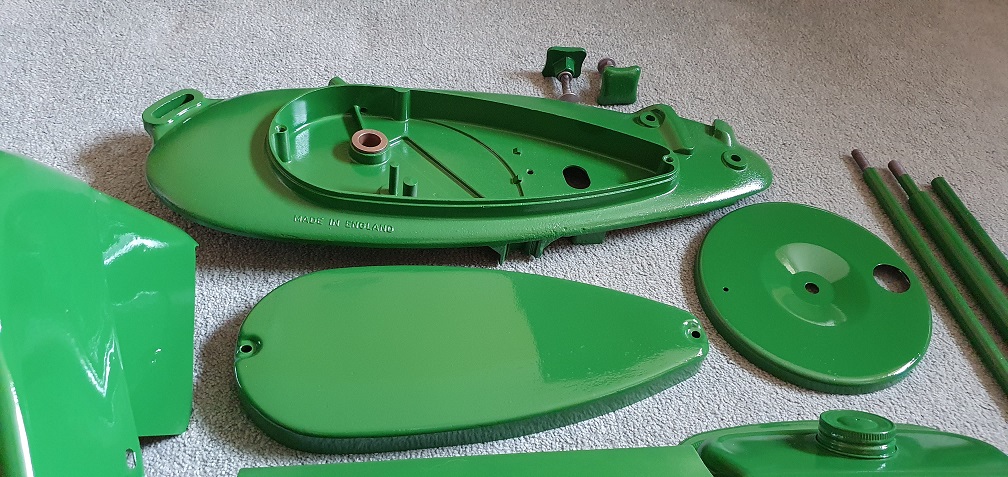
Some finished painted parts after flattening where possible. The sandblasting media must have been quite aggressive as it did leave a very rough finish on the parts, so some parts don't have a particularly smooth finish even after priming/sanding/painting - but overall I'm happy with the finish

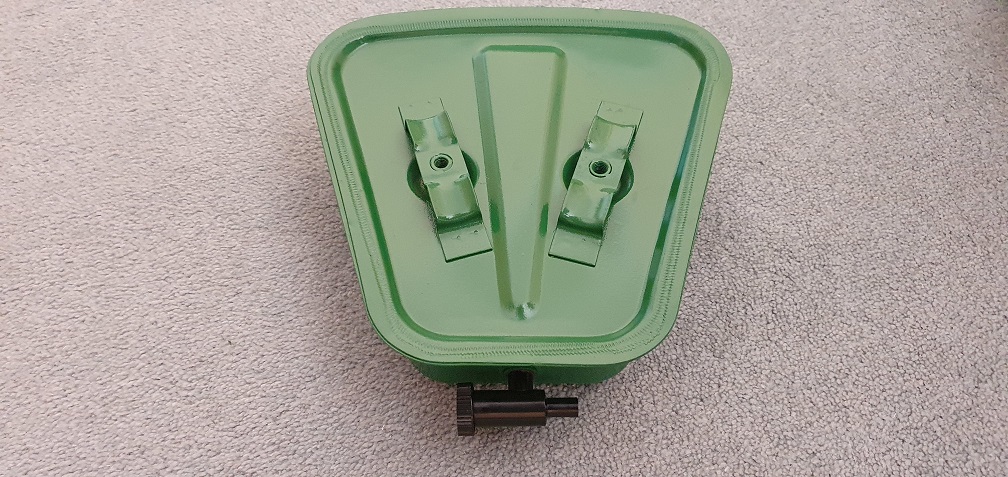
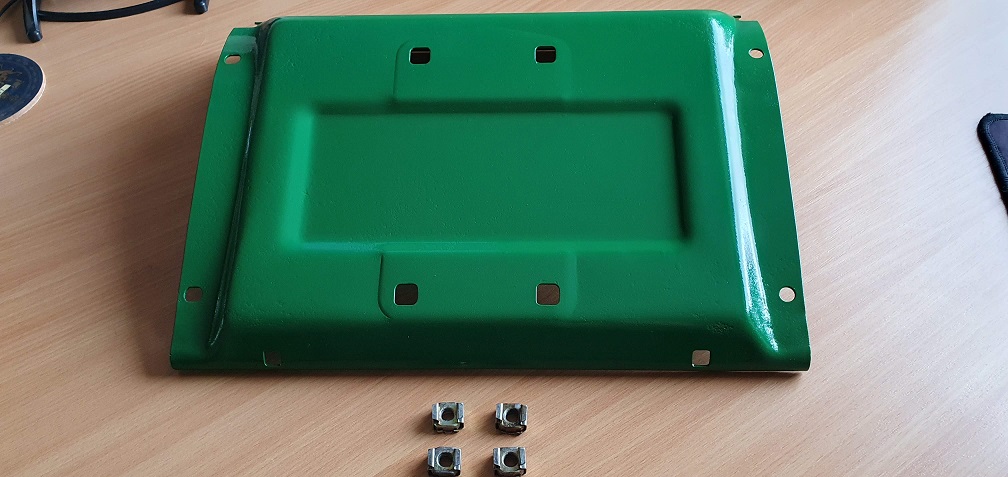
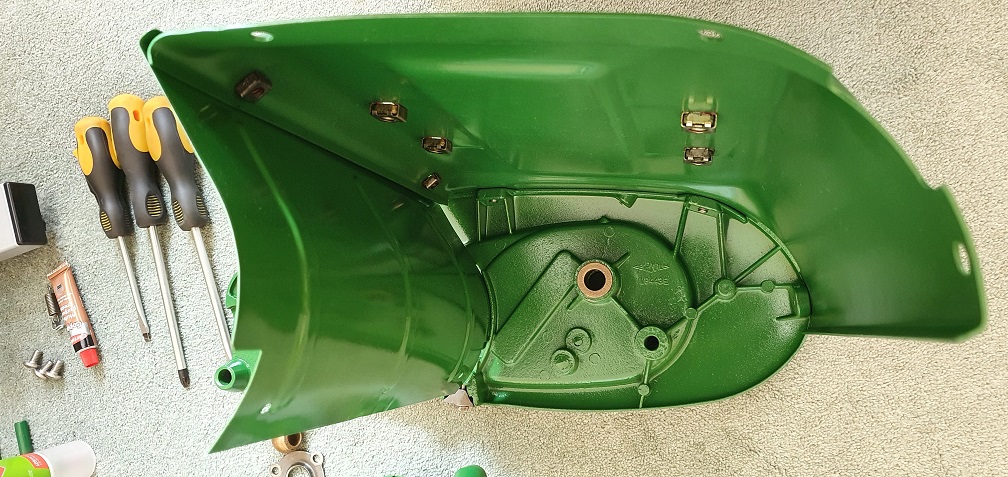
The replacement chain case
The replacement chain case cover arrived and it's certainly much better condition than my original. Only a few grazes and little dents on the ends - which I can hopefully make look at least a little bit better before painting. Certainly enjoy the mechanical side of things much better than the bodywork side that's for sure!
I can appreciate the work that goes into the art of panel beating! Trial fit before setting to work - a bit tight due to dents but goes on!
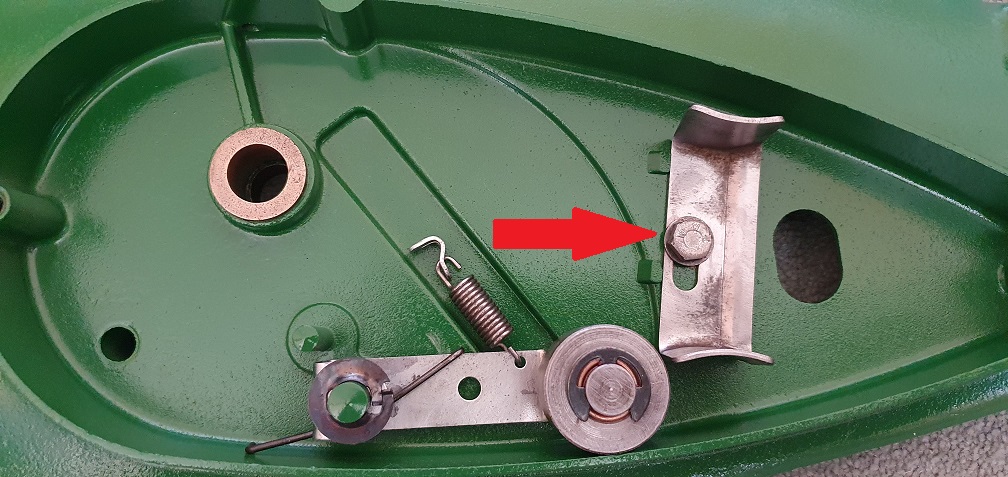
Starting to try and fit a few
Starting to try and fit a few little bits here and there. Can anyone tell me what the vertical adjustment is for on the belt guide here - should it provide some tension on the top of the belt even without the clutch engaged?
My original picture before strip down could well have it set in the wrong place

With the drive engaged it
With the drive engaged it should be just clear of the top and bottom belt runs . Disengaged it should touch either run to encourage the belt to spring away from the pulleys to allow the mower to be pushed and pulls freely. The spacer washers on the split front pulley can be assembled between the halves as required to assist this.
Ah perfect, thanks very much
Ah perfect, thanks very much Angus! I didn't have any reference to that in the PDF manuals I have here.
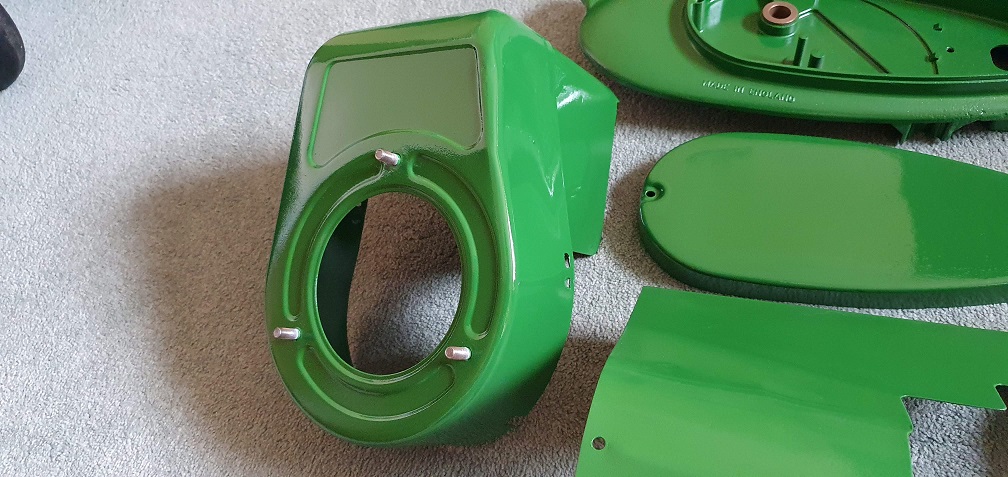
Trial fitting of the recoil
Trial fitting of the recoil starter assembly onto the engine cowling - the driving pin only comes about half way down the lugs on the ratchet mechanism as per the below photo - is this correct? There is currently one spacer fitted behind the driving pin assembly / against the flywheel face which is how the mower came to me and is correct according to the parts diagram
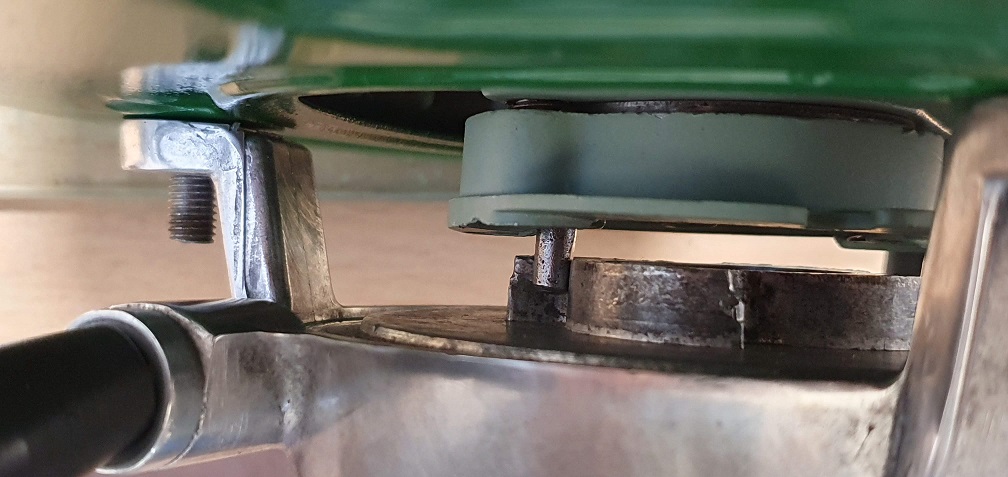
That’s probably adequate for
That’s probably adequate for what it has to do, but you may find a bit more engagement by slackening all the cowling fixing screws and the two head bolt fixings and then pushing the cowling towards the engine.
I had that on a few later
I had that on a few later ones, the blower cowl mounting points were just a tad too far out and I was chasing my tail on the recoil itself, some of the cowl mounts had the bottom locating holes slotted all the way some were just fixed holes but enough "slack" as stated above to adjust and get better engagement.
Thanks both, I'm pretty sure
Thanks both, I'm pretty sure the cowl is fully on back as far as it will go, but I'll loosen and just re-check to see if it's possible to get a fraction more. Should I grease up around the circumference of where the driving pin engages a little?
Also, had a 'bad' nozzle on one of the cans of aerosol paint, as on the top coat of one of the panels it decided to spit everywhere. Absolute pain - if I ever restore another mower I'll be getting someone to do the painting instead. Thought it might work out a bit cheaper doing it myself, but I ended up using more paint than I thought I would, to get decent enough coverage, plus all the inevitable overspray, sanding, flattening, to get a finish I am happy with...
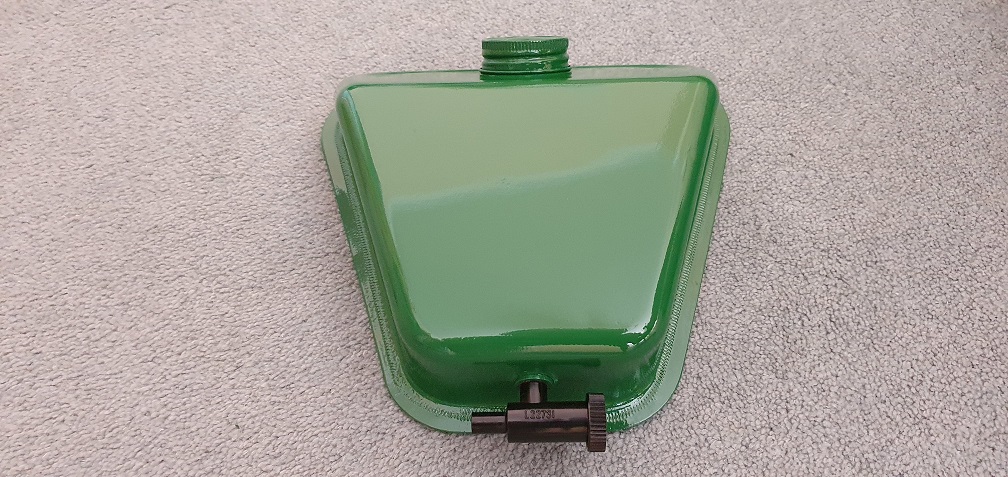
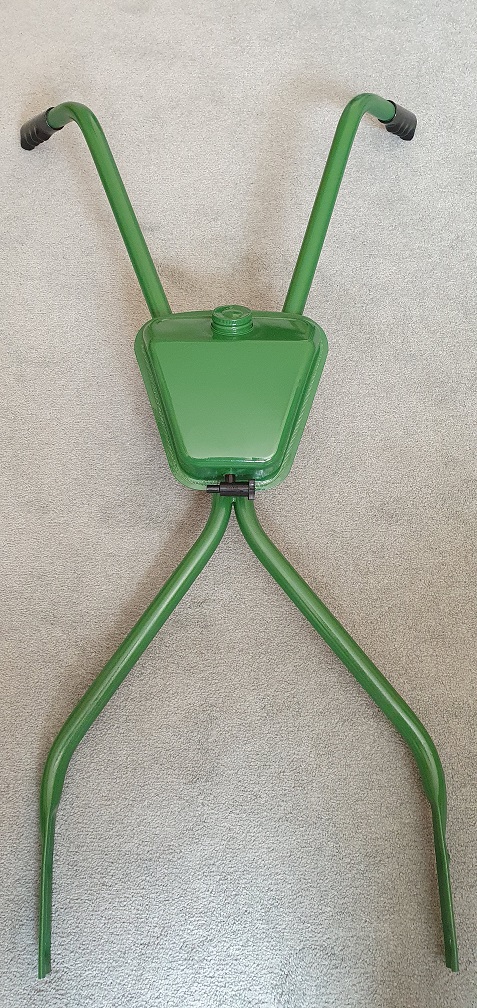
Getting there though, the handle grips are on, and the fuel tank mounted to the handles
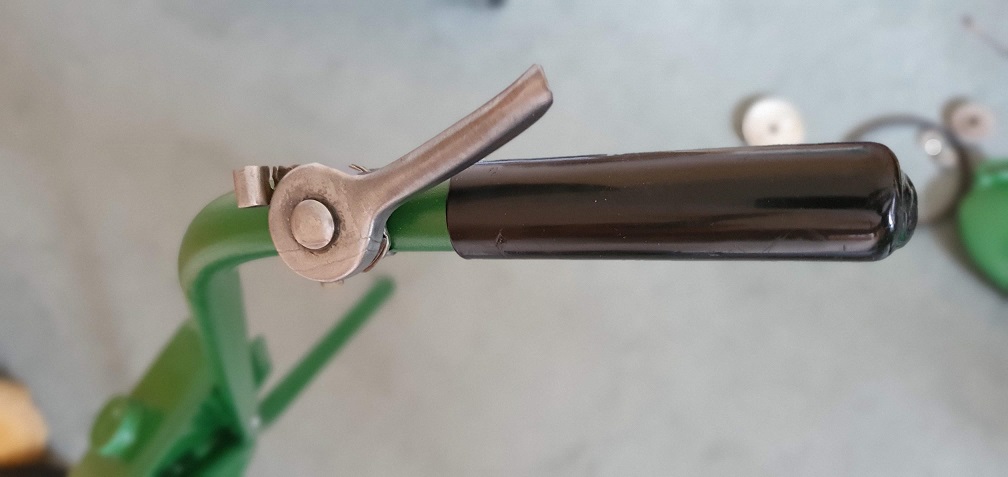
Should there be a nut on the back of the lower clutch lever screw? Also, the positioning of the throttle lever I assume is personal preference/based on the throttle cable length? Should it be out the way of the handle grip so that it can be pointing backwards and not interfere with the hand gripping the handle?
If you turn it 90 degrees
If you turn the throttle lever about 90 degrees clockwise it will be a fairly natural thumb movement , both open and close.
Scott, paint looks good. I
Scott, paint looks good. I doubt the clutch /ever would have had those split nut things that I can't remember the name of (in case of orginality), A nyloc nipped up to keep things together and not drag would be the go
split nut things Aero nuts ?
split nut things
Aeroloc nuts ?
Thanks, the 'screw exit' half
Thanks, the 'screw exit' half of the clutch lever has a couple of threads built in, so the screw actually pokes through and threads into that side. I can't tighten it up too much otherwise it impedes the movement of the lever itself, so has to remain slightly slack. I imagine the vibrations when in use would soon loosen it further so some sort of locknut must be used. I'll measure the thread and see about getting hold of a nyloc or Aeroloc nut which fits. Actually, managed to just find a picture of a new old stock clutch lever (part L09973 in the Atco manual), which shows a nut with a slot across the top and 2 slits going town into opposing sides? Is this an Aeroloc nut?
Aeroloc nuts ?
Aeroloc nuts ?
That was really bugging me, yes a type of aero nut, but the ones with the splits in the side = Binx Nut!.
Couldn't take it anymore, cheated and asked elsewhere,
Every day's a school day :)
Every day's a school day :) Binx nut - another new one on me, thanks Chris. I've measured the thread and it's 1/4" so I'll have a look online for the smallest pack available! Shame the recoil starter housing doesn't attach with the same, as I've got some new 1/4" nuts to attach that with.
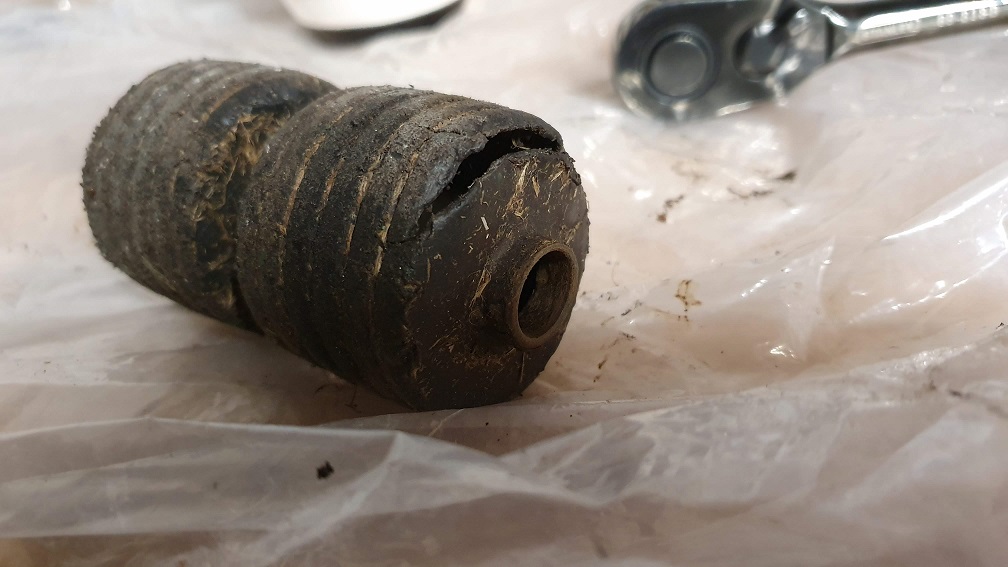
I am trying to find a replacement spherical bush (Oilite?) for the clutch drum shaft, but places are out of stock. I'll try Jon Cruse to see if he can help.
The felt packing strip that goes around this bush - should that be soaked in oil before being fitted to help keep the bush oiled, and should the bush itself be soaked in oil overnight before fitting?

That was really bugging me,
That was really bugging me, yes a type of aero nut, but the ones with the splits in the side = Binx Nut!.
I should have known that as they hold the bottom blade screws on Allen National triples and a year or two back I had to slice a bit of 24 of the B**** because the required thin nuts were not available .
Now, PK screws ?
Lever mod. On customer / sales machines that don't justify a new lever I put a pack of washers inside the moving lever to keep it pressed out into the fixe part. It recifies "floppy lever syndrome" and on latching levers maintains alignment of the latch.

because the required thin
because the required thin nuts were not available
This is actually an important point, if the replacement Binx nut is too thick and there is not enough screw to bottom down into the nut, the "Binx" bit won't work and lock onto the of the screw, worth checking the dims if you are ordering replacements, I would just stick a nyloc on :-)
I put a pack of washers inside the moving lever to keep it pressed out into the fixe part.
Never thought of that, think I will knock up a few spacers.
Had to look up PK screws as
Had to look up PK screws as well :) That's good use of washers for the sloppy lever syndrome. I don't have any 1/4" Nyloc nuts either so will get hold of some. Really think it's time to invest in an assortment of imperial nuts for future use!
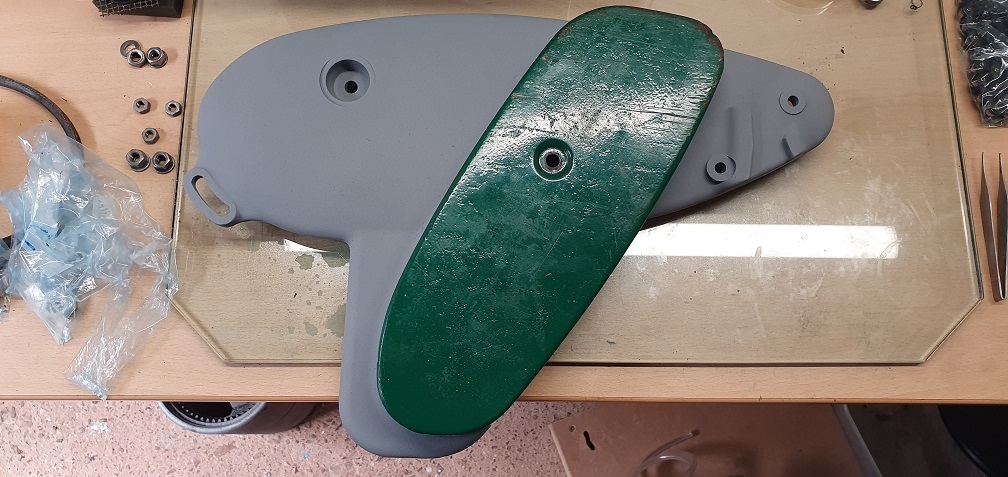
What other updates are there in the meantime....ah yes, Ignition grounding plate painted and fitted in place
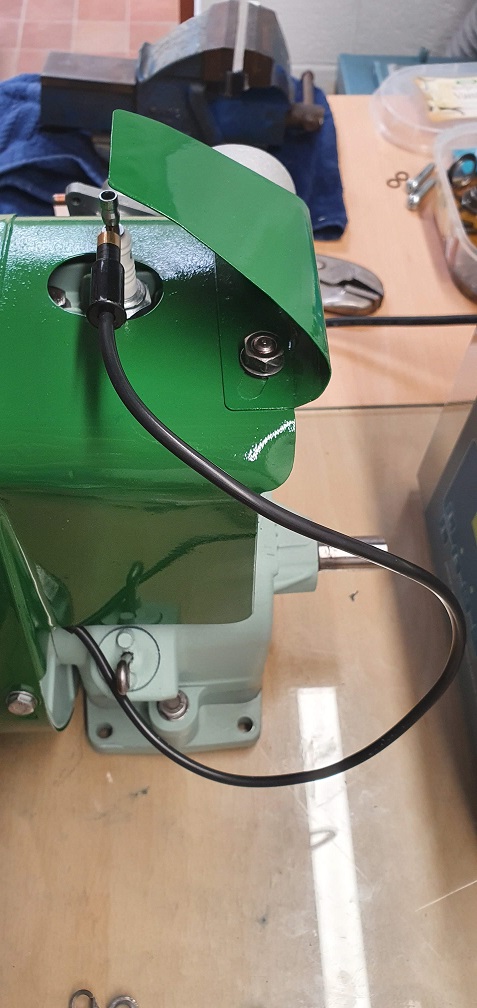
Now I can trim the new HT lead to the correct length
Never thought of that, think
Never thought of that, think I will knock up a few spacers.
BZP of course ? However the washers are adjustable for width .
Answers on a postcard for
Answers on a postcard for this one....the 2 round holes near each bottom corner of the (new) grass deflector plate are for?

No idea, possibly to position
No idea, possibly to position it during the manufacturing process .
Answers on a postcard for
Answers on a postcard for this one....the 2 round holes near each bottom corner of the (new) grass deflector plate are for?
Rust induction accelerators , a Suffolk patent I believe :-)
Both very plausible
Both very plausible suggestions. Perhaps for feeding air generated from the spinning blades back towards the roller to keep it cool when you unleash the horsepower - similar to brake ducts on performance cars?
While comparing the parts
While comparing the parts diagrams/manuals for the Atco Standard 12" and the Suffolk Super Colt 12" I see that the Atco uses plastic front rollers, where as the Suffolk uses wooden rollers.
Oddly the Atco diagram shows 8 plastic rollers where as all of the pictures I've found online, as well as my own mower, have 6, or rather 3 sets of double rollers. Also, I've seen a lot of Suffolk Super Colt's with plastic rollers rather than wooden.
As my rollers have seen better days...
I'm not sure whether to replace with plastic or change to wooden rollers - would welcome thoughts on this? I prefer the look of a nice set of wooden rollers to be honest, however the plastic ones may be more 'original' for this mower, hmm...
Some artistic licence in the
Some artistic licence in the Super Colt drawing from the Qualcast/Suffolk parts manual.?...it shows 4 double rollers in the drawing but lists 3 in the number reqd by the part no.
My machine...that still sits very idle.. has a set of wooden rollers, but they are on the large size so concluded they were an in service home bru by the original owner...so have gone with a set of plastic rollers, pattern parts....they sit at the bottom of the stairs here, with the other parts...awaiting a burst of enthusiasm....which may yet happen given the weather today....
I was shelling broad beans for the freezer form the back garden earlier today...gardening still to the fore here but its not very summery today :)
C.
however the plastic ones may
however the plastic ones may be more 'original' for this mower, hmm...
Probably just to do with the date of manufacture, and how long in store at Stowmarket, then how long at the dealers and eventual sale to the first owner.
Ah I see, I think in that
Ah I see, I think in that case I'll just stick with the original plastic and get some new ones ordered. Clive - sounds like you are getting closer to starting work on yours - perhaps when I get mine finished it will give you the inspiration you need :)
Just trying to cover off the
Just trying to cover off the last few outstanding bits now. Which brings me onto Decals. With it being and Atco Standard, would it originally have still had the Suffolk Super Colt decals on the clutch cover and chain case cover? Would there have been an ATCO decal somewhere either on the Petrol tank, the engine cowling or the clutch cover?
It has been so long since I
It has been so long since I saw one, but I am sure there were no Suffolk decals, mainly because they were trying to 'con' people into thinking it was a totally different machine.
As to 'Atco' decals, I don't remember one on the tank, though there could have been one on the engine shroud above the starter. I am also fairly sure there was the Atco royal warrant on the front of the clutch cover, however, I could be totally wrong about all of this, as I said it has been a long time since I saw one ;-)
There would be no ref to
There would be no ref to Suffolk Super Colt as it was sold fair and square as an Atco...not even the usual foil type Suffolk engine info on the cowling front as Atco by then tended not to identify makes of engine. The only remnant of transfers I can see on my machine is the royal warrant crest in very faded condition on the front of the engine clutch cover. There is no Atco 4 stroke on the engine cowling and I can't see any evidence of there being one...however there may well have been a small clear stick on cellophane type one, at new, rather than a transfer of old.
Photo attached...the red part in the photo is just resting there...a weld repair to a Little Wonder lawn edger blade guard.....
C.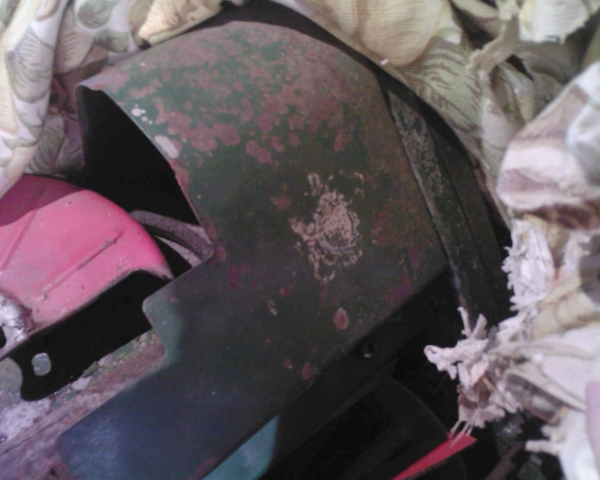
Great, thanks very much
Great, thanks very much Hortimech and Clive, that's a big help. It looks like a single decal on the Clutch cover is all that is required in that case - due to the age of the mower and based on the remains on Clive's cover, this looks like the correct Royal crest?
https://www.oldlawnmowerclub.co.uk/restore/transfers/atco-elizabeth-ii-crest-100-x-110mm
Yes, that looks correct and
Yes, that looks correct and isn't it nice to get proof that you are not going gaga, I did remember correctly :-D
Good memory there! Well done,
Good memory there! Well done, certainly puts my memory to shame :)
Just waiting to hear back about that decal as to availability. The cylinder and bottom blade should be back from sharpening soon too, then the parts can really start coming together - a la James May. It had better start after all of this :)
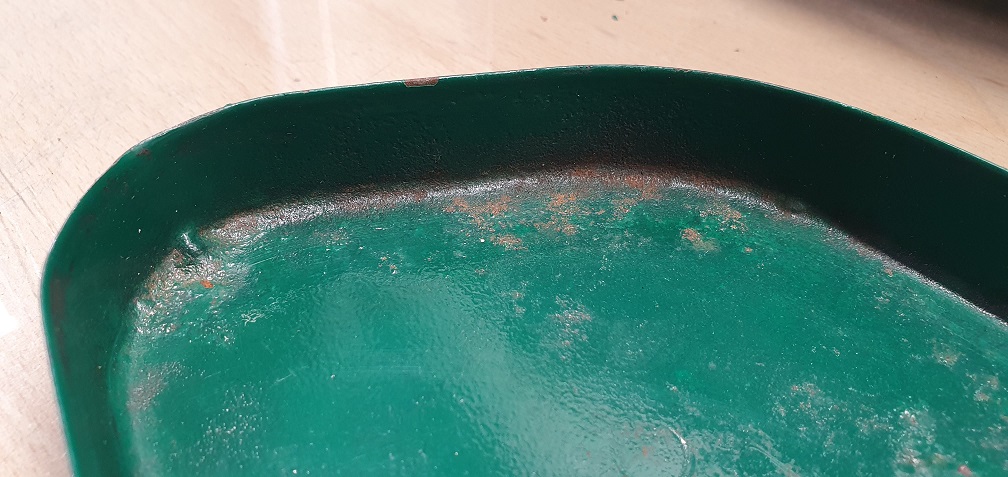
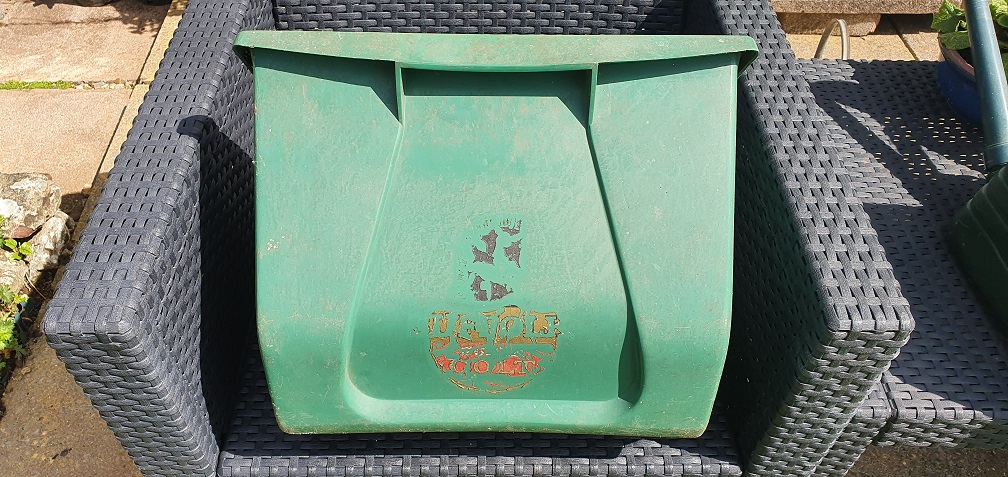
Don't want to curse things, but I believe the last thing I need to sort out/address is the grass box. Back near the start of this thread, if my memory serves, I believe the plastic grass box that I have, would have come with this mower, and I didn't necessarily need to look for a metal equivalent. After all it's in good sound condition with fairly light surface scratches. There are remnants of a 'Suffolk Super Colt' decal on the face of the plastic grass box, so it's definitely for the right 'machine'. Only issue is that now it stands out as a very different green to the rest of the mower, and given the mower is now the colour that was found under the handle grips, the box must have been either whatever was around at the time of selling the machine, or, more likely, a replacement at some point during previous ownership.
What to do. Stick with the plastic and spray it to match the mower? Look for a good condition 12" metal box and spray that?

Really not too sure about
Really not too sure about painting semi flexible plastic, even with the right sort of paint, I would be worried about flaking not just due to flex but changes in temperature contracting and expanding the plastic.
Option 3? give it a good clean, get the decal on it then give it multiple generous going overs with a plastic nourish fluid like Armoral, it won't probably won't restore it to the original colour but should improve it a lot. I have used hot air guns on things and had varying results, some good, some disastrous, if it goes well you get back a shiny finish, if it goes badly (too much heat) it deforms never to come back, and I would think a grass box is too much area to do consistently with heat.
If you're not happy with the plastic nourish finish, you could always keep your eye out for a metal box.
Great minds - already been
Great minds - already been out cleaning and polishing up a small section with some t-cut just to see how it brings it up :). I've also got some Autoglym bumper care which I think will help if used sparingly. I think I could certainly get it looking at lot better, as I have a DA polisher which will help speed up the process, however it's a completely different colour green :( I'll post a comparison pic just to show the difference. I think the most recent lick of paint the mower had, prior to my ownership, was matched to the grass box! At least the mower has a functional in tact box for now, and I can keep an eye out for a metal equivalent that can potentially be restored/sprayed a matching colour.
Clive will possibly know for
Clive will possibly know for sure but I don’t think that the Atco version of the Suffolk came with a plastic box . May be worth keeping your eye open for a steel or alloy box and repainting it to match the mower. That said alloy can be tricky for paint adhesion even with a etch primer.
Reverting to your plastic box , not my thing but body shops use a special flexible plastic primer for bumper repairs . May be worth investigating.
I was pondering on this and I
I was pondering on this and I imagined if sometime between maybe 1979 and 1985-ish someone arrives at the counter and says...can you sort my mower...I've got it with me in the back of the 'truck'...and can you get new "buckets" for them....backed over the ***** thing in the garage....
We always kept in stock one of the Suffolk Super Colt/Punch30DL plastic grass boxes... As a spares item it would by then come as a plain box only, no transfers, with the handed brackets as separate parts to suit. There were brackets for Super Colt and a different set to suit it being used on the older Colt, as a modern spares replacement, (and in later years some to suit EP and Panther). So it would be likely that at that moment given the option of...we can see if we can source an original metal box ?..or we've got this one in stock, that fits your mower chassis type, which you can take now.?..I'll fit the brackets for you......
The plastic box in the spares dept would have been the colour to suit the Super Colt and by 79/80, the Punch 30DL, with different transfers applicable, but not stocked. Later the box was a darker green for Punch 30S. I reckon that Atco would have used the steel box at new.
So maybe remove all trace of Super Colt transfer, as your box will have been a swap from another machine and try to buff out the plastic, because with the story above it could be a Trigger's broom "original" whilst keep an eye out for a steel one.... :)
C.
All the Atco 'Suffolk super
All the Atco 'Suffolk super colts' I saw, came with a metal grassbox, so if you want it to be authentic (and seeing as how you have progressed so far, you probably do), you need to find a metal Suffolk super colt grassbox and paint it to match.
I am looking forward to seeing the completed mower, sat in its glass display case, well, it is going to be too good to use :-D
I am looking forward to
I am looking forward to seeing the completed mower, sat in its glass display case, well, it is going to be too good to use :-D
That reminds of some bits and pieces including a new blue Q. Concorde grassbox in its cardboard wrapper that we exchanged from my then work, swopped for a load of Concorde drive belts with Brian Gray the rep' from Serpar, I assume he was based at the Eckington branch.? This was for some machines that were going to be re-worked for the Derby museums...but shortly after there was the pull out of Derby :( and it would not have been a good time for anything to pop up on display....I wonder if any machines did make it to this collection ??
C.
What a vivid picture you have
What a vivid picture you have painted there Clive, very insightful and useful information indeed, thank you!!
It would be a shame for the mower not to get used after all this. Saying that, I have recently acquired a new little mower project, which is giving me some extra incentive to get this one finished, and which may be better suited to being a working restoration, or more of a overhaul/preservation rather.....
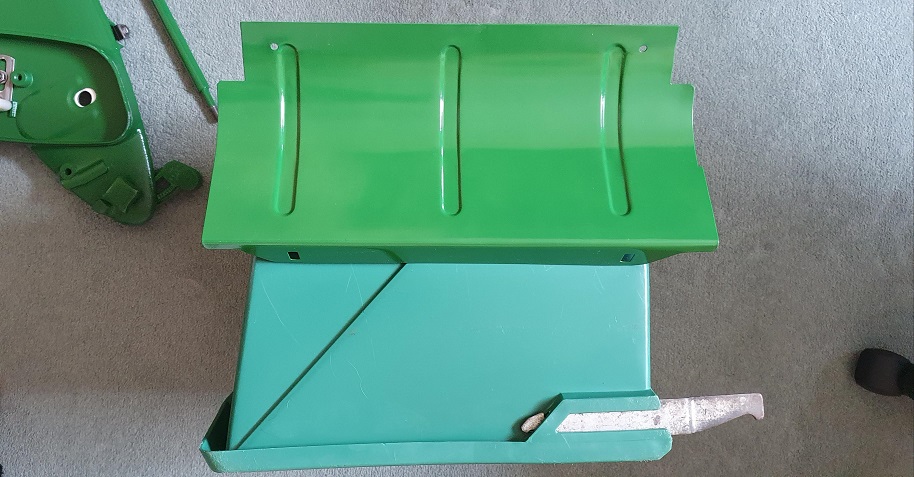
Just to show the difference
Just to show the difference in colour between the box and the mower
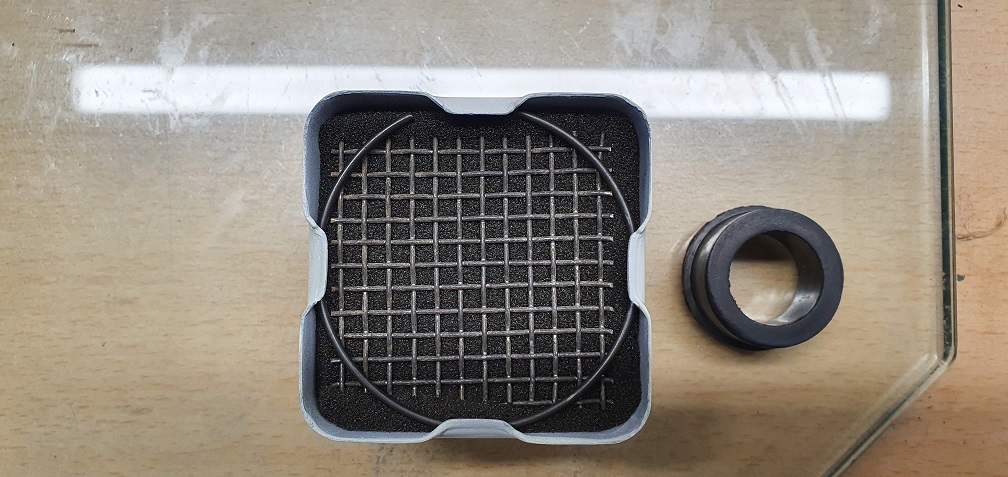
Air filter sorted with new plastic insert to do away with the bodged screw from before
The grassbox plastic has come
The grassbox plastic has come up well :)....I could put it back in the parts dept ;) as an x grade.
Maybe just maybe you need to acquire and restore a Suffolk Super Colt next to fit it on. ;) If you find a steel box, It's dangerous having a few stock parts in hand from one project...it can breed into a second one :)
Pleased you got hold of a filter bush, I found I had stock for my machine....left over from a Central order of old...the new filter foam I had from the same time though had perished, so I bought new.
C.
Thanks Clive, yes I'm happy
Thanks Clive, yes I'm happy with how the box has cleaned up, I'll get a couple more pictures up shortly. I'm sure it would make one of your Suffolk Super Colt customers very happy :)
On the hunt for a steel box but could be a bit of a waiting game! I know what you mean about keeping spare parts - I certainly have a few bits as spares - although a fair few parts were broken/damaged beyond use and had to be thrown after overhauling this poor mower. Good job I haven't spotted another Super Colt nearby or I may well have been tempted to do another with my new found knowledge of these particular mowers :) I did however spot something a bit different nearby which I couldn't refuse, which will be a whole new learning experience, and which is now taking up the remaining spare space in the garage :) I may have accidentally picked up a brace of Ransomes Marquis (Marquises, Marquisi?) in need of some attention, which will be a new thread on here when I can manage to finish this project and make some space to work on them!!
Looking good :)
Looking good :)
Postman brought me two parcels this morning, pattern parts, for my same machine.... So I must be a fraction closer venturing in to the workshop/garage ;) One more suppliers parcel is outstanding...
Out of curiosity, what was the source of your engine platform screws. ?
...and whilst I remember...going back to the start of the thread, my machine has the very same Atco style ignition stop contact..but mine had survived at its correct angle to be ready to pressed/held to stop..
C.