Brand-new member, be gentle!
I thought I'd better make a post to introduce myself (and because the website told me to, or else!)
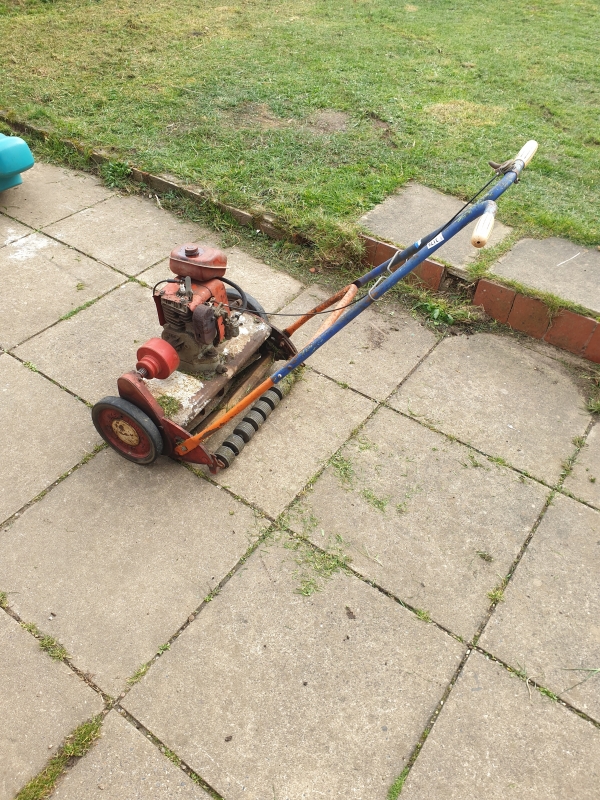
My name is Leon (floydism) and i'm a mower addict. like many, my affliction began late at night browsing everybodies favorite auction site. this led to the purchase of an 1950s 20" Atco with a villiers MK12, bundled with another mower that had been reduced to kit-form by the seller in an attempt to "understand how it worked better" Neither were runners (the seller cheerfully informed me that he doubted either would run again!) but how could i resist for less than £20. after a little tinkering (the usual points and carb cleanup) and a firm kick I had a running mower! The addiction began! I even managed to justify my purchase by mowing the lawn with it! My word it's a handfull on our rather undersized lawn!
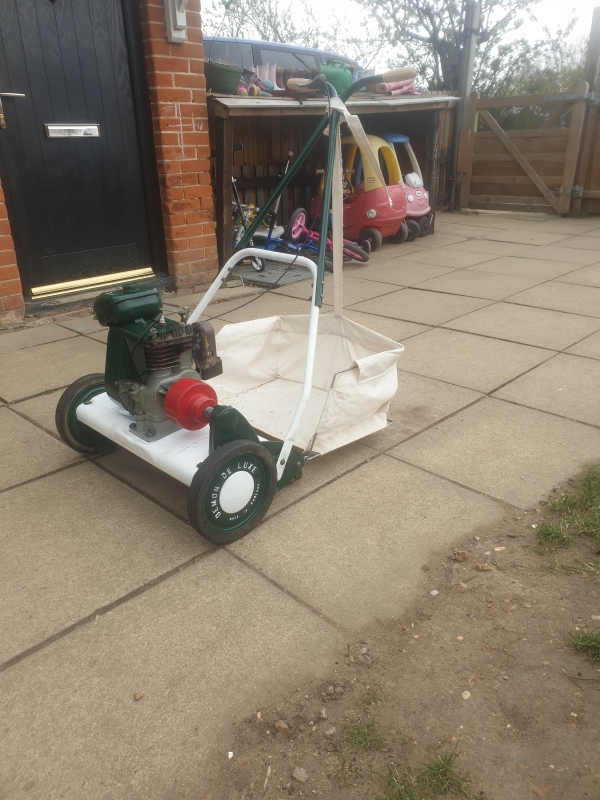
Seeking a more practical mower for our particular patch of turf, I scooped a Suffolk Demon de-luxe at our local auction rooms. After the usual fettling we had another runner although the running gear seemed unreasonably noisy and the clutch neither engaged or die-engaged fully making things decided physical despite being such a slight mower. a proper strip-down and inspection was required! much scrubbing of built-up mung ensued, new clutch bushes were made, bearing balls replaced (only 4 left in one of them! and a decidedly wonky drive-sprocket re-made after the mauling it received at the hands of another repairer (who must have realised it's sinister-threaded nature only after beating it into submission). The high idle and reluctance to pick-up was cured by replacing the worn-out throttle spindle with a new-made shaft and butterfly, with a pair of bronze bushes gently pressed into place and reamed. I took the decision to repaint the whole thing as it seemed better to do it now while in bits than to wish i'd done it later! I'd carried out a weld repair on the main bed-plate which had cracked in a few places, so it was definetely in need of a bit of a tidy-up, as well as the bars being an obviously mis-matched set. While the colours I chose are not exactly factory colours (which were a bit hit and miss anyway by many accounts) i'm pretty pleased with the result. I even exercised my sewing skills and made a rustic but servicable canvas grass-catcher! The best part is, IT MOWS! it's light enough to whip around on our little lawn and being a suffolk it does it pretty quietly and with the minimum of fuss.
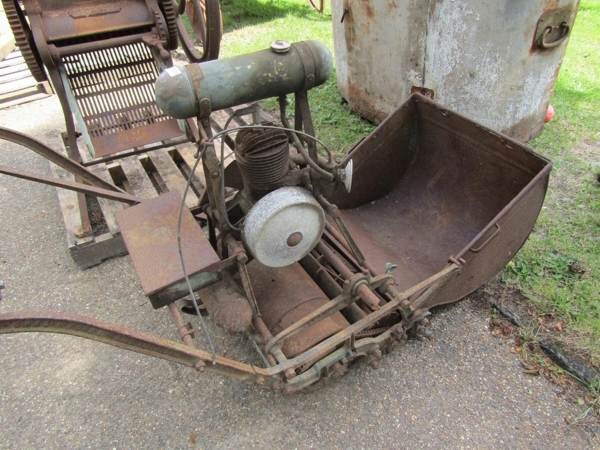
That brings us to last week, when my son and I were wandering around the auction rooms (picking up a sewing machine, another of my unfortunate afflictions) when we spotted a rather rusty 20" Atco standard, "can I bid on that dad?" asked the boy, well i guess I probably didn't need much more of an excuse than that! Upon our triumphant return (and a stern talking to from "the managment") we proceeded to oil-up and inspect our purchase, it's all there (including grassbox!) and has decent compression (we gently checked to see if it would turn over a little before bidding) although sadly there's no spark (coil HT side is open circuit) so we'll have to wait a little while (thanks steve from VS for the coil!) before we can make 2-stroke noises with it. some of the roller bearings are shot but we'll be going through it all slowly in a series of mini-projects so those can wait until we get to that particular bite of the elephant. We've got a LOT of cleaning ahead of us and no doubt there will be other obstacles to overcome but it's a great way to share some skills with my son (I work on this sort of thing for a living) and he's enjoying the process of ressurecting of this old lump of iron.

Forums
I'm pretty confident I've got
I'm pretty confident I've got the spark thing covered, the coil I've got coming isn't actually the correct one (it should be a 1008x1 but I could only find 1030x16 coils for sale anywhere) Although it should fit and function correctly as the body measurements are pretty close and the core Dia/length is the same. I reckon we'll find out when the postie comes!
On the subject of wooden parts, I'm quite fortunate that I have Half a handle to use as a pattern, it looks to be original as it has the grooves in the right places, i shall be turning up some replacements when the time comes. For the toolbox I was simply going to put together a small collection of appropriate tools using the parts listing as a guide, I'm aiming for functional rather than factory correct, but I will at least try to stick to era-correct spanners etc. Making a nice comfy (and rattle-reducing) nest for them is probably a good idea, It will obviously have to be made to fit the tools I have on-hand.
My immediate intention is to get the machine to a running/working condition and preserve what's there, before i even think about taking it right down to it's parts. It's far too easy to be tempted to blow it all to bits but I've learned the hard way that this way often leads to difficulties, and mystery washers left over! I like to live with a machine for a bit, getting to know it and correcting issues as they're identified. I'll probably do it eventually, but i'm in no hurry.
Yup, a 1030x16 coil fits
Yup, a 1030x16 coil fits where a 1008x1 normally goes! It even makes big fat sparks at the (shiny new) spark plug. It's not quite a perfect fit, but it's in there pretty snugly so isn't going to move. The trouble is, it still won't go broom!
There's compression, not exactly diesel-like but to my arm it feels pretty good. I've known engines to run on much much less!
There's sparks (see above) and i'm pretty confident timing's within a gnat's of where it needs to be.
There's fuel, although possibly too much, as there does seem to be a bit of a slow drip from the carb (a drop every 5-10 seconds with the tap on), I've drained the crankcase (twice) and there's been a good thimble or two of oily fuel in there after a minute or so of cranking. I did strip and clean the carb before even trying to start it and the needle/seat passed the blow test, but now I'm not convinced. Are VIs very picky about mixture? I've cranked her over in every state from almost completely dry to drowning and there's still no go, i would have at least expected a pop by now.
The crank seals have a little wiggle room in them, only 5-10 thou or so and they're wet with oil so i'm not entierly sure they're letting any significant air in/out.
It's probably a case of all these things adding together, I'll just keep at it until it goes (or my arm gives out)

Are VIs very picky about
Are VIs very picky about mixture?
Its original mix would probably have been 16:1 using a straight non detergent SAE 30 oil which will help seal those worn main bearing bushes. Try a drop of that and see if it makes a difference.
It’s a fact that when working on vintage and veteran engines, especially two-strokes , it’s usually the sum of the wear in several areas that spoils the party.
I'd suggest the timing could
I'd suggest the timing could be slipping - the flywheel tightens a loooooooong way when you put it back together, took me a while to find out how far - but normally that seems to happen if it fires, and you haven't got that far yet.
The flywheel's stayed where I
The flywheel's stayed where I put it for now, although I did manage to break the tab that secures the back plate from rotating while buggering about with it, you may have heard me swear! oh well, it's not exactly a complicated bit to make, I'll probably modify the design slightly and make it from slightly thicker stuff and slot the hole for the screw that holds it to the backplate, there's plenty of stud to add a seperate nut/washer for it too. I like the idea of being able to fine tune the timing without messing about with the flywheel, and there's a limit to how many times you can bend a bit of metal before it gives up.
Managed to cut the lawn with the suffolk today, the recent modification to the fuel system came in handy, I've added a small sediment bowl (a knock-off briggs part) as I was getting a little more water in my fuel than I normally like, that's caused a few premature halts mid-mow in the past, but I'm glad to say the bowl is doing it's job. It's because I tend to run my tank around half-full to save sploshing fuel from the (rather rubbish) breather hole in the cap. I'll probably make myself a better one when I can be bothered to set up for cutting the oddball thread into a nice piece of brass. that sounds like a challenge for a chilly winter night in the shed.
Hi Leon, welcome to the
Hi Leon, welcome to the madhouse!
What a fabulous Standard - just goes to show you what's out there. As far as I can see you are just missing a few wooden bits, and your grassbox looks in good nick too. I replaced the coil on mine in April last year and there is a thread on my travails that may help you - it sounds as though you are ahead of me already, but you never know, it might help. The one hidden gotcha is that if you take the condenser box apart, make sure your top hat bushes go back the right way round, or you'll never find the damn spark! If I hadn't had a spare to compare with/rob I'd never have found it. Other than that it's Adrianproof, which is like idiotproof but spelt differently.
You've probably worked out by now that the easy way to take one apart is to take one side plate off, clean etc that, and then start assembling bits onto that as you work across the machine. That's what I did when I first did mine (after 25 years in a barn I need to do it again!) - the man from the DHSS who wanted to see if I was malingering must have wondered what the flip I was doing when he came round and found me dismantling it across the back step (I wasn't, BTW, I was sending in 20+ job applications a week at that point, the mower was my sanity when the rejection letters kept hitting the mat).
Do you still have the wooden insert in the toolbox with the shapes for the toolkit? Mine just has the wooden box sides, no lid or anything, and I'd love to get one made up for it.