Atco Light14 1956
Hi Firstly hello all, I am not exactly new here just let my membership slip for a few years. I have a very nice 1956 Atco which I have been cutting the lawn with for the last 7 or 8 years. At the end of last year she became harder to start and this year would not start. After is bit of messing about I have come to the conclusion the timing is out (coil ok, getting a spark carb cleaned and seems ok). I have looked on this site and have tried to use the instructions I found but find one thing a bit confusing.
I have a mark on the flywheel and one on the housing mounting plate which I understand show when the points should open, however one of the spokes on the flywheel covers the points when at this position so you can’t see if the points are open let alone set them to 15thou? Anyone any ideas or am I timing incorrectly?
Forums

As per the instructions on…
As per the instructions on the last post but if you find that a bit daunting use the manufacturer’s marks.
Loosen the flywheel and set the points gap . I think the book says 12-16 thou , I always go for 14. With the gap set and the points given a “ white card” clean to remove any grease from the feeler gauges etc. Then turn the crank to top dead centre and without letting the crank move turn the flywheel to line up the big arrow with the raised marker on the magneto backplate . Tighten the flywheel nut . Rotate the crank a couple of times and check that nothing has shifted.
Thanks chaps will have a go…
Thanks chaps will have a go this weekend.
Ok managed at last to find…
Ok managed at last to find the time, and thanks to the advice my Atco lives. I tried the second method first, so tdc then aline the flywheel and she started second kick. So quick and easy I then tried the first method afterwards just for good practice! Thanks for the advice.
That’s good. With the timing…
That’s good. With the timing correctly set, there are only two things that allow it to change during use. One is wear on the heal of the contact breaker arm, which will only be very gradual. Some lubrication on the small felt pad that rubs against the cam minimises that. The second is that the flywheel shifts on its taper on the crank. Villiers manuals give instructions that the flywheel holding nut should be tightened using hammer blows on the spanner and to that effect sold a “ hammer tight spanner” for that purpose. Other than not being tightened sufficiently the rare incidence of a back fire can shift it.
I believe that the Villiers hammer tight spanners are available from Villiers Services and they also crop up on auction sites. Just be aware that there are two sizes.
The bottom one is probably…
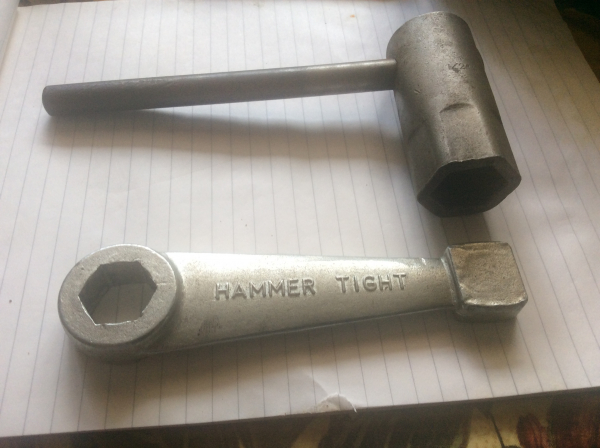
The bottom one is probably correct for your application, says Villiers Unit on the reverse. I can’t remember from where I acquired the top one but it’s stamped 1/2”W and fits a Villiers Mk25, and presumably other large horizontal shaft Villiers engines.
It would seem something is…
It would seem something is not correct if you are unable to access or even view the points when the ignition is about to spark. It would indicate you are using the wrong marks, either on the flywheel or the housing mounting plate.
An alternative method of checking or setting the timing is to remove the spark plug to determine the piston location using a rod down the spark plug hole. I believe the points should just start to open (and the ignition ‘fire’) when the piston is 5/32” before Top Dead Centre. Mark the rod against a point on the cylinder head when the points just start to open and again when the piston is at TDC. You may not be able to do this very accurately but I would have thought accurate enough to be able to determine whether the flywheel is in the correct position.