Ransomes Auto Certes
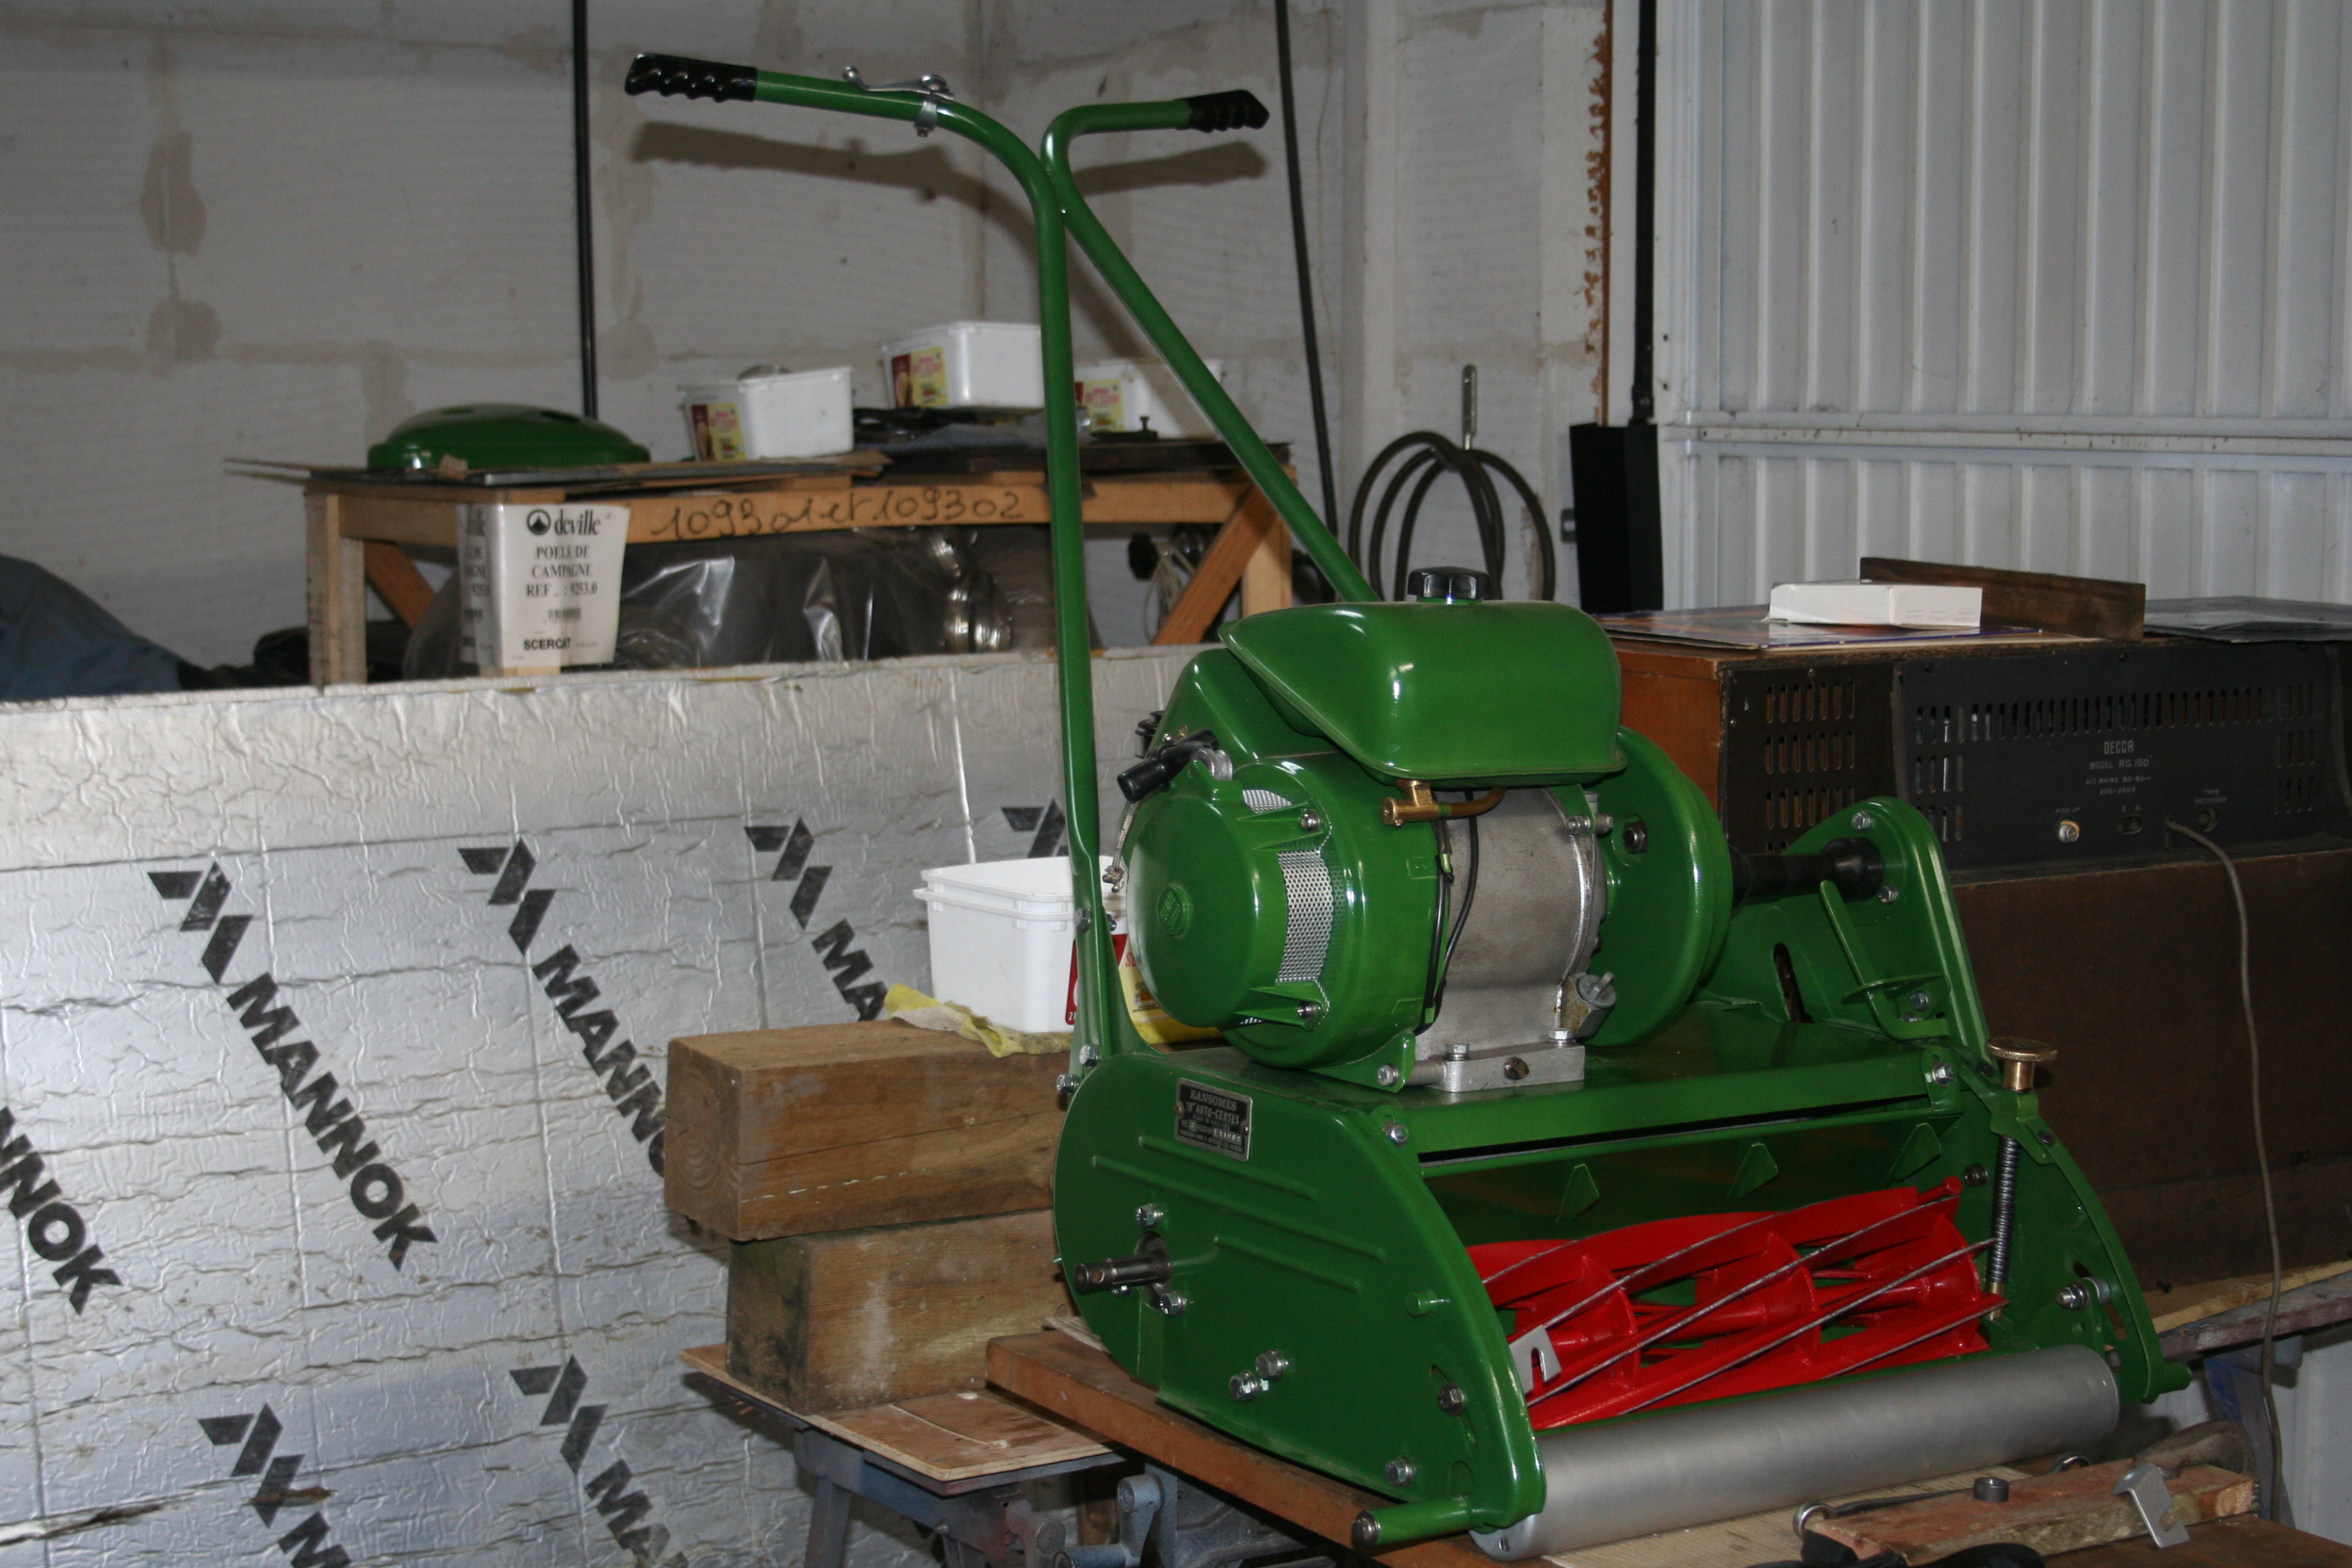
Just bought a Ransomes Auto certes and I am restoring it. It has the Norton Villiers F12 engine and I have a few questions.
Mower was bought as "won't start" but I found that the exhaust valve was stuck open. This freed off easily so no problem there. There is a weak spark when flywheel is turned over by hand, but thei may well be ok on the pull starter when replaced. However i am wondering if I can check the points essily and if so, what needs to be removed and will I need a special puller.? Carb needs a new float needle and main jet tubular filter, which is essential as jet has a hole not much bigger than the sharp end of a needle. Are silencers available for these mowers or do I make a new one?. I have all the tools to do the job so that does not scare me. Is a service manual for the engine on line anywhere ?
This is a good mower all round and does not look like it has done much work, so well worth restoring. I worked in the lawn mower shop for five years from 65 to 70 and well remember the chap who built the hand Certes, a Harry Pitcher, who lived north of Ipswich in Tuddenham, where I lived, and I often gave him a lift to work. Good days and a great bunch of guys in that factory.
Forums
Some slow progress on the…
Some slow progress on the Certes. I have been cleaning down the cylinder and was wondering how I could clean off any surface rust etc. off the centre spindle. I then found a long narrow strip of emery cloth and working this back and forwards while wrapped round the spindle worked a treat and was quick.
Mike.
Slow progress as I have…
Slow progress as I have other more important work to do. The main frame is now painted and I will give it a few more days to dry totally. I was getting the engine ready to fit the cowl and tank and looked at the clutch shoes and I then noticed that I had them the wrong way round according to Ransomes Certes handbook. I had previously greased the shoe pivot pins , so easy job to swap them round.
Mike.
Mike re the sloper exhaust …
Mike re the sloper exhaust Id be interested in a new exhaust for my Marquis if the price was reasonable.
Thanks
Ok. Will let you know how I…
Ok. Will let you know how I get on.
Mike.
Now trial fit of the…
Now trial fit of the landroll clutch and I am concerned that when the three clutch nuts are done up tight to the tubes that are inside the coil springs, the springs are very compressed. To work the clutch by hand it takes me both hands pulling on the clutch lever, in order to disengage it. I am considering adding distance pieces under the tubes to release pressure a tad. However, not sure if this is correct thing to do and more importantly, would the clutch then fould on the side cover.? Mike.
Engine was bolted on, but…
 Engine was bolted on, but now off again,
 as I found out from the parts book that there should be a felt oil seal on engine side of the small chain sprocket bearing.A couple of photos to show progress, even though at times it goes backwards !!
Mike.

Your issue with the traction…
Your issue with the traction clutch may be due to incorrect assembly. It’s possible that you have the threaded collar the wrong way round. Ransomes describe it as “securing nut ,clutch”. The one that has the two holes for the adjusting tool.
Hi Wristpin, will check the…
Hi Wristpin,
will check the collar with the two holes in. I think it is on ok but will check anyway. I am wondering if someone has replaced the springs with longer than standard . Do you know the free length of these springs. I assume same as Marquis? Also do you know the length of the inner sleeves? If either are wrong then that could be the problem. Am I correct in thinking that you tighten the three clutch nuts up so they are tight on the inner sleeves ?
Mike.
I’ve come across them with…
I’ve come across them with the collar on the wrong way round so it wouldn’t surprise me to hear that it is your issue. Anyway, I’ll get those measurements for you tomorrow. While we are on that clutch , make sure that it’s got the ball bearing between the two push rods. Always worth making sure that the adjusting bolt and lock nut are freed off and lubricated before you get too far on assembly and too much paint on them.
Hi Wristpin, Measured the…
Hi Wristpin, Measured the tube and spring. Tube is 1.063 Spring is 1.375. Boss of the collar is facing outwards. Ball in place between the outer rod (engine side) and inner rod with flattened end. Other thing could be brand new clutch pads, maybe too thick. When worn, clutch springs would be slacker. I will measure them and post. One other point re. clutch, when holding the edge of the large toothed pad carrier, I can move it side to side around 1/32" to 1/16" . Do I need to replace the inner bush, or ring bearing. (or maybe both.) Restoration slow going at the moment due to building work I am doing.
Found this drawing of the…
Found this drawing of the clutch which is quite useful.
Mike.
Dug out an old clutch ,…
Dug out an old clutch , Springs and tubes are within a hair’s breadth of yours .
Was the clutch working ok before you stripped it out?
I’m still thinking an assembly issue.
Mower was not running when I…
Mower was not running when I bought it, so no way of telling how clutch worked. I now have all the clutch parts seperated and only problem so far is the brass bush that runs on the steel bush is not up to scratch and I will have to find or turn up a new one. The steel bush is measures a thou under 0.8125, so that seems ok, being hardened. I will measure the clutch segment pad thicknesses now. I also made sure that the ball bearing is between the two rods. The clutch segment pads are 0.325" thick. Re. the bronze/brass bush, it might be able to be made in two parts,i.e. a plain bush and seperate washer, instead of the shoulder. I will give it some thought.
Mike.
Now have the bottom blade…
Now have the bottom blade and cutting cylinder in the frame. Now here's a thing. There is a long 5/16" UNF bolt that screws into the drive end of the cutting cylinder. I have that bolt, but it does not seem to have any purpose ? In the parts list for the Mk.8, it is listed under part 25, as washer retainer, but no washer is listed as far as I can see. I will probably add a large washer so if the circlip breaks, or comes off, the cog will still stay in place, or near enough, not to do any damage.I am getting to the stage now where I am wondering how to lift it off the work table !!
Mike.
Doesn’t ring any bells with…
Doesn’t ring any bells with me and I don’t have a Mk8 IPL. An image may be useful.
Strange the way that these machines get heavier as time goes by !
Hope this can be viewed. The…
Hope this can be viewed. The bolt is at the top of the page and must be inch and a half long. I will measure it later.

I Measured that long 5/16"…
 I Measured that long 5/16" UNF bolt and it is 2"long. I am still concerned about the large nut on the drive side of the land rolls. The way I am thinking is the only thing stopping the gear boss pushing on the bearing carrier is that circlip behind the bearing, unless the nut can't turn any more in than the key which can't move in the keyway. I don't want a repeat with the circlip being pushed through the bearing housing, as in previous posts. I will have to do some checking in that area. It is all going together quite well and just have the grassbox to clean up and a small spot weld repair to one of the hook bracket area where the thin metal has cracked.
Mike.
To Wristpin. I at last found…
To Wristpin. I at last found out what the spacer /distance piece is for that I queried in an earlier post. It fits between the front roll carriage frame and the side of the main frame. The long 5/16" bolt head when loosened, slides round the crescent shaped slot when adjusting the height. On one side, someone in the poast had replaced the spacer with a large nut, so I have now turned up another on on the lathe. (3/4" od. 3/8" wide with a 5/16" hole through the middle.) One job I have yet to do is to replace some of the wire tines on the comb, as they had been rubbing on the front roll and have nearly worn through in places. I think they just press out, so hopefull;y I can find some of the same size wire to replace them. (Coat hangers maybe.) A point that I did not realise, the Marquis differs with the Auto certes as it does not have the cutting cylinder clutch. Maybe a safety measure on the Certes to prevent any injury or damage to the cutting cylinder when transporting the machine on the rear rubber wheels.?
Mike.
Interesting, obviously OEM…
Interesting, obviously OEM as it’s in the book! Never worked on a Mk8 but have done several Mk3s that came as Imperial and Metric machines and all the ones that came my way had a nut on the end of cylinder, I wonder why the Mk8 changed to the set bolt ?
The last Mk3 that came my way had its original hand book and delivery document showing that it could be purchased with the option of either a Villiers or Briggs and Stratton engine . Assuming that the Mk8 would be of later manufacture , it would seem that the Villiers was still offered.
The comb tines are 3mm…
The comb tines are 3mm diameter so I have ordered a length of 3mm stainless steel rod to make a new set as most are damaged by rubbing on the front roll. The original tines have a press mark in the top middle of the "U" shape of the tine. I think that was done so that it sprung the tine so that is would not fall out.
3mm. stainless rod is exact…
3mm. stainless rod is exact size for the replacement tines. You need around 3.5mts. to do the job. I found that if you cut off slightly longer than original and shape it using a 5/16 rod in the vice as a mandrel into a "u" shape, it then taps into the support bar nicely. To shape the top of the "U" I heated it red hot and then tapped the middle with an 1/8" thick flate piece of steel with a hammer and no looking like original. I have made a new throttle cable and just need to make a new clutch cable. I have been looking for suitable bowden cable clips to secure the cables to the handlebars. Old cycle ones are available but too large in diameter. I have been measuring the landroll shaft and nut etc. and not happy with the way that all the force of that nut bears on the bearing housing circlip. Only way I can prevent it is to either make a stepped end key, so all force is on the key and key slot, or add a smaller key around 1/4" long so nut will bear on that and transfer force to the key. Can't come up with any other ideas.
Grassbox is now in primer at last. Would not want to do one of those again !!
Mike.
There is a right angled…
There is a right angled bracket with a dished hole spot welded onto the sloper engine valve cover. Is this a guide for the clutch cable to pass through ?
Mike.
No, for the fuel pipe when…
No, for the fuel pipe when correctly fitted from the tap, under the flywheel through the clips in the cowling, then through that bracket. A lot of people don’t bother and take the pipe around the other side of the crankcase .
The flywheel route could…
The flywheel route could/would be better as the flywheel would keep the pipe cooler than the other route I guess.
Back working on the mower…
Back working on the mower after 10 months absence due to building work at my place. I now have the clutch back together and the problem mentioned in a previous post now does not exist. Don't ask me how or why, but I must have put in an extra washer in the wrong place, maybe ???. I now have just a new silencer to make and have to get a steel die made up in order to press out the two sides. I will report back if this goes to plan, hopefully fairl soon as I now want to get this Certes working.
Mike.
The clutch pate was dragging…
The clutch pate was dragging slightly on one side so I added a this washer with 7/16" bore under one of the other springs, to give the spring a little more compression and that has cured it.
Mike.
More building work here so…
More building work here so progress on the mower had stopped for a while. I am now engaged in making a new silencer and as soon as that is completed I will test run the engine. I had to make two exhaust manifold studs and will need to find a gasket. Maybe a similar one from another make mower engine may fit.. We shall see. I will take a photo of the exhaust interior before I weld it up. It consists of two short lengths of steel tube, a small piece of 1/8" steel plate and some18G steel plate . One tube is 5/8" diameter and the other is 3/4" I did wonder if it could be made in copper, but I do not have gas bottles anymore. Solder may melt with the exhaust heat I guess. It would sound quite nice and reminds me of a friend who made up a complete copper system for his Ford Zephyr. Now that did sound good !! I believe it was illegal, something to do with certain fumes it produced if my memory serves me correctly. On a mower this would be no problem unless your lawn is in the house.!!
Mike.
Have now taken some photos…
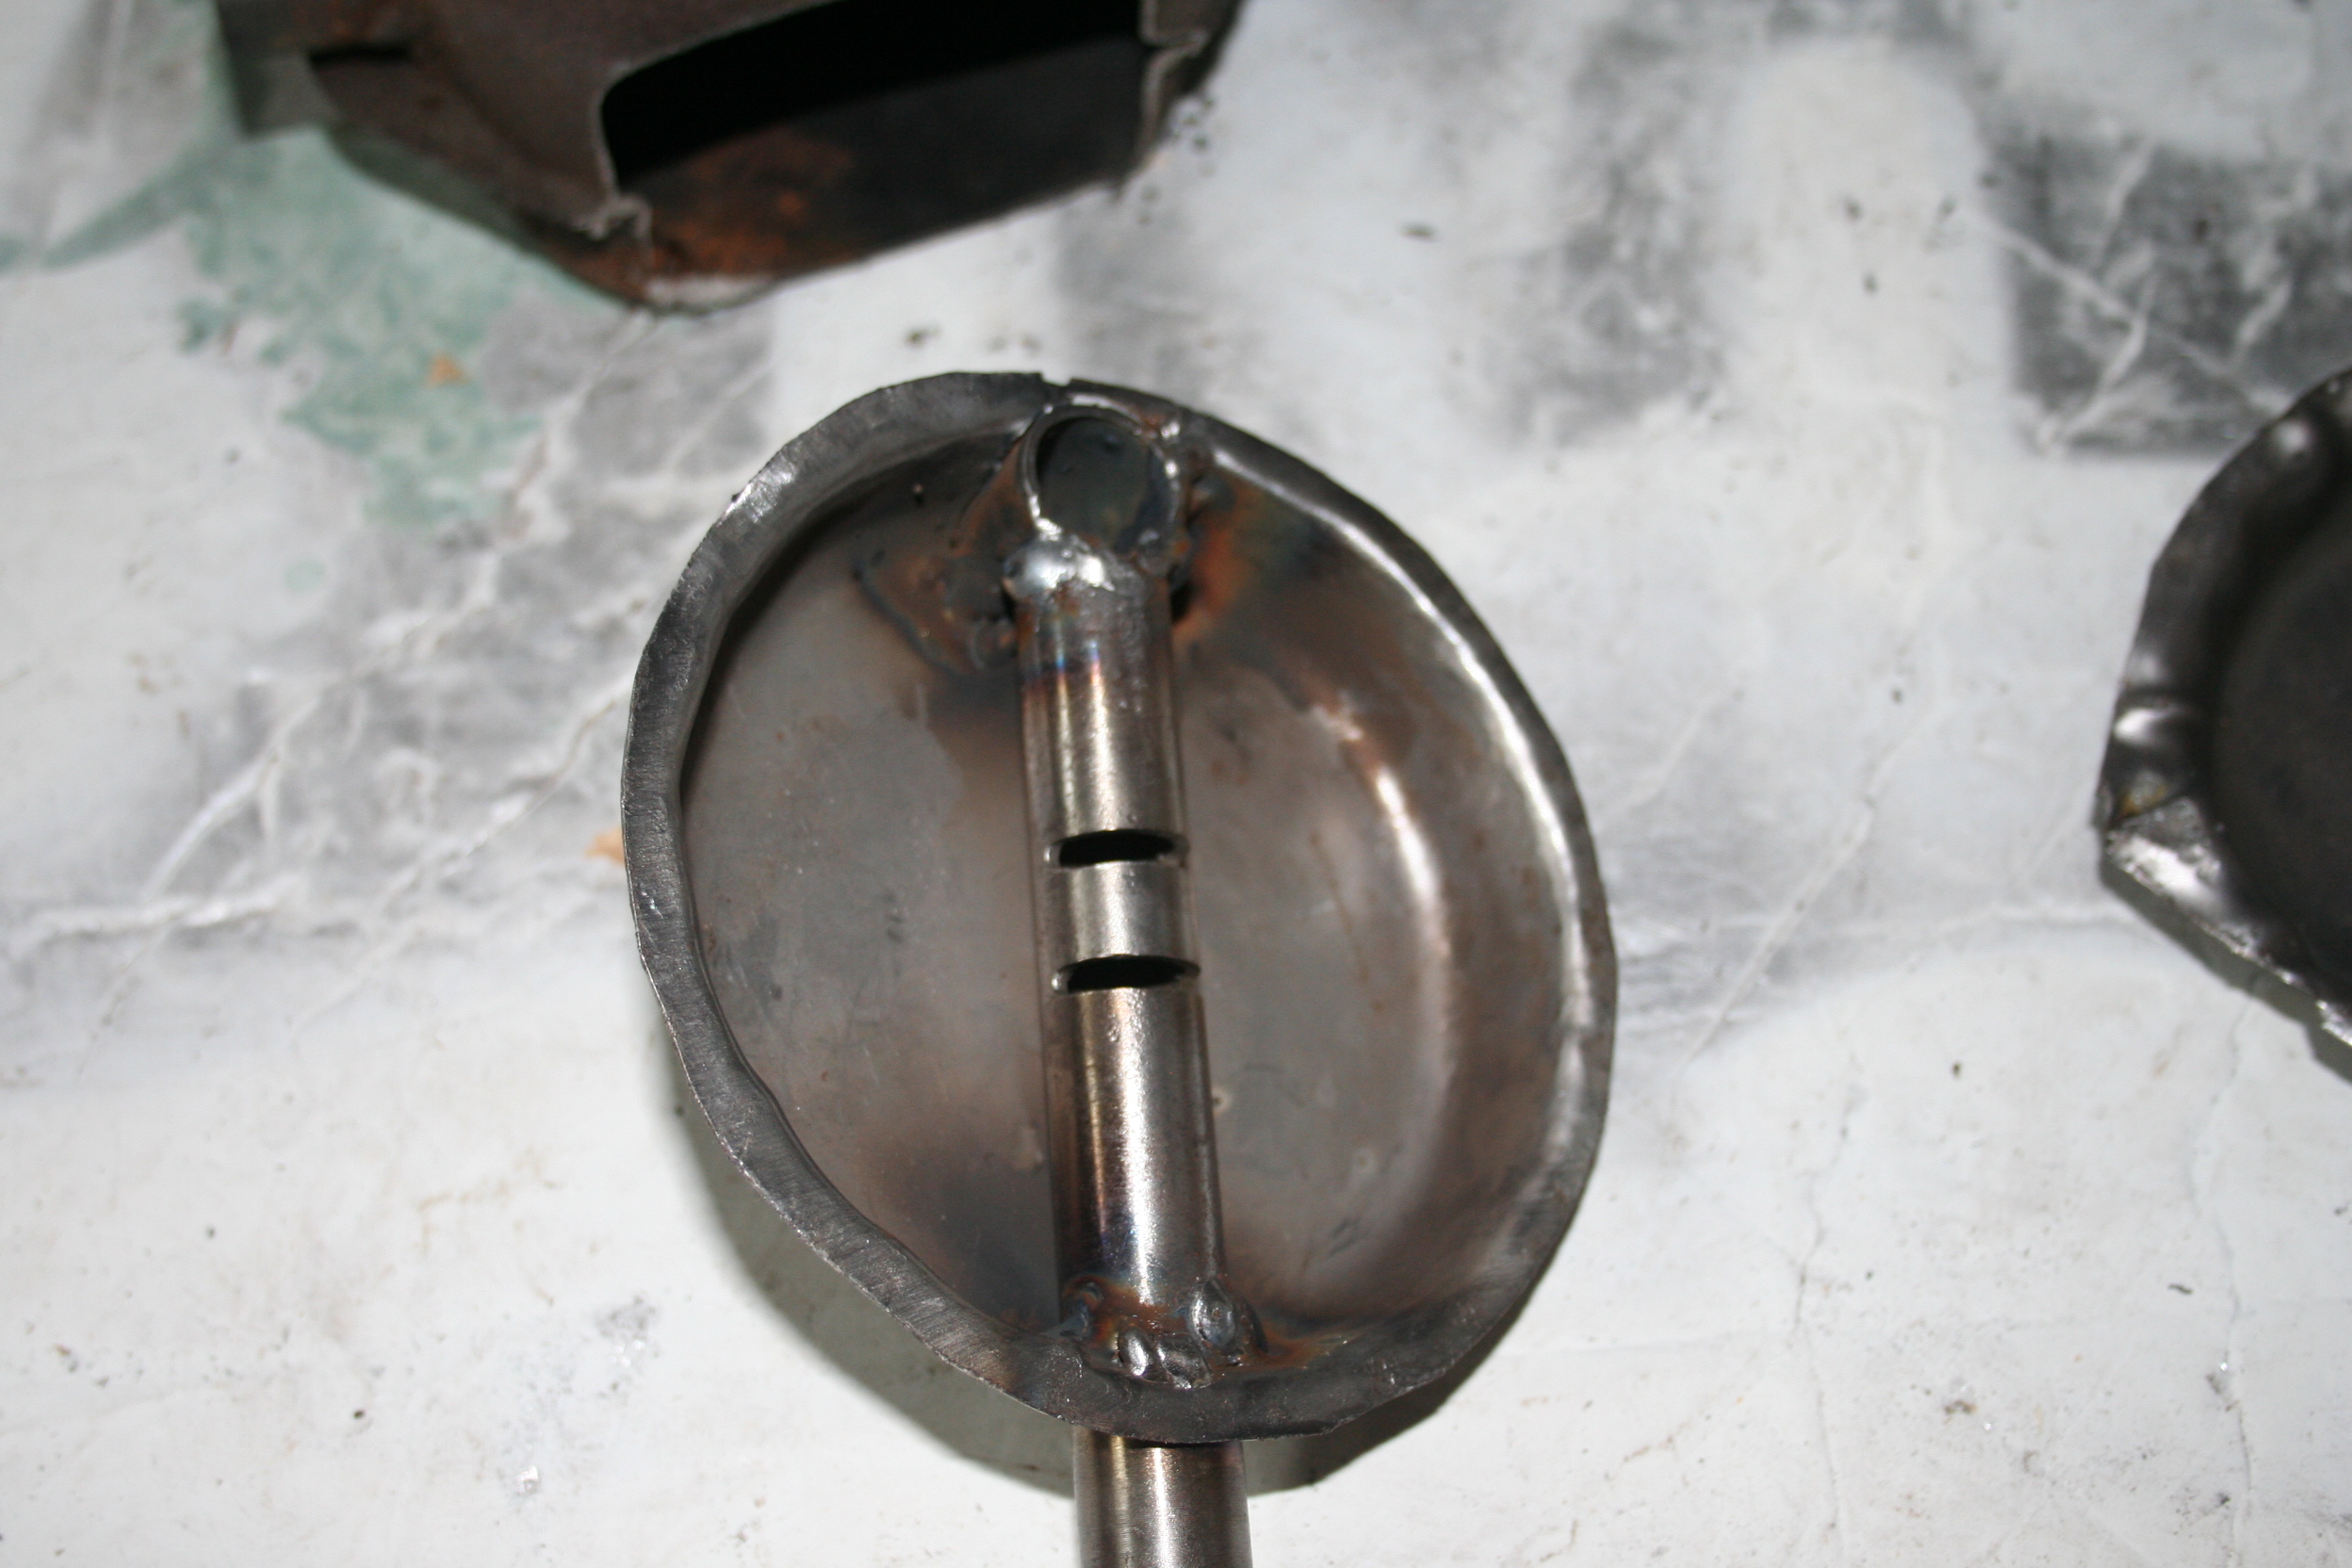
Have now taken some photos of the home made silencer/exhaust. The long 5/8" internal tube is blocked off where it is welded to the shorter 3/4" so that the exhaust gases follow the route as shown in the photo. Just need to weld the other dished cover on and shorten the outlet tube a little. This tube I will make slightly longer than original ,so it will clear the paintwork on the handle and side frame. I have an aerosol of high temperature paint which I will spray the item with.
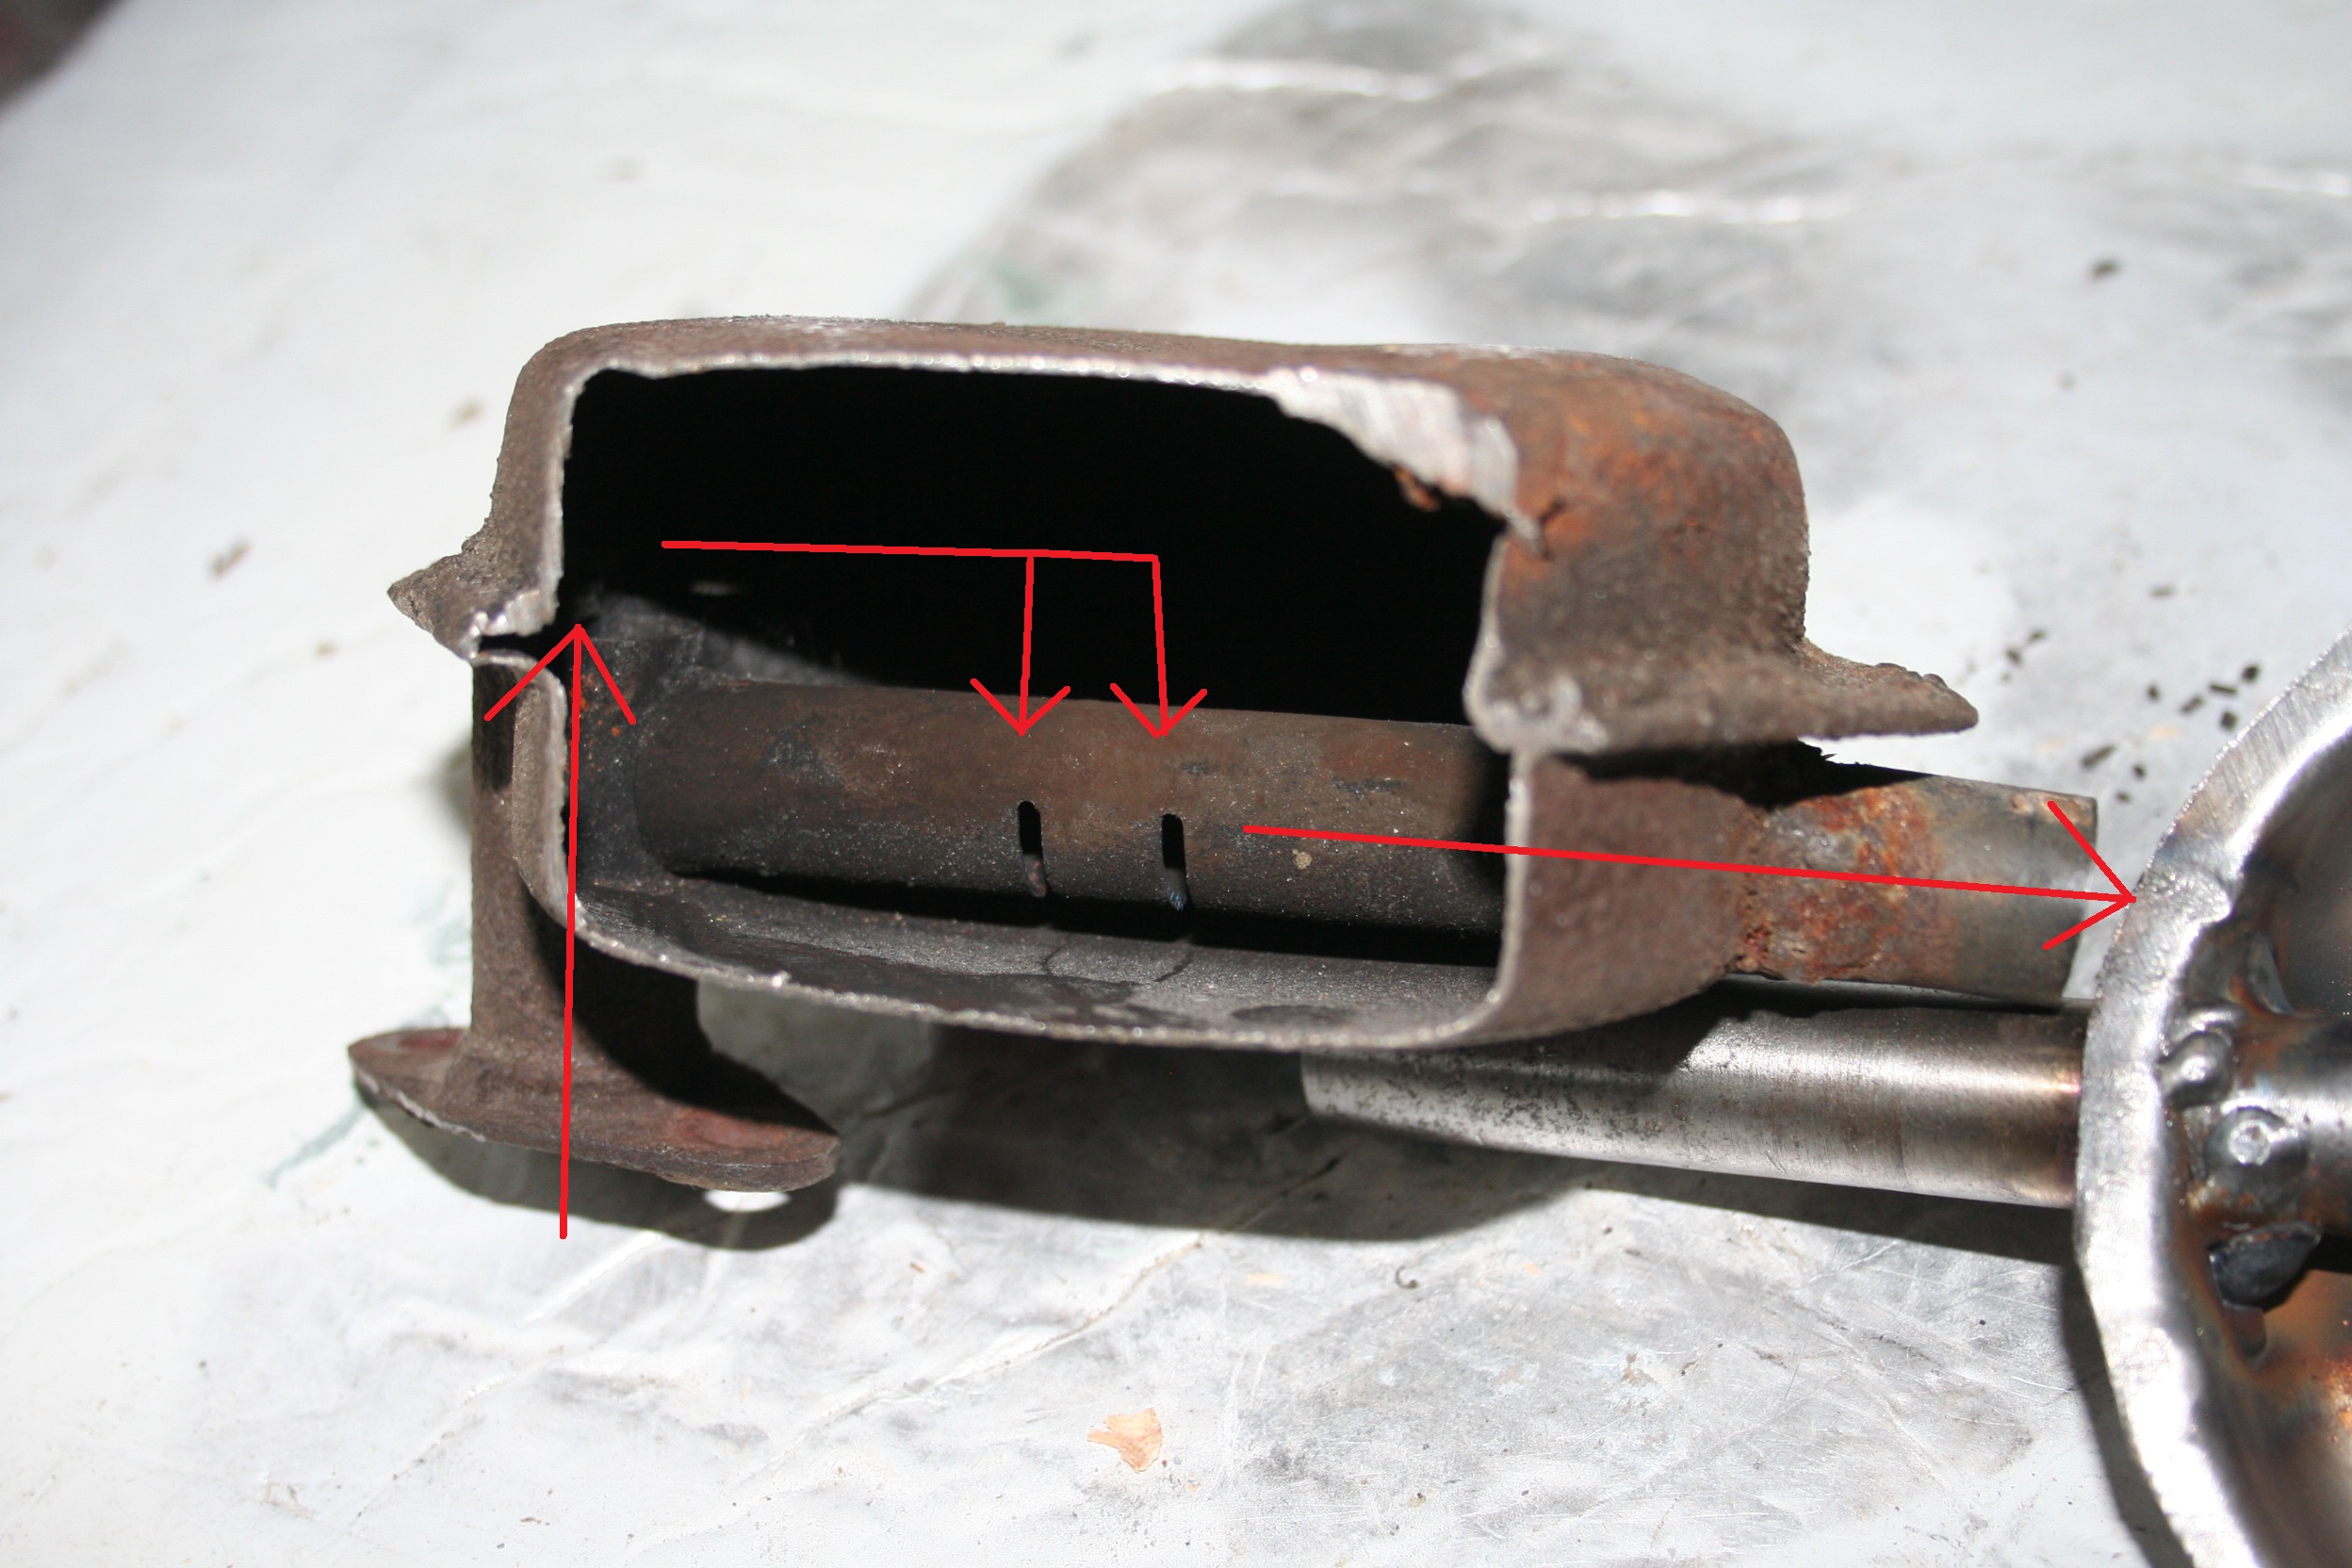
One more photo. Taken before…
One more photo. Taken before I welded the two cans together. Originals could have been crimped together, but the original one had been welded all round, so I followed suit. The angle of the inlet plate with the stud holes in, is quite critical and if not correct it would probably foul other parts of the mower.
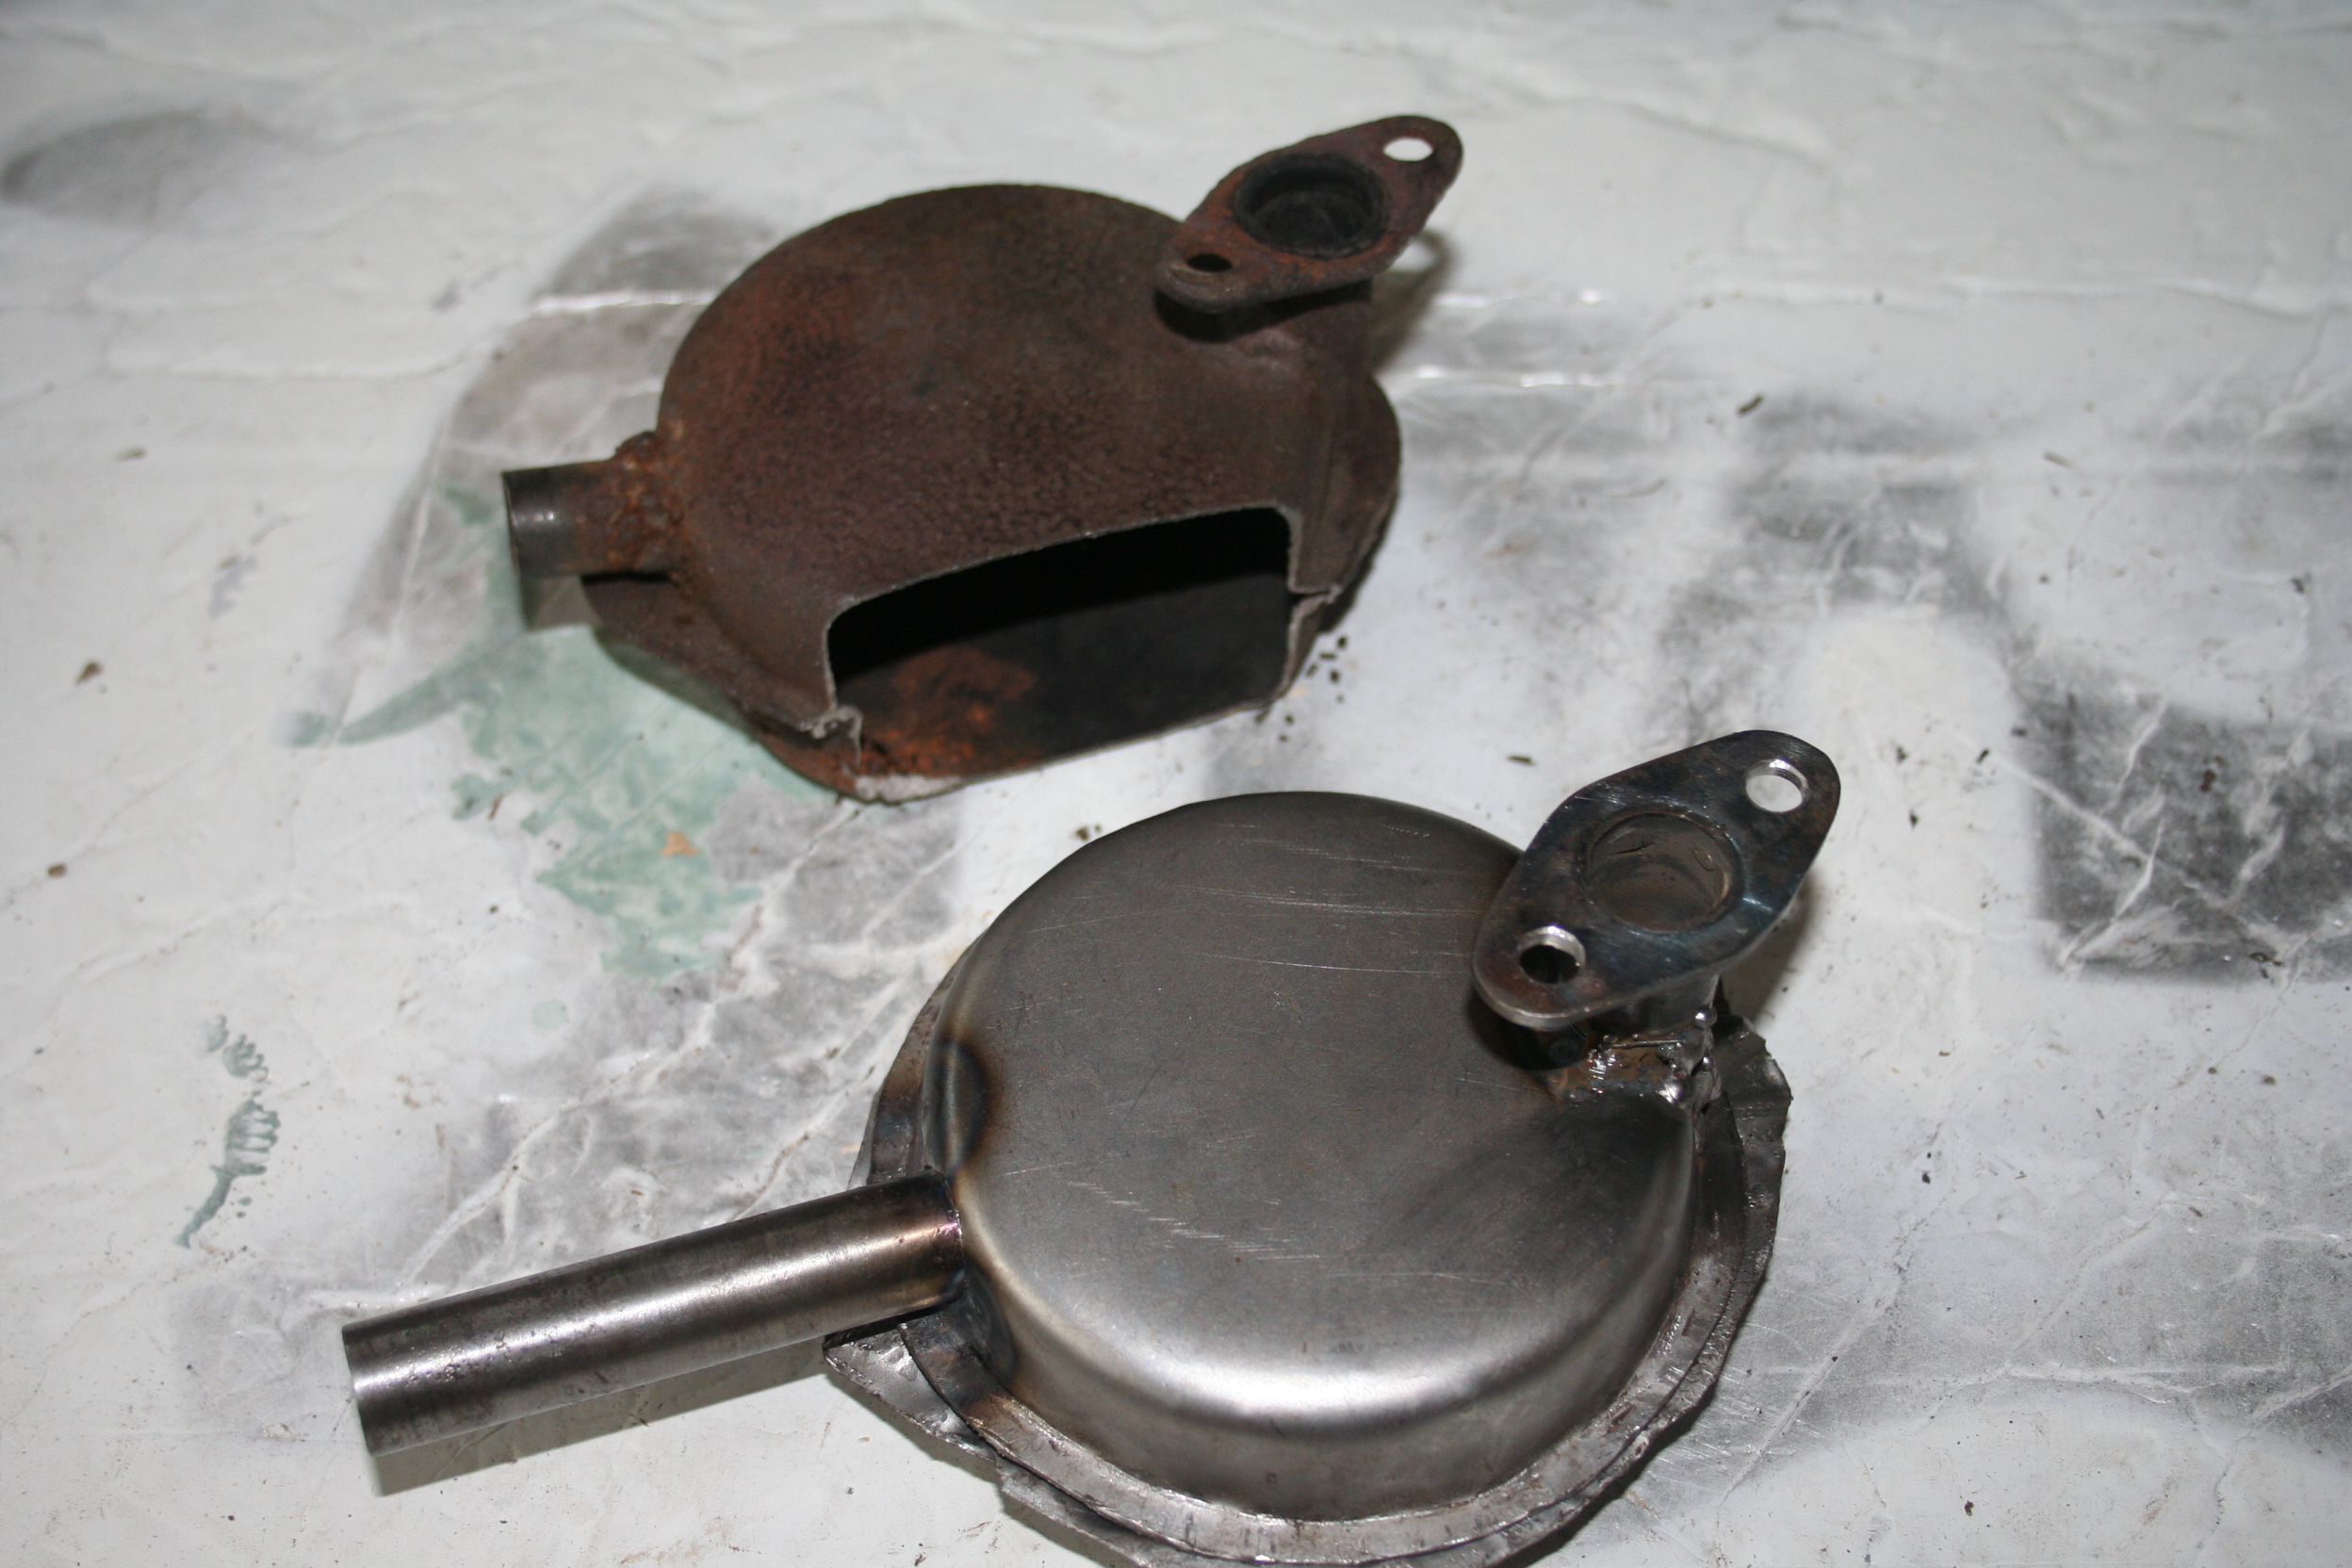
Now completed the silencer…
Now completed the silencer/exhaust can. A bit of a pig to fit as I have studs in the engine and maybe easier with bolts. Anyway, its on and tight. I turned over the engine on the pull cord and plenty of compression. I have an old vintage spark/plug checker that fits between plug lead and plug. Turned over the engine and nice blue spark. Next think was to pour some fuel in the empty cleaned out tank. I then opened the fuel suply with the push/pul tap, which I thought would leak like a sieve, but instead the carb is pouring out fuel. The leak is around the banjo at the base of the float chamber. Looks like I need parts 391/026 (banjo top washer) and 360/040 (banjo bolt washer.) The top fibre washer has to be a certain thickness, or the banjo will not seal tight. Now a question for wristpin. In the parts list, there is a washer under the head of the needle seating, (391/024). This is missing. Is this a plain steel thin washer, or another fibre washer. ?
Mike.
I punched out a new thicker…
I punched out a new thicker washer from Flexoid sheet for the needle guide and put it back together. Mower started after three pulls but now fuel was pouring out of the top of the float chamber.!! After taking it to pieces twice I realised that I had not got the needle captive in the float. Needle was too high and when fuel level raised, the needle hit the top float chamber lid, but had not shut off the fuel. All is well now and I actually did a circuit of the lawn, during which it cut out at the furthest distance from the garage, but after pouring in more fuel all is fine. Its a nice feeling when a mower which has not run for several years, bursts into life again. I have to adjust the slow running screw and as far as I can find, this needs to be one or one and a half turns out from closed.
Mike.
I will need to set the Amal…
I will need to set the Amal monobloc carb up. Does the throttle slide adjustment on the cable end have to be adjusted so there is a slight slack in the cable ? How many turns should the angled screw be turned out. ?
Mike.
I shortened the outer casing…
I shortened the outer casing for the throttle cable by around 1/4" as the throttle slide was not resting on the bottom of the hole, so engine would not slow run. The angled screw is turned out about 2 turns and have now got to the point where the mower starts up on first pull of the cord.
Well yesterday for the first…
Well yesterday for the first time, I mowed the lawn with the AutoCertes. Its giving nice stripes and cutting very well, however,. I has nearly completed the job when mower gave a few coughs and now refuses to start.
I need to check the main jet as my spark tester proves that the ignition is fine. Anyone know where I can buy a new gauze tubular filter for that jet ?
Mike.
The mower non starting is…
The mower non starting is getting to be a bit of a mystery, which is a shame as it was starting on first pull of the cord.. I first checked the carb and found (as I first thought) that the main jet was blocked, so blew it out and replaced it. After doing this around six times and each time jet being blocked, I drained the tank and purged it through twice with clean fuel. It still will not start !! So removed the cylinder head and checked valves, but all is working as it should, so head back on, but no start. I even stripped the carb again and washed it all out and checked any drillings.
I am now wondering if somehow the timing has slipped, if that is possible, although I thought flywheel was keyed. Tomorrow I will set engine to TDC and check if I get a spark at correct time.
I suppose it sparks on each revolution although it needs two revs to get to firing stroke (I think.)
Mike.
Well I found the problem of…
Well I found the problem of the non starting which turned out to be a modern spark plug which I am told do not like any oil on the insulators , or they break down. So far had this happen twice, so looking for some NOS plugs such as Champion N8's. Having got over that problem, another one has surfaced. So far the clutch cable has broken three times at the top end. I am wondering if there is a heavy duty one on the market, or perhaps my clutch springs are too heavy. I can work the clutch manually with an adjustable spanner and it takes a fair bit of pressure to release it.
Perhaps "wrist pin" could advise on this . I certainly do not want to keep buying new cables for the machine, but do want to get it running reliably as it does cut very nicely. It does tend to fill up the grass box pretty quickly, but I guess in a bowling green situation, the grass would be cut daily, so content would be reduced. A thought in my head, perhaps I could convert the clutch to hydraulic operation. I probably have all parts needed in the shed.
Mike.
I have now made a fresh new…
I have now made a fresh new cable up and slightly reduced the clutch spring pressure by fitting a washer on each of the threads of the posts that the cap nuts fit on. Clutch now feels a lot better to operate than before, so I will see how it works in the next few days. Inner cable thickness was a fraction under 2mm, and measured 0.075" diameter. At the clutch end I turned up a new brass nipple with a recess on the large end so that the cable could be splayed out before filling the recess with solder. Hopefully this will be anchored ok.
Mike.
I need to make a new…
I need to make a new silencer for the sloper engine. I have searched hi and low, but could not find any original types for sale anywhere. The silencer is basically two deep dish pressings with a couple of tubes welded inside for inlet and outlet. The outlet tube has a couple of slots mid postion to let out the exhaust gases. I have made a trial die consisting of a male and female section and had reasonable sucess pressing out one side. However the die material, a hard wood, was not strong enough and the metal left a few grooves in the die. With this in mind I am now thinking of making a proper steel die which should be good for several parts. Is there a call for these.?
Mike.