Atco Identification and Advice
Good afternoon,
would anyone be able to help me identify the Atco mower attached?
I saw one for sale a couple of years ago which had been repainted and well looked after, unfortunately i didn't manage to purchase it but decided to bring one back to life myself.
Where is the best place to start? I need a new spark plug and started rope and wondered if i should clear out any of the other engine parts prior to trying to start the engine.
thanks for your help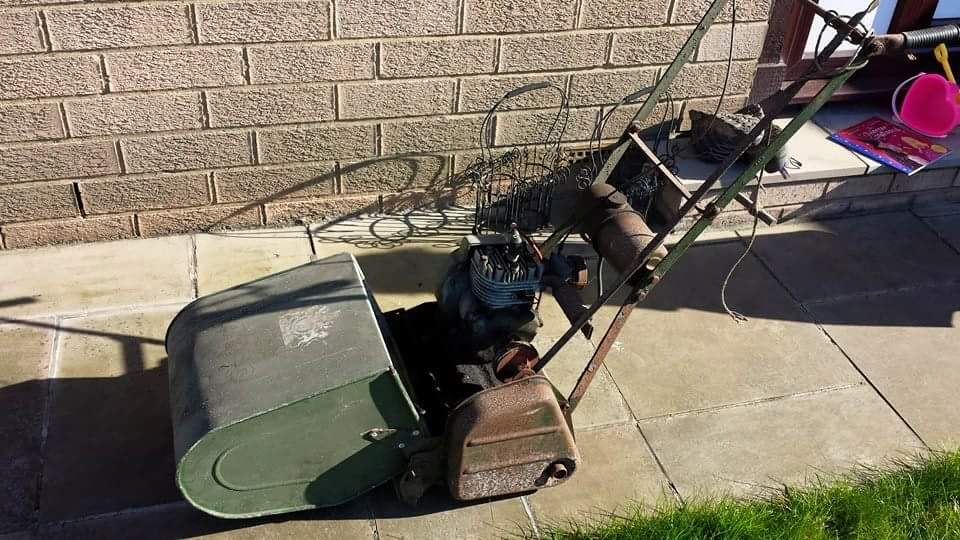
Forums

OK thanks. I think the tag is
OK thanks. I think the tag is 6221 with an L at the end pressed into the metal.
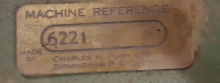
Atco two stroke ID plates
Atco two stroke ID plates were usually stamped with a number like 1247 designating a 12 inch cut made in 1947.
I don't know how to decode a four stroke with 6221 on it, but OLC member Sir Chook may.
For dating purposes, the engine can sometimes provide clues.
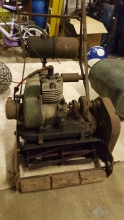
I have a similar machine but
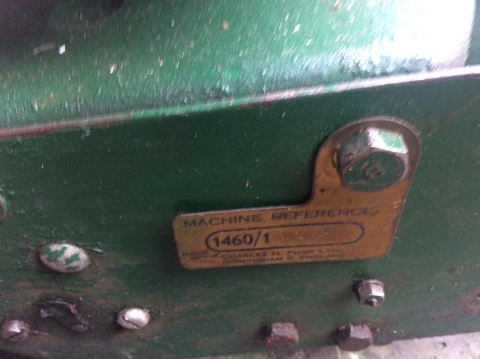

I have a similar machine but it has a different ID
Forum software seems to be intent on putting my text st the end of the post rather than where I put it at the start. This is my third attempt!!
That does look very similar.
That does look very similar. How did you go about restoring the engine? What should I clean before attempting to start it. Even an obvious question..... dor I just use unleaded with some lead additive?
Mine came with the plastic
Mine came with the plastic front rollers but should have wooden ones similar to yours and I added the mesh guard around the recoil starter as there was a potentially finger trapping gap.
Check the oil level in the sump then start by checking for a spark off the end of the HT lead and if you have a decent spark I would then put some unleaded in the tank and try your luck. If it fires and runs you are in luck. If not, check and clean the carburettor .
Unless you intend to run the engine really hard there is no pressing need for additive but a bit of lead substitute, Redex or even just a drop of two stroke oil won't do any harm.
If you do need to strip the engine or cab, gaskets are available from the likes of the Hailsham Mower Centre and Villiers Parts.
One thing to watch out for is that back in the day when the machines were in regular use the recoil starter was a weak point and if the engine became difficult to start the recoil units used to suffer. My best advice is to get the engine onto compression, pull the rope gently to engage the pawl / dog and then give it a firm pull. Those recoil units did not put up with much snatching. The process is not helped by the need to pull upward due to the orientation of the unit. Having given mine an engine overhaul it has very good compression and consequently it is necessary to steady the machine while engaging the starter or it tends to leave the ground!
Thanks for the advice....it
Thanks for the advice....it all sounds very technical. Will give it all a go this weekend, hopefully she ticks over after a bit of a clean. More than likely not but I'm looking forward to learning as I go
OK I've made a bit of anoise
OK I've made a bit of an amateur error....I didn't take a picture of the parts when I took apart the pull cord.
Managed to get the cord in but I'm left with a few spares and I can't remember what order they came off. Could anyone give me any pointers?
None of my Villiers manuals
None of my Villiers manuals illustrates that pattern of starter but if I get a moment over the weekend I will remove the starter from my similar engine and post an image.
That's very kind of you. I
That's very kind of you. I laid them out in order but got a rush of blood to my head andown ended up quite frustrated with myself.
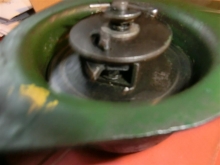
Sorry for the delay. The
Sorry for the delay. The reassembley order is - pulley, pawl with the lug pointing upwards , the thick washer with flats, the slotted disc with the pawl lug through the slot, thin washer, spring, other thin washer and the split pin.
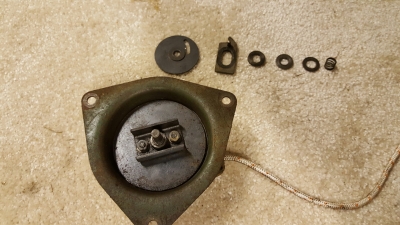
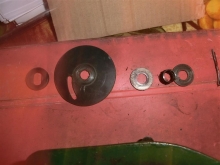 Components
 Pawl positioned on pulley
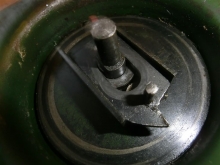
 Disc in position Pawl retracted - lug nearer to centre.
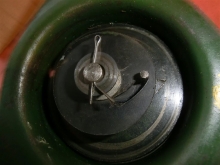 Pawl extended - lug nearer to outer edge of the disc.
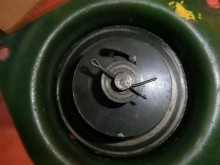
 General view of assembled components with the pawl extended.
Thank you so much for the
Thank you so much for the pictures. Managed to put together and seems to be working. I think I may need to take it apart again as the rope does not recoil. I think the knot I tied may be too thick and causing friction against the casing. At least I can put it back together again!
Kudos to Wristpin yet again
Kudos to Wristpin yet again for superb assistance.
May be that or may be not
Managed to put together and seems to be working. I think I may need to take it apart again as the rope does not recoil. I think the knot I tied may be too thick and causing friction against the casing. At least I can put it back together again!
May be that or may be not enough pre loading of the recoil spring.
A few more images from
A few more images from different angles and out of shadow will make identification easier. Also, there would have been a metal tag with som ID data held by one of the chassis fixings on the right had side of the chassis - is it still there?