Suffolk Super Punch - take 2
Hello all, I last posted on here maybe 3 years ago when I was trying to get my ancient punch going.
Well, spring has sprung and im trying again.
The last time I tried to get it running, the engine was racing basically at full pelt - engaging the clutch (which was a bit hairy)
I have just stripped the carb again (Zenith 13TCA) an it looked pretty spotless.
one thing to note was air mix screw seems to be a little bent - would that effect things?
Governor spring was replaced - but unsure if its correct as seems a different length & strength from the old one. I also fitted the linkage in the slackest position on the vane etc.
Just waiting on replacement fuel hose as mine has gone rock hard - updates to follow
Forums

Thanks Wristpin,
Thanks Wristpin,
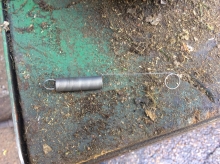
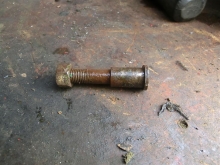
I have attached two photos, one is the original spring that came with the machine, the other is replace I got that was told was suitable
Original

New

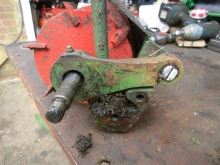
Your governor link rod is the
Your governor link rod is the wrong way round ;-)
The loop in it should be at the vane end and this is where the spring connects.
Change it round and test run, if it still runs too fast, take a bit of tension out of the spring by pulling one of the 'rings' out slightly.
This one is the same but
 This one is the same but different!
The correct spring for yours has a " leg" similar to this one but not as long and may no longer be available so you may have to stretch yours .
Sorry, the forum software has moved everything around!
Cheers all - thought
Cheers all - thought something was afoot...
My old spring looks very similar to your spring Wristpin. so i will try an keep on with that whilst I try an get a replacement - if you knew the dimensions theres a chance i could have one made/ fabricated?
Has anyone got a photo showing how the throttle cable is set up please as i have a feeling that isnt quite right
Thanks
Your throttle cable looks to
Your throttle cable looks to be correct.
A manufacturer would probably want an order for hundreds to make it worth setting up to make to pattern but for the degree of accuracy needed adaptation is probably sufficient.
Thanks for the clarification.
Thanks for the clarification.
I will attack it again tonight. I want it to run properly before i shell out on getting the blades sharpened etc - plus it makes it a tiny bit safer having really dull blades just incase the worst should happen
I have plans of getting it shot blasted an repainted - watch this space
Another strange thing I noticed last night, I was manually turning the blades after a few seconds the drive mechanism engaged. Which was fine whilst the engine wasnt running but a little disconcerning when it does run....does that sound normal?
Not quite sure what you are
Not quite sure what you are saying but working back from the cutting cylinder there is a sprocket and chain to the top / clutch shaft. The top shaft then has a pin clutch ( small drum that slides with a strung ball detent ) to totally disengage the blades and landroll drive from the centrifugal clutch and engine. Then there is the centrifugal clutch on the end of the engine crank shaft. By the look of the corrugated landroll you have a 17" Punch so the cylinder sprocket will have a second chain to an intermediate sprocket and thence to the landroll via a dog clutch . ( lever with red knob low on the left where the LH handle bar fixes.)
Now, if the dog clutch is engaged or binding , rotating the blades/ cylinder will turn the landroll. If the pin clutch is engaged or binding turning the blades will turn the centrifugal clutch drum and if the centrifugal clutch shoes are binding on the drum ( seized pivots etc) it might try to turn the engine.
Take the chaincase cover off and all will become clear - hopefully!
It lives!
Cheers Wristpin, that does make sense, I have had a quick look within the chaincase but didnt really delve into it. Good spotting on the roller, it is indeed a Super Punch (17")
It lives!
Put it all back together as per instructions from here (thanks), full choke an it went on the 3rd pull
It ran for about 10 seconds, coughed, farted then died. I tried to pull start it again an the spring in the starter become detached which left me with a handle and long bit of cord.
but still a fairly successful evening
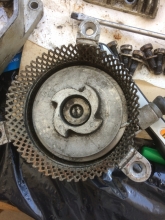
Hello all, I seem to be
Hello all, I seem to be struggling with the recoil/ starter.
On friday the cord was not recoiling, so i removed the three nuts an removed the assembly, undid the central screw removed the pully/ cord holder (after figuring out which way it needs to be wound) refitted it an test it in my hand - which was fine
refitted it an the same thing happened its like the back of the cord carrier is jumping/ moving away from the coiled spring - hope this makes sense??
Anyone had this before?
Not quite sure what you are
Not quite sure what you are describing but perhaps these images will help
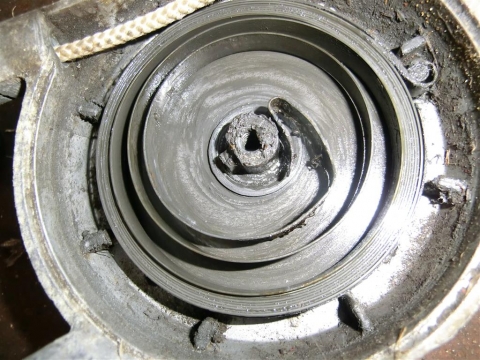
The loop on the outer coil of the spring hooks over a peg on starter housing.
The hook on the spring has to engage hook in the centre of the pulley.
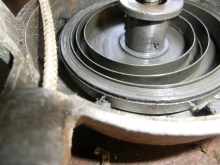
When correctly assembled the notch in the centre bush must locate over the protrusion in the casing.
The golden rule of starter repair / setup is that the rope should be fully extended before the spring becomes spring bound - that is fully wound up. If the spring is fully wound before the fully extended rope stops further rotation of the pulley the spring will eventually fail.
Hi, recoil sussed, rewound an
Hi, recoil sussed, rewound an refitted, the good ole girl went on the first pull. I even managed my first ever self propelled stripe of the lawn then it conked out.
Figured out, it was a fueling issue, as pressing the tickler no fuel would appear. So I opened the lid from the tank to a "hiss" so I'm guessing airlocked - it still has the old fibre seal on the fuel tank, this is sodden with petrol though. Im guessing new cap is required.
When the mower was being self propelled it seemed quite quick, i dont know how fast they are suppose to go but, it was running on full choke an needed a brisk walk to go after it.
next job is removing the blade(s) to be sharpened
The "fibre" washer, perhaps
The "fibre" washer, perhaps with a tin foil cover, should have a small hole in it and there should be another small hole in the centre of the steel cap. That should be enough to allow the tank to breath and stop it vacuuming. As a temporary measure you can mak a new washer from cardboard and make an offset hole - lets the air in but stops the fuel splashing out.
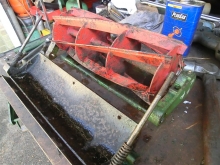
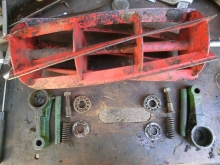
Removing the cutter unit will be made easier if you remove the engine and the engine platform - not essential but makes things easier. Also, slackening the cross bars will create a little extra clearance to fiddle the unit out. You will see that the cutting cylinder bearing carriers are pivoted on the cast iron combined bottom blade carrier and lower throw plate. Take note of " Cast Iron" and if the shoulder bolt pivots are seized be very careful how you go about moving them. You will also see that the threaded blade adjustment rods pass through the blade carriers and are anchored into the bottom blade carrier. Do Not try to unscrew them. Usually unseen there are steel pins locking them and attempting to turn them , shears them .
I should be able to post a useful image or two tomorrow.
As ever cheers Wristpin - I
As ever cheers Wristpin - I owe your many beers!
I couldnt see any holes in my tin cap, but could see the remnants on the seal (inside) a sort of hole.
God knows how long the blades have been on the mower for, but the bottom blades screws are stuck fast - ever had smacks from an impact driver - fingers crossed i dont need to wizz em off
By removing the lump/ engine, would this cause realignment issues coming back to refitting it?
Pictures would be awesome
Thanks
There's the possibility that
There's the possibility that your cap is the victim od a "cap swap" - the caps on steel 5 litre oil cans were a good fit on a Suffolk tank but, of course, did not have a breather hole.
Engine alignment. Not a problem, there's a bit of "slop" in the engine fixing bolts and it's easy to "eye up" the relationship between the clutch back plate and drum.
Bottom blade. Unless the lip is worn right down it may be skimmed in-situ so no need to remove it . If it has to come off, putting lots of heat into the screw heads is favourite. When I had the business and had oxy-acetylene we would cherry red each screw as a matter of course - saved time and faffing around . Also if someone has used over length screws with their ends sticking up above the carrier, grind the protruding ends off rather that trying to drag the rusty threads back through the carrier.
A few images of the cutter unit on a 14" Punch - same design as your 17"

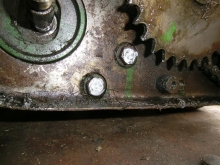

If the bottom blade has
If the bottom blade has sufficient material left, you do not need to remove it from the block. If it does need replacing, you may require a good heat source, a good blowlamp or similar. Heat each screw until cherry red, then attempt to start to turn it with a good drift. When you fit a new blade, you will need to ensure the screws are extremely tight, or they could work loose. The bottom blade must be fastened to the bottom block to reface it.
Thanks for the replies chaps,
Thanks for the replies chaps, Im hoping to get out in the shed this weekend for a tinker.
How would i go about finding out if there is sufficient material on the bottom blade to reuse?
Does that go for the main blade too, do they "go past their best" an need replacing too?
When i had it running on Tuesday it did actually cut some grass, which i was suprised at as they blades are about as sharp as a wooden spoon at the moment
Every time the cutting
Every time the cutting cylinder blades are sharpened metal is removed and the effective diameter of the cylinder reduced. The first effect of this reduction in diameter is that the throwing effect is reduced and the cut grass is no longer thrown to the back of the grass-box, Eventually in combination with the equivalent wear on the bottom blade the two no longer meet and the mower no longer cuts. A new bottom blade may restore things for a while but ideally you should be looking for a new cylinder. Back in the day with bigger and more expensive cylinders we would cut out the worn blades and weld in new spirals (some were even bolted) but as far as I know, no one does that now.
This cylinder from a 1950s Suffolk has suffered from neglect and rust pitting but shows remarkably little reduction in blade depth. The relief area could be halved before there is much reduction in efficiency.
This is a new bottom blade and the lip depth could be safely halved - unless of course, it is matched with a worn out cylinder.

Hello all
Hello all
I tackled the cutting cylinder this weekend but didn't get very far, i stupidly followed the manual (for the 14" Mk Vll) which did match up to alot of mine.
Procedure was -
Loosen cylinder adjusting screws
remove chain cover
remove primary and intermediate chains
remove the chain wheels from cylinder spindle after removing nut - I know this part isnt done yet
remove nuts (91 & 92) pff tie rods, the screw (90) holding the sole plate RH side only and screw 13 holding delivery plate
remove RH side plate and withdraw the cutting cylinder
Surely i will need to remove the sprocket from the output shaft from the engine to enable the side plate to be removed....or am i barking up the wrong tree?!
thanks

You don't have to remove
You don't have to remove either side plate. Read the description that I posted and look at the series of images that I posted. It's not rocket science - as the saying goes - much more serious!
Cheers Mr Pin will have a go
Cheers Mr Pin will have a go tomorrow
As you have found out, the
As you have found out, the MkVII is of a different basic design from the Super Punch as its cutting cylinder and bottom blade are individually supported in the chassis , not removable as a unit.
It really will make life easier if you remove the engine, there are no horrible consequences unless you count the possibility of the engine anchor " spire nuts" , that are clipped into the platform, coming adrift. I've not yet discovered a source of new imperial ones but if the worst happens you can substitute 8mm metric and change the engine mounting bolts.
While you've got the engine off it's an opportunity to drop the sump off and flush out the layer of sludge thatb's built up over the years. Sump gaskets are readily available.
Engine off - success!
Engine off - success!
But now im stumped on how i remove the sprocket from the cutter spindle - if that makes sense.
Im guessing i will need a puller?
thanks
That sprocket is keyed to the
That sprocket is keyed to the shaft and can be tight and a small two leg puller is useful but a couple of "cam ended" pry bars will usually suffice. At least the sprocket being tight suggests that the shaft has not been mauled about over the years.
With the engine and handlebars removed the whole machine becomes much more manageable and then removing the engine platform does make dropping out the cutter unit easier. While you have the machine stripped to that extent it is a good time to check the rear roller end float ( side to side movement) as excessive float hinders correct adjustment of the lever operated rear roller dog clutch. Some end float is desirable to stop the roller binding up but I would suggest that anything over 2mm should be dealt with - ideally with a shim washer at the left (clutch) end but one can be inserted at the right hand end to reduce the amount of dismantling needed.
Hello all im struggling to
Hello all im still struggling with the sprocket. Do i attempt to remove the key before the sprocket or does the key come out after the sprocket has been removed?
(I have never dealt with woodruffs before)
thanks
Sprocket off first. Are you
Sprocket off first. Are you using a puller or levers?
An image could be useful.
I have tried pry bars to no
I have tried pry bars to no avail - an was worried i would damage something.
Ive just got hold of both a 3 leg puller & 2 leg to try tonight
Pics to follow
Also, just had a quote of £40 to sharpen the bottom blade an cylinder - i dont know if that is good or not?
thanks
£40 is reasonable ,
£40 is reasonable , presumably with the cutting cylinder stripped out of the cutting unit. Leave the bottom blade screwed to the sole plate.
Well finally got the cutting
Well finally got the cutting unit out, puller worked a treat - an can confirm the sprocket was really tight
removed what i can, im worried on the condition of the springs on the adjusters they look really rough, but i cant remove them as i cant get these two nut off grrr
there doesn't seem to be room for a ratchet an couldn't get a good enough bite with a spanner - may have to resort to wizzing them off with my dremel
there seems (to me) like there is loads of meat left on the cylinder - which at least is something
The cylinder looks good. I
The cylinder looks good. I undo those nuts with a Snap- on socket ; thin walled at a price!!. Getting the nuts off may be the least of your problems as the shouldered pivot bolts have a habit of being seized and you need to take care applying the necessary force without damaging the CAST back plate. ( see my earlier post and images)
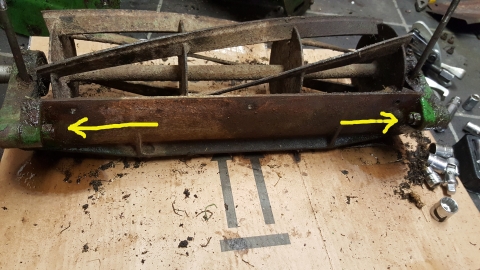
Off topic - how do you add those yellow arrows to that image? Never managed to get to grips with that " ology" !
Thanks Wristpin
Thanks Wristpin
I have brought the unit into work for our maintenance guys to take a look at it. The bloke who has offered to sharpen it said i can bring the cutter unit as it is to him too, as he was concerned about the castings fracturing too
To add the arrows etc....
Are you using a windows based computer laptop? i will presume you are. The easiest way to add arrows is right click on the image you want to change, click "edit". this will then open the image up in "MS Paint", then click on the pencil button an do as you please. click save (save it somewhere easy to reach like your desktop) then upload to the site as normal
Update
Update
Cylinder is totally removed an freed from the bearings (which were stuck solid into the carriers)
Bearings will need replacing...!
So plan now is to shot blast the cylinder an anything else i can fit in the cabinet (its tiny) then the slow an arduous process of rebuilding the wee beasty
Thanks for the IT instruction
Thanks for the IT instruction , I'll give it a go on the W10 PC.

I discovered a little while
I discovered a little while ago that you can also do this on pictures stored on the etchasketch (Ipad) if you open the edit function.
hello all
hello all
can anyone tell me if its possible to buy/ make or whittle, the metal disk/ shim that goes between the cutting cylinder an the cylinder carrier.
Mine got chewed to buggery when i removed the cylinder (with a puller). I have new bearings but not the shim bits - if that makes sense?
thanks
Those steel dust excluders
Those steel dust excluders are still available from Jon Cruse at the Hailsham Mower Centre .
www.themowercentrehailsham.com
The original part number was L4380. then L04380. then F016L04380
Thanks Wristpin only just
Thanks Wristpin only just getting around to having another go at this.
I will contact Jon tomorrow, doesnt seem to be any answer at the moment, will all three of those part number be suitable for mine?
Also, im worried about the condition of my bottom blade, there doesnt seem to be much "lip" left an the sprung adjusters were wound all the way down, like someone had been trying to get the bottom blade closer to the cylinder - if that makes sense?


As bottom blades go that one
As bottom blades go that one doesn't look too worn but might be s bit thin when cleaned up. Let's have a pic of the cylinder blades - suspect that they maybe worn down by use and re- grinding.
Those part numbers have superseded one another over the years but the part has remained the same.
Dust covers ordered (x2).
Dust covers ordered (x2).
Blades off to be ground.
Sump gasket has arrived, so will do that tonight - if im not told i need to decorate the hallway.
Hopefully I might have a working mower by next week, if i can remember how it all went back together again
Hello all
Hello all
Cylinder an blade are back from being grind down, an look great. only problem i have now is that i have forgotten in which order the bearings & spacers are arranged on the cylinder!?

Bearing into carrier then the
Bearing into carrier then the steel seal with the inner raised flange against the inner race of the bearing so that the outer circumference of the seal is just clear of the bearing.
Cheers Wristpin, I think i
Cheers Wristpin, I think i have it worked out.
one thing that is worrying me is it looks like I have quite a big gap between the cylinder an bottom blade, i very much doubt if i will be cutting sheets of paper between them anyway, I guess this was why the springs were fully compressed when i removed the cylinder?
Does this point towards the bottom blade being past its best, as according to the guy who sharpened both blades the cylinder has "loads of meat left on it"
Are there any "gotchas" when reassembling the rest of the machine - the plan is to attack it tonight now
If the cylinder blades and
If the cylinder blades and the bottom blade cannot touch before the springs are coil bound something is worn . Can't remember, have we seen an end on image of the cylinder blades? If the cylinder blades are " down" you may be able to recover the situation with a new bottom blade but it will only be a temporary measure.
Edit. Just gone back to your image with the two yellow arrows and the cylinder certainly looks OK so the situation that you have seems strange. Perhaps you can assemble the cutter unit and photograph the relationship of the cylinder and bottom blade end on?
Hi, quick update started
Hi, quick update started rebuilding the old girl last night, got the cutter assembly back in, the grass "deflector" and the plate the engine sits on fitted.
Tried turning the cylinder to check how it looks now refitted in relation to the bottom blade - an hit a problem.
The cylinder seems to be binding/ tight spots when spun, as in it takes a bit of effort for it to spin, im hoping once the engine has spun the cylinder a little it will free off.....hopefully?
Bearings were packed with grease an were spanking new when fitted, new dust caps etc.I pressed the bearings into the carriers as they were a super mega tight fit - they were the correct size according to bearing supplier.
Also can confirm blades are sharp, my finger got trapped in cylinder whilst refitting cause it to "bite me" just behind the nail - lots of blood, lots of colourful language, but musnt grumble *whimpers*
How tight is tight? My
How tight is tight? My immediate reaction is that the tight cylinder needs to be sorted now rather than hoping that it will free up. I would drop the unit out of the chassis and double check everything , starting with checking the orientation of those steel seals; they may be binding against the outer races or even the carriers. Sometimes a smack on each bearing carrier with a plastic dead blow hammer or a block of wood will settle the bearings but take care.
Squeezing the bearings in between the jaws of the vice is fine but having to resort to a press is perhaps time for a pause for thought. Were the insides of the bearing carriers completely free from rust and paint etc? I usually clean up the inside faces with a fine grit flap wheel . Leaving the carriers on the Aga and the bearings in the freezer usually ensures that they slide in without stress or distortion.
Re the tight spots as you
Re the tight spots as you describe them try setting the cylinder parallel to the bottom blade but not actually touching it. If there is still drag in the bearings lightly tap the cylinder both to the left then the right, this should settle bearings centrally in their housings and hopefully allow the cylinder to spin freely.
I think most of us folk who work with cylinder mowers will have been 'nipped' at some time while setting up a freshly ground cylinder.
Its more of a bind, as in
Its more of a bind, as in takes a fair flick to get any movement in the cylinder an will only turn a quarter of a revolution?
I was under the impression the cylinder should just spin pretty effortlessly having new bearings etc.
I didnt clean the carriers any more than wiping them over - in hindsignt i would normaly run some scotchbrite over things like that, but in haste didnt.
This may sound like a stupid question but, when the bearings go into the carriers how far in do they sit? just worried that have been pushed passed where they should sit?
will investigate tonight
thanks chaps
The bearings should bottom in
The bearings should bottom in the carriers .
Sorry for the delay in
Sorry for the delay in updates (for those interested)
Cylinder is back in an now not binding - i dont know what was causing the bind, but removing an refitted has rectified it
Weirdly since refitting everything, the bottom blade an cylinder now come together like a pair of shears - good times
But, an old issue has reared its head again.....the pull start keeps jumping from its spring, leaving me with a long bit of cord dangling from the machine.
Im obviously refitting this incorrectly?!

Hi - this is all very
Hi - this is all very instructional :)
I'm just about to fit this...
..to my machine. I guess there must be something amiss within yours if it's not recoiling? Sorry I'm no help! Someone who knows what they're talking about will be along shortly :)

How about an image with the
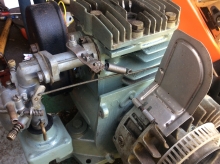
How about an image with the engine cowling removed to expose the relationship between the flywheel , the governor vane and linkage ?