Newbie Help Needed - Suffolk Punch 17"
Hi everyone!
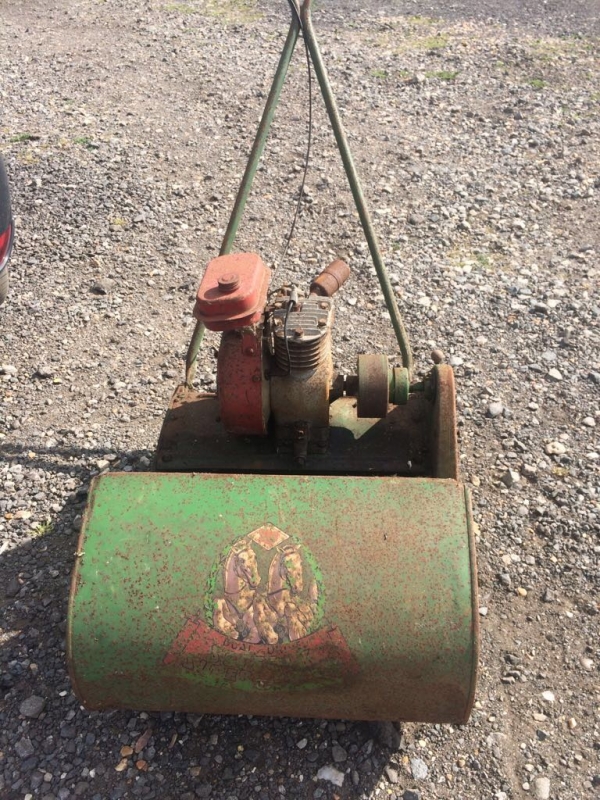
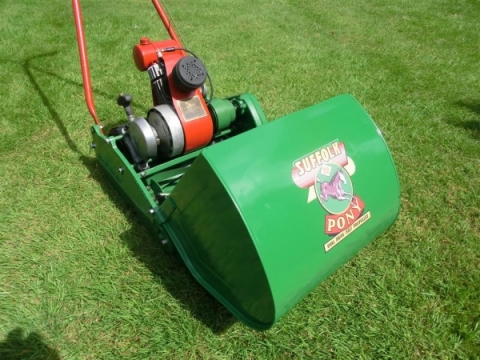
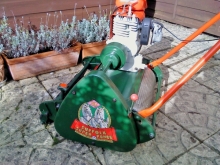
Life has conspired in a most wonderful way to make me the owner of this rather amazing machine. I know little about it, save for the fact that my Dad had a smaller version back in the day - but this is massive!
I could do with some help identifying the year if that's possible, it doesn't appear to have a serial No. anywhere. Certainly I'll need your expertise if I am ever to get it going, so thanks in advance for that. I live near Hailsham, so I can see myself bothering the parts shop there for a starter assembly as this is missing (I'm tempted to say 'for starters', but enough sillyness..) Any help much appreciated.
Apologies in advance if the photos don't show..

Forums


Well! That's certainly very
Well! That's certainly very helpful, thank you Mr WP. I'll try to get another photo and search for the serial No after work tomorrow evening.
Thanks again :)
Found the serial No. pointer
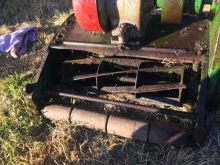
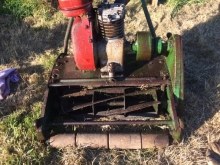
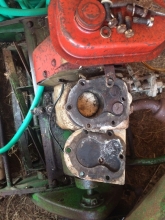
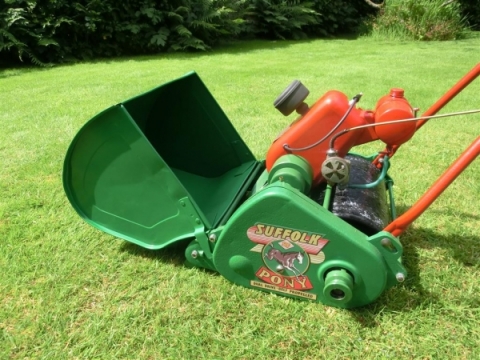
Found the serial No. pointer - if the serial No is on the top of the chassis it's completely rusted - any ideas? Attack it with wire brush? Also attached a photo with the grass box off as requested. Is that any help? Thanks again in advance :)
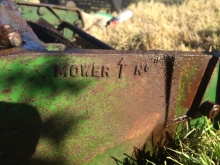
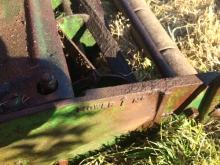
Just re-read your post WP, if it's embossed into the horizontal edge, maybe careful rust removal should uncover it..
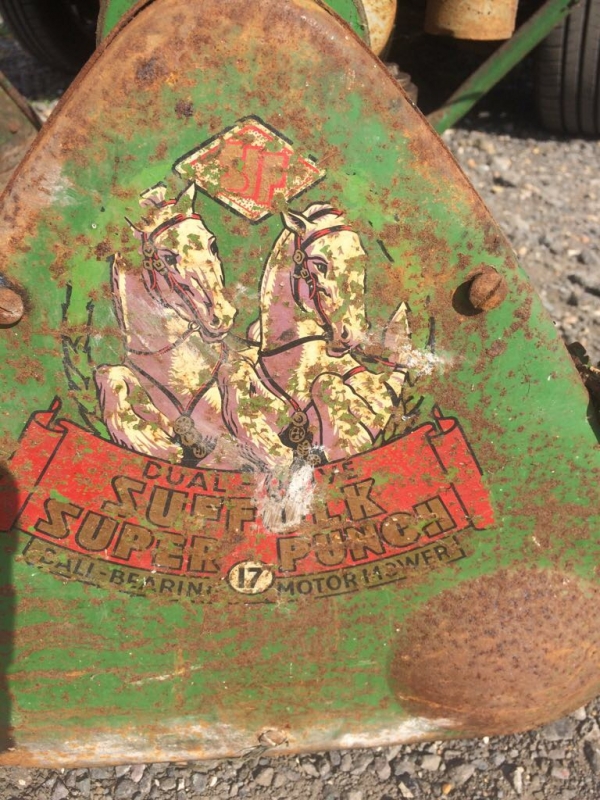
A series 1 Super Punch it is.
A series 1 Super Punch it is.
Marvellous! Thank you.
Marvellous! Thank you.
I wouldn't get too worried
I wouldn't get too worried about the lack of a serial number as I've never seen any Suffolk literature with a reference to serial numbers. Certainly, none of my parts books make reference to them.
Additional info that may be
Additional info that may be of use. Suggest that you print it off as I do occasionally purge my Dropbox links to stay within the free allocation.
https://www.dropbox.com/s/86qeclr61flb9u0/Suffolk%20Super%20Punch%2017%…
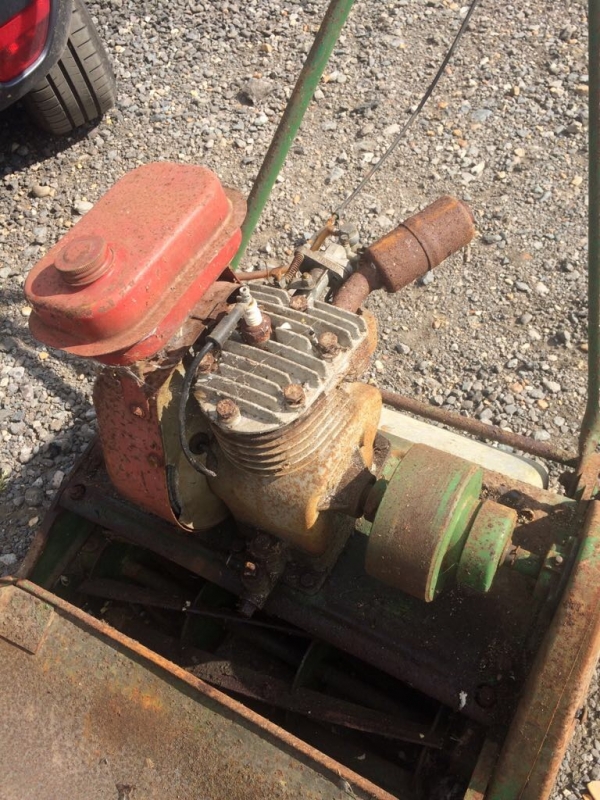
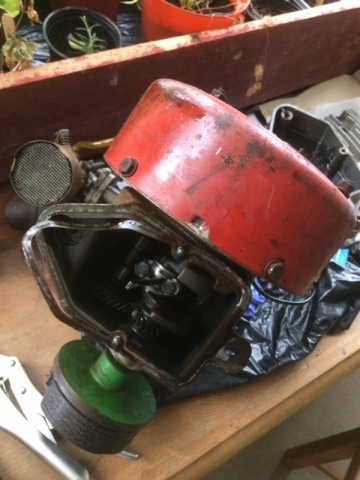
Yours would appear to be missing the air shroud around the cylinder fins . Not difficult to make and may be advisable if the machine is going to be used in anger!
Spot on! Thanks again. I'm
Spot on! Thanks again. I'm assuming the starter assembly isn't the recoil variety? - Maybe that's optional - judging by the handy file you sent the link for. I'm looking forward to doing some angry mowing!
Also, reading around the Forums... 6 bolts on the cylinder head indicates that this is a 75cc model? Is that correct?
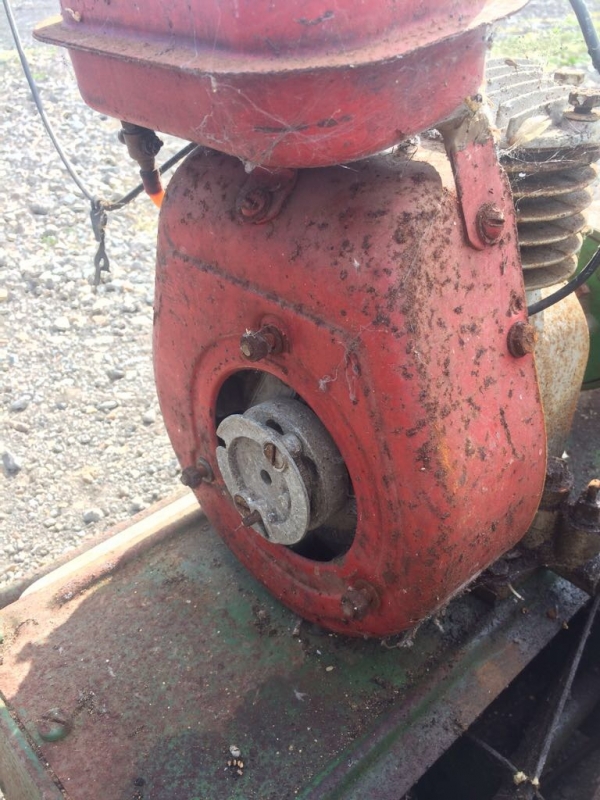
I think you are missing the
I think you are missing the recoil starter assembley Hence three nuts on red cover under fuel tank.
I was under the impression
I was under the impression that those early engines had a wrap round starter pulley but as has been said the studs are there for a recoil unit and part of the ratchet mechanism is in place on the flywheel - and then the back of the engine parts list shows it as an option!
Yes, it is a 75cc lump . The 98 cc didn't come along until a bit later. The engine ID plate would be on that missing shroud, may be time for ta delve into the depths of the shed?
Cool. I actually bought it in
Cool. I actually bought it in this state - impulsive fool that I am, so it's off to the shop tomorrow for a gasket set and a recoil starter assembly. Pity the shroud is missing, but £11.50 for this learning experience has definitely been worth it so far :)
The only recoil starter that
The only recoil starter that you can buy new is the later horrible plastic affair that will need a starter cup as well . Far better both mechanically and ascetically will be a used alloy bodied one . I notice that it looks as though the head bolts are loose so before you buy anything take the head off and have a look - just in case the previous owner took one look and said "get shot" .
Good point. I'll do that in
Good point. I'll do that in the morning. Any pointers as to what I'm looking for apart from a big bag of rust?
Check the sump for oil - even
Check the sump for oil - even if its thick and black .
Look for scrapes or scores in the cylinder wall and a large amount of carbon build up in the cylinder head and on the piston crown. That said, those engines are fairly "bullet proof" and will keep going while smoking like a "goodun".
It's quite probable that there wont be a spark from the plug lead but that's another job and should be reasonably easy to fix..
Shall do! Will report back.
Shall do! Will report back.
OK, so took off the cylinder
OK, so took off the cylinder head - looks a bit gunky but no worse than I expected really. Valve on the right is rusted. I can't see any major scores on the cylinder wall and the piston moves freely when the crankshaft is rotated. Hope to check sump oil tomorrow :)

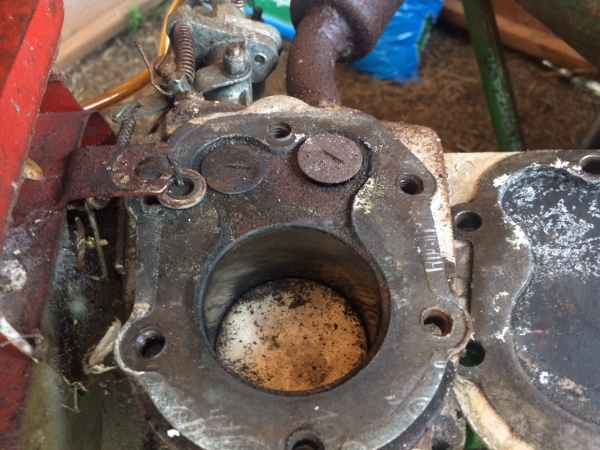
Looks about as would be
Looks about as would be expected . Are the valves going up and down as you rotate the engine or is that exhaust valve stuck open. Not too much of a problem to deal with but now is the time to apply plenty of Plus Gas or whatever your favourite releasing fluid is. Diesel or heating oil is quite useful.
Drop the sump off and check that the big end bolts are not loose ( a sign of previous problems ) and that the dipper / splasher is in place. Then give the sump a thorough clean out. Including up the passage to the horizontal drain plug. Then a new gasket and fresh SAE 30 up to the level of the vertical plug - no dip stick on those early blocks.
Is the exhaust valve the one
Is the exhaust valve the one on the right (in the pic)? It's certainly very stiff whereas the one on the left rotates freely - whether it goes up and down as the crankshaft revolves is another matter.
WD40 any good? Shall do, I have a greenhouse to glaze tomorrow, then I'm getting on with this. Thank you so much for your detailed help.
Yes, the one on the right in
Yes, the one on the right in line with the muffler. WD was originally formulated as a Water Dispersant for drying out electrics but is now promoted as a "cure-all", but better than nothing. Plus Gas dismantling fluid is a proper penetrating oil as was Holt's Graphited Penetrating Oil but that seems to have disappeared from the shelves .
If you've never done a top end / valve job on a small i/c engine before, now is an ideal time but perhaps one thing at a time.

Afternoon Bay leaf. If and
Afternoon Bay leaf.
If and when you get round to a paint job you will be able to buy new decals for your machine on ebay. 2 different sizes required. The larger one is for the grass box. I have just received mine for my Suffolk Super Punch Professional, later model than yours though.The decals are printed by a chap in Australia. I've had quite a few off him and would highly recommend him.
I second that re the
I second that re the Australian decals , good quality, fair price and quick service. Just done my Suffolk Pony with them.
Good luck with your project.
Good luck with your project.
Please don't make the mistake I did of breaking the cylinder adjustment screws (part 32 in Angus' diagram) as they are fixed into the bottom soleplate (part 39) and don't unscrew.
I agree the transfers look good. My Suffolk Super Punch Dual Drive is not quite as old as yours.
Al
Bloody nice job wristpin.
Bloody nice job wristpin. Well done. looks great. Once I get to grips with this forum and how to get photos on I'll get some uploaded. Currently me Suffolk Super Punch Professional is fully stripped. Rear roller, grass box and cylinder blade are with my local powder coating company. The rest Im just spraying. New bushes and bearings throughout. Engine seems to be running great so Im thinking leave the engine well alone?? It had an oil flush out twice and oil change. What do you suggest I do with the engine?
Thank you.
Once I get to grips with this
Once I get to grips with this forum and how to get photos on I'll get some uploaded.
There are a few steps involved. All explained here: http://www.oldlawnmowerclub.co.uk/forum/adding-images
Please don't make the mistake
Please don't make the mistake I did of breaking the cylinder adjustment screws (part 32 in Angus' diagram) as they are fixed into the bottom soleplate (part 39) and don't unscrew.
Just to enlarge on that scenario - they are fixed with a tiny cross drilled pin which is probably invisible until you clean up the vertictal side face of the sole plate. Drive out that pin and, rust ,corrosion and age excepted, they are a push fit. Back in the day they were actually available as a spare part but it's interesting that in the scan that I posted neither they** nor the roll pins are given a part number. That said, there is generally no need to remove them* as the cylinder bearing carriers lift out over them once their pivot/shoulder bolts have been removed - and they can be a pig and require patience and care due to the fragile nature of the cast iron soleplate.
* I find their presence a pain when it comes to refacing an existing bottom blade or giving a quick skim to a new one as due to the construction of my refacing machine it is a bit of a balancing act mounting the assembly firmly. Other makes / types of machine may not have this issue.
** A later parts list shows L03653 for the rod but ignores the pin.
Thanks guys. I'm unsure as to
Thanks guys. I'm unsure as to whether or not I'm going to do a full restore on this machine - I sort of like the antiquated look. I might buy another to do a full restore - this learning curve has been steep enough already! Thus far the engine has only made it to the dining room table..

- In my defence, I've been battening the hatches around the greenhouse due to the recent strong winds. So, set to go now, time to blow the cobwebs off and see what's occurring with that exhaust valve.
I've got a couple of machines
I've got a couple of machines that had enough original paint on them to leave them as is. The oily rag treatment works well to preserve the patina or I also use Owatrol for more durable protection .
This 1960s cultivator has entirely original paint with a light coat of Owatrol protecting the fuel tank and engine cowl from further deterioration.

regarding my suffolk punch
regarding my suffolk punch engine. it starts and runs great. would you suggest leave well alone? im thinking of paint job only.
thanks
Change the oil, service the
Change the oil, service the air filter and enjoy it!
Gaaah... What size spark plug
Gaaah... What size spark plug wrench do I need? Neither of the two that I have fit this one. Plus the connector on the HT lead fractured when I removed it - can I solder it ok or is it best to source a new one? - Given that I haven't looked at the bottom end yet maybe I'm getting ahead of myself :-/
Well, it depends on what size
Well, it depends on what size plug you have! Sorry, but not so silly as it sounds as as it is quite possible to have a plug with the same thread diameter, reach and heat range but with different size hexagons for the spanner. The thread size for your machine is 14mm and the correct reach 3/8". No apologies for mix of dimensions - that's how plugs are.
The standard plug for your engine is likely to have been a Champion J8 or Lodge C.A.N (NGK B6S) and the socket of the day would have been marked 1/2BS 7/16W which is 13/16" or roughly 20.5mm. But if someone has used a miniature plug of the same "value" plug would be a 19mm Champion CJ8 (NGK BM6A)
Whatever you do, don't attack your plug with a cranked ring spanner and break off a cooling fin or two. A boot fair could be a good source of a suitable plug socket or tube spanner.
Spot on as ever WP! Managed
Spot on as ever WP! Managed to remove said spark plug with a 21mm wrench. This may have involved a hammer and some colourful language, but that's not unusual I'm sure.
Both valves moving as intended when crankshaft revolves now, so things may be looking up! Sump oil was black and yucky as expected, so the next job is to remove the sump casting. True to form this doesn't want to budge either - is there a slightly more subtle means of encouraging it other than the hammer? Or should I invest in a soft mallet?
Good idea re the soft mallet.
Good idea re the soft mallet. Some have interchangeable faces such as copper, hide and nylon. Others are " dead blow" basically a rubber or plastic casing with loose shot inside. Thor is a good brand but maybe a bit ott for a casual user. The old adage of buying the best tools that you can afford , sometimes requires tempering with expected usage or cost per smite. Perhaps a hammer via a bit of soft wood will suffice.
Back to the Suffolk sump, hex head screw / bolt ( not the time to get too pedantic about terminology) back and front and two hidden dowel pins about mid way along , so the sump has to be tapped downwards - no tapping it sideways to break the " stiction" !
Ah! You are a mine of useful
Ah! You are a mine of useful information! Are those the pins that our friend and colleague Arnk was speaking of? Bit of wood and a downwards tap with old faithful then! Sparkplug and various other bits arriving this weekend - including the starter assembly - a metal one :) This could get interesting.
No, those pins / rods are the
No, those pins / rods are the ones at each end of the cutting cylinder with nuts on that move the cylinder down onto the bottom blade.
Ta-Da! (You must all forgive
Ta-Da! (You must all forgive me for getting so excited about this - I haven't taken an engine apart since I was about 17. And that was a considerable number of years ago!)
Thanks for the top tips - a few taps with the wooden end of the hammer in the appropriate direction did the trick :)
Developments..
Developments..
Bottom end sorted out hopefully, still polishing all the carbonated gunk off the cylinder head, but another issue has raised it's head. This may be why I guess the previous owner abandoned his restoration (I guess, I have no info to go on regarding this)
Crank shaft spins ok generally, but when starter assembly was attached it stopped and wouldn't go anywhere. So I faffed around, reattached starter assembly and it was spinning nicely until it stopped again last night. Does this make sense? I can try posting a video perhaps - or does it ( I fear) indicate a deeper problem? Any help. as usual, much appreciated.
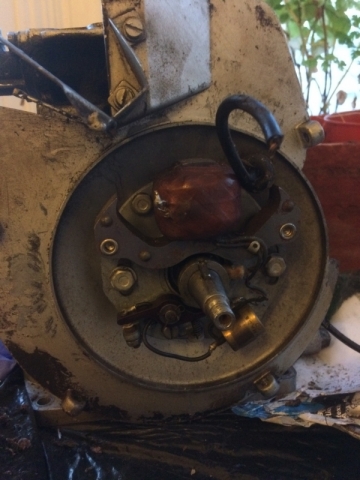
If the flywheel turns easily
If the flywheel turns easily without the starter fitted, but starts to stick when the starter is fitted, I would peer very suspiciously at the starter and the pawl assembly screwed to the flywheel. Is the pawl sticking or fouling the starter, is the center screw in the starter coming loose, is the starter built correctly.
It could be that the starter
It could be that the starter pulley is pressing onto the ratchet mechanism on the flywheel . Try jet slackening the three nuts holding the starter on - only a turn or two and see if that eases the problem. If it does you can either put a washer under each starter leg to space it out or slacken the four hex screws holding the engine cowl plus the two nuts on the extended head studs and see if there's a bit of slack to allow it to be pulled away from the flywheel.
https://youtu.be/7rkGx8IxNno
See if this works. Taken the starter assembly off and it's still sticking in one direction. Is there something obvious I'm missing? Seems a bit intermittent - at some point it will free itself and rotate clockwise when spun. I'm obviously clueless. Sorry about crap focus, but I think you get the idea. Thanks for any help.
Take the engine cowl off and
Take the engine cowl off and check for obstructions . Could even be something within the flywheel magneto.
I feared you might say that!
I feared you might say that! Engine cowl off this morning - no sign of any obvious issues, so I'll delve deeper and report back. Thanks as usual :)
So with no starter and no
So with no starter and no cowling the flywheel rotates for a full 360 in both directions ? ..... and if I understand your earlier posts correctly it did so with the cowling in place but with no starter ?
Hey WP.. Well it did, then it
Hey WP.. Well it did, then it didn't, then it even turned clockwise when I had the starter assembly on, but I wasn't really paying attention tbh as I was worrying about cylinder heads etc. Now it won't even do a half turn clockwise but will spin freely anti clockwise. That's with it currently stripped down to the magneto which I haven't removed yet.
[Edit] - so now I've undone the reverse thread screw holding the magneto and whacked it a few times with a piece of wood to try and loosen it (to no avail) I find that it spins clockwise again no problem. 360 degrees both directions. This makes no sense other than it's something behind the magneto? It was stopping with a proper mechanical clunk previously. But then why would it spin anti-clockwise with impunity and refuse even to go 180 degrees clockwise. Unless it's just because it's from Stowmarket and has some sort of issue. IDK
How about a stray washer or
How about a stray washer or some such stuck to one of the magnets within the flywheel and catching on the stator pole pieces?
Ideally you will remove the flywheel using a puller which can be as simple as a bit of steel plate with a couple of holes drilled in it. The flywheel has a couple of threaded holes to accept two UNC threaded bolts. Protect the end of left hand threaded crankshaft by undoing the nut far enough to cover the end.
So.. Flywheel off and no sign
So.. Flywheel off and no sign of any interfering bits.. But rather interestingly, I find the HT lead isn't attached to anything within, so it's just as well I did.
Zen and the Art of Lawnmower Maintenance...
So was the wayward HT lead
So was the wayward HT lead the culprit? Does the crank rotate freely without the flywheel?
So far so good! I can't
So far so good! Spinning like a dream.. I can't imagine how that would have stopped it, but hopefully so. My next question is - where should it attach to? Can I solder it? There's a silvery looking bit that looks like it's been done previously.
Just out of interest - I used the internal bit of the starter assembly as a flywheel puller - stuck a bolt and nut through the crankshaft hole then tightened the screws either side incrementally to eventually pop the flywheel off. Thanks for the tip!
Well, you got away with the
Well, you got away with the improvised puller but bear in mind that it is made of old soft alloy and it could have ended in disaster .
The end of that HT lead was quite capable of producing the strange incidents of jamming so once that is back attached to the coil all should be well but it does occur to me that the reason for it being detached just might be that the previous owner had abandoned an attempt to track down an ignition issue.
Ah! I'll not try that again
Ah! I'll not try that again then - luckily I had a spare in any case :)
Well, I guess I'll find out about the ignition when I get round to turning it over. Fingers crossed!
Thanks for your help - I really appreciate it.
It is most likely to be a
It is most likely to be a Super Punch 17" Series 1 made between 1956 and 1959. To be certain we need an image without the grass box in place.
It is possible that the words " Serial Number" with an arrow are cast into the upper vertical edge of the right hand chassis casting and the the number itself is imprinted into the horizontal edge .