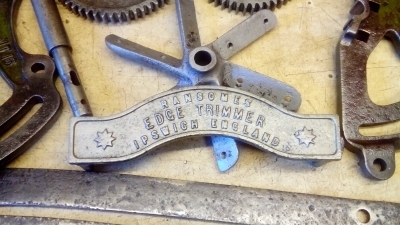
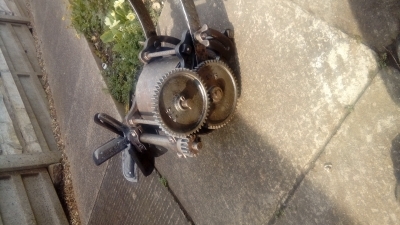
Ransomes Lawn Edger
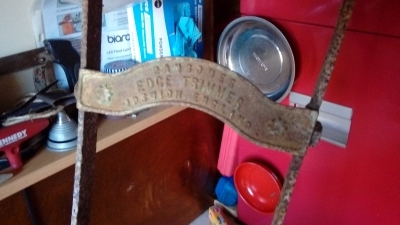
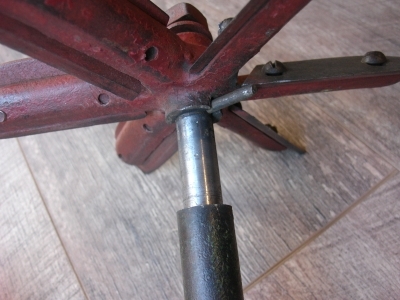
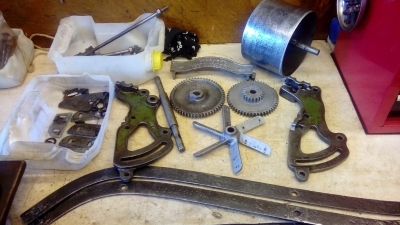
I have decided that this old Ransomes Lawn Edger has been been in the waiting pile for long enough and yes it was this rusty when I bought it at a local sale many years ago. I apologise for it appearing upside down but the loading procedure here has inverted it during the loading process and does not seem to want to allow me to rotate the image, perhaps someone at mission control could rectify it for me?
As you can see the decision about re painting or preserving the original finish has been made for me as there is nothing much remaining of the original paint, I think getting it apart is going to be a challenge as every part is rusted solid, it should keep me quiet and out of this cold wind for a few hours.
Forums
Once the image is on this
Once the image is on this site I don't think there is rotate facility (OLMCadmin will no doubt let us know if there is), Therefore perhaps re-load, possibly starting off in the inverted position!
I did consider a head stand on the sofa to view it, but resisted due just having had a large bowl of porridge, resorted to turning laptop upside down so no problem.
Good luck with the restoration, look forward to see the finished item.

Image sorted, plus added the
Image sorted, plus added the others that Hillsider had previously uploaded but not added to page.
Image rotation is difficult to provide on the site without added complexity. All images have hidden data - usually created by the camera used to create the original - that is used for orientation when displaying the image on devices and websites etc. What looks right on one device can often look different on a website because both might assume different default starting points. Different cameras produce subtly different data which makes it difficult to provide a "one for all" solution on a website like ours where images can come from a number of sources in a variety of formats.

OLC Admin - thank you for
OLC Admin - thank you for dealing with the inverted image issue and adding the two extras for me.
Clive - yes I would think turning the iPad would be preferable to turning you upside down. It is my intention to post images as the project progresses.
HD Trust - yes an Oxy Propane torch would have been very useful, at work we used to fit pepper pot nozzles to get things really hot, but my trusty Rothenberger MAPP Gas torch fitted with the optional pointed flame nozzle gets most things that I deal with now hot enough to let go.
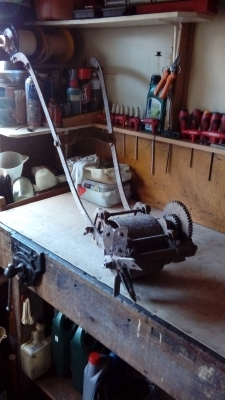
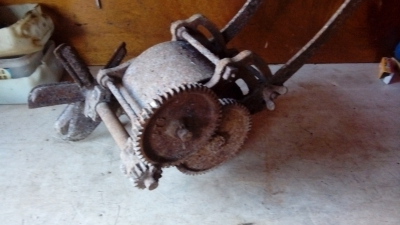
Most of the dismantling is now done but does any one know if the Star wheel that carries the blades is screwed onto the shaft or keyed on? ( a parts list would help if anyone has one ) So far it refuses to move but the threaded end to the shaft has sheared off so removal of the cutters would be helpful to get the shaft in a lathe for drilling and tapping to take a stud. Also I have found one of the cutter blades has broken due to the pressure of rust build up between the blade and the star wheel, hopefully the blade can be welded enough to hold it together.
Afternoon, found one of mine
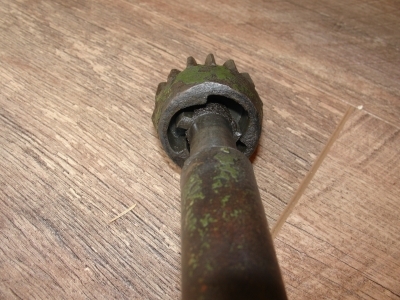
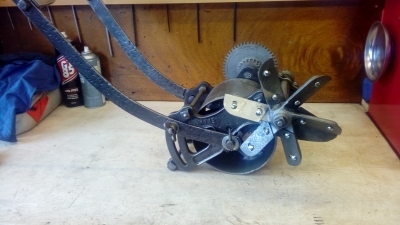
Afternoon, found one of mine in an accessible position for a change, appears the blade holder is push fit on the shaft & held in place by a pin, see images below, I am assuming this did not change over the years? Also an image of the other end of the shaft so you can see whats going on there.
If there was a parts list made available I have not seen one which is surprising as this style of edger was produced for around 40 years with only minor modifications. Not yet seen one of the earlier chain drive models that I believe came between the early conical roller type and the model we are dealing with.
Thank you for posting the
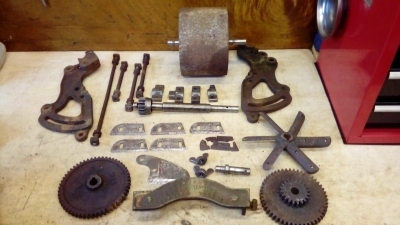
Thank you for posting the photos of your machine, if only mine was as rust free. I have now fully dismantled the one I am restoring so will soon be sorting through the parts and removing all of the years of rust deposits.
One job that I shall be considering is what to do about one of the cutting blades that has fragmented, I am hoping that it can be welded or brazed back together again good enough to be a display machine. Unless of course anyone knows of a supply of spare blades? There is also a shopping list of replacement bolts and screws to be sourced.

A good application for the
A good application for the electrolytic rust removal process ?
Yes electrolysis would work
Yes electrolysis would work and generate less dust than the wire wheel and flap wheel did today. I have followed your examples especially fuel tanks as you have posted them but have never taken the initiative to set up a system for myself. An alternative might be the commercially available rust removers, does anyone have any experience of using one?
I have had good results with
I have had good results with an oxalic acid bath .I also have used VACTAN and found this to be good also.
Bult Hamber products have a
Bult Hamber products have a good reputation with the machinery restoration fraternity. I have not come across Vactan which appears to be similar to Kurust but it seems to have a good reputation, particularly with the boating fraternity.
I have used Owatrol to good effect. It doesn’t attempt to remove or convert rust but seals it off from moisture and oxygen - the “ ingredients” of rusting.
Vactan has a primer/sealer
Vactan has a primer/sealer chemical.It stops rust re forming.you can use filler on top of it.Kurust treated metal will re rust and cannot use filler on top.Vactan is great to seal cast iron bits and tinware before painting.
I've used hydrochloric a lot,
I've used hydrochloric a lot, very effective diluted with hot water, gets into difficult areas and strips rust. It does need neutralising and painting over fairly quickly as will flash rust otherwise. Bit of a personal choice rust removal..
Shame about that blade, there plenty of laser cutting services out there that could replicate one fairly cheaply which you could then sharpen
Yes I agree its a personal
Yes I agree its a personal choice how to treat rust .
No further progress made
No further progress made today but thank you all for your suggestions, all good food for thought.
Vactan has a primer/sealer
Vactan has a primer/sealer chemical.It stops rust re forming.you can use filler on top of it.Kurust treated metal will re rust and cannot use filler on top.Vactan is great to seal cast iron bits and tinware before painting.
Interesting to see that Vactan appears to be a generic product rather than a stand-alone brand. A bit of "Googling" shows it to be marketed by at least three companies and appears to be based on an original ICI development using tannic acid.
Paco Systems, Performance Chemicals and Rustbusters.
Some progress has been made
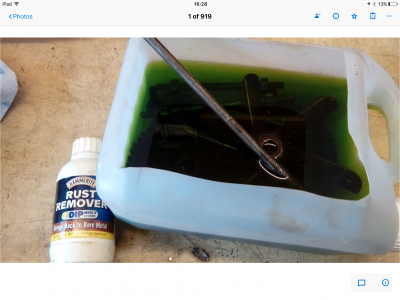
Some progress has been made today as the clean up has begun, I found a bottle of rust remover that I had forgotten that I had so I though why not give it a try certainly for the smaller parts, the larger parts are still destined for Vapour blasting.
The threaded holes in the side castings and the blade wheel have been run through with a tap to clean out the threads. During this operation I discovered a fragment of what I believe to be the original paint, I am thinking that this is not the current Ransomes green but the older version as mentioned in the Mower colours section of this website.
Work is continuing on the
Work is continuing on the lawn edger albeit slowly, cleaning up and removing as much of the deep seated rust as I can without destroying the components. The rust remover that I have used is working slowly and whatever is left behind will get a good wire brushing using a cup brush on the angle grinder followed by a good coat of rust beater paint and all should be well. Many surfaces are left deeply pitted but I do not intend using filler as I feel that the pitting is all part of the machines history.
The experiment using vapour blasting met with mixed results, smaller items that I had already partly cleaned brighten up well but the handle bars did not fit into the cabinet very well and were best dealt with using a flap wheel and by dipping the ends into the container of de rusting solution. Evidently the vapor blast process works best on non ferrous metals and certainly I have seen good results from it on alloy crank cases etc.
Most of the parts cleaning is
Most of the Lawn Edger parts cleaning is now completed as shown in the photos below, leaving the following before commencing painting:-
Repair to the cutter blade shaft - install a stud to replace sheared thread.
Cut down and rethread 2 new bolts for the handles.
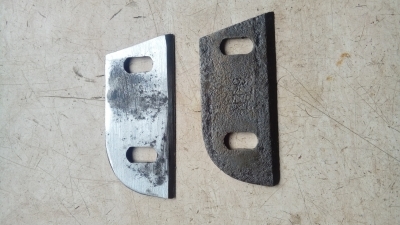
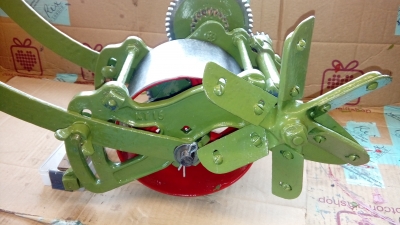
The blade to the left of the photo was made from a scrap rotary mower blade to replace the blade that was broken into several pieces by the pressure of rust forming between the blade and it's carrier. My plan to braze it failed so I reverted to plan B.
Thank you for the compliment,
Thank you for the compliment, there are a couple more of the blades that have cracks in them but in the spirit of originality and given that the machine will not be working for its keep I have decided to leave those on the machine.
Considering the poor
Considering the poor condition of this edger before starting work on it I thought it might a good idea to do a trial build before painting to give me the opportunity to sort out any problems. I am pleased that I did as there were a few issues over the fit of parts and the free running of bearings, all sorted now and here is the results.
It has been a while in the
It has been a while in the coming but I have finally managed to complete the restoration of my Ransomes Lawn Edger it has transformed from a solid lump of rust to a machine that would work if I had chosen to set the blades closer.
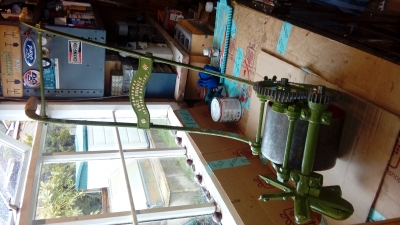
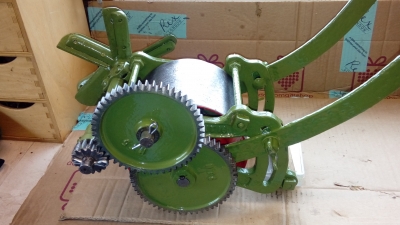
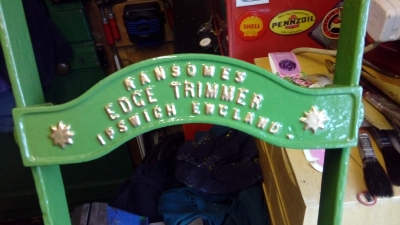
The whole job is finished off rather nicely by the new handles, many thanks to fellow OLC member Wristpin as he honed his wood turning skills.
Apologies for the orientation of the first photo it was alright when it left me!
That has come out looking
That has come out looking really great Hillsider, hats off!
Any tips on the lettering? or was that just a very steady hand?
Thank you Chris, The
Thank you Chris, The lettering was mostly a combination of a steady hand and a small paintbrush.
I applied a couple of coats of Humbrol Gold on the letters and there was a certain degree of making good some over generous application in some areas with a small brush and green paint to straighten lines alongside the raised letters.
Hi Hillsider, I recently did
Hi Hillsider, I recently did some lettering on a big Record vice with silver guilding leaf, it came out ok as the lettering was about 3/4". Got the idea from another site.
Quite durable if finished over with clear varnish or spray, I have another to do with much smaller lettering and not sure it will be able to cope with the detail - its just another option. An option you clearly don't need :-)
A nice job for an oxy-propane
A nice job for an oxy-propane torch and it will keep you warm as well!