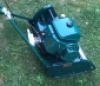
Atco De Luxe B14
Hello all. Just wanted to introduce myself and my mower. I'm based in SE Derbyshire and grew up with a range of petrol mowers that my Dad collected (picture attached -- old image, poor colours, grass never that yellow!). I wasn't really interested at the time and they're all gone now but now I have a large lawn of my own to maintain and a lack of vintage petrol engines to fettle with, I acquired (what I believe is) an Atco De Luxe B14. I've posted a second picture of this. I also have an Admiral 16SE rotary which is okay.
The B14 seems to have been looked after... it's had a new fuel tap, a new air filter, the petrol tank is clean and rust free and the drive chain seems to be well-oiled. It runs nicely and the clutch is nice and smooth. My only job at the moment is to sort the rather poor cutting ability as the cylinder and bottom blade seem blunt. I've tested cutting a piece of paper and it only bends it. Adjusting the seating of the cylinder does obviously close the gap between bottom blade and cylinder, but this still isn't enough to produce a decent cut.
I have bought a sharpening kit which involves a clip on strip and length of 80 grit sandpaper which I hope will be enough. Not got around to assessing its use yet, but it seems fairly straightforward. After this, long term plan is regular maintenance and an eventual repsray and restoration of the motifs.
Site looks great -- learnt lots already. Another generation interested in the preservation of grass cutting machinery.


Forums

Thanks for the welcome. With
Thanks for the welcome. With the bottom being a continuous flat blade I'm a lot more confident sharpening that -- the cylinder though (as you'll know) is much more complex and can't be sharpened as easily. I see your point though and I'll see what results I get when I use it tomorrow.
Drive chains look a bit dry -- do you have any recommendations on any particular type of grease to use? I have copper grease but I think this might be damaging to the chain.
Hello, welcome.
Hello, welcome.
I have toyed with the idea of dressing / sharpening the edges of cylinders and bottom blades also, having recently started sharpening axes and knives I know there is a bit more to it in terms of angles, technique and kit. But would be interested to read how you get on with the clip on job - had thought of a try a while back but seems a bit of a gimmick and per Wristpin's comments..
I've had 17" & 20" cylinders and bottom blades properly sharpened outrageously cheaply including paint (£20) I don't think that will happen again but gives you an idea of the minimum for a decent grind and angle.
Regarding the chains, clean them up with rags as best as possible in situ if you're not going to take them off, take off the grease and "oil" them up, don't use grease.
Its not the exact same model but this will help a lot I think -> https://www.oldlawnmowerclub.co.uk/sites/default/files/opmanual/Atco%20Commodore%20B14-B17-B20.pdf
As per @chris G, oil, not
As per @chris G, oil, not grease. If you have some chainsaw chain oil it has an anti-fling additive as does dedicated transmission chain oil. Copper “ grease” is more of a anti seize / corrosion medium than for lubrication.
Thank you both for the
Thank you both for the replies -- much appreciated. I'll let you know how I get on with it. To be honest I'm not sure what to expect but it probably is a bit expensive for what it is (as in essence it's just a strip of sandpaper held on a length of metal!). What swung the decision was its ability to only sharpen the front of the blade as it turns and not 'round them off' as manually sharpening them may do.
£20 is a superb price for sharpening and re-aptining -- that's nearly what I paid for the the sharpener!
As for the drive chains, they are definitely covered in grease so I will remove and use oil as per @wristpin's suggestion. The neighbur has a chainsaw and I believe a bottle of oil specifially for it. I wouldn't have thought to use this so thank you. Will have a look through the manual too it looks largely similar merchanically to my machine despite the age gap. Will be usualy for setting up the carb which is a little rough on acceleration.
That is a problem to begin
That is a problem to begin with, you do not want to take metal from the front of the blade. When you grind a cylinder, you spin it backwards, which removes metal from the rear of each blade, you continue grinding until the cylinder is true and parallel. Your 'toy' cannot do this, do not use it, it will make things worse. I speak as someone who has had to grind out cylinders 'sharpened' with these things.
There is also the problem of the bottom blade, if the cylinder requires sharpening, then the bottom blade will as well. You can have the sharpest cylinder in the world, but it will not cut grass if the bottom blade is blunt.
Understand your point and
Understand your point and position given your work @hortimech, even if it is a little condescending calling it "a toy"!
When the sharpener is used, it is advised that the cylinder is spun backwards which would (in my mind at least) remove metal from the rear of each blade as you say, would it not? I am asking purely because I'm trying to understand why it may not work.
I've already addressed sharpening the bottom blade in a previous post of mine.
It is a toy, especially when
It is a toy, especially when you consider that a new cylinder grinder is going to be in excess of £20,000
These things were sold to the gullible who didn't know better and yes, you could spin the cylinder backwards, but you still wouldn't get the correct relief on the blades. From my experience of putting right what these things do, you are more likely to reduce the life of your cylinder than get a sharp, correct edge on the blades.
My advice would be to leave it on a shelf and forget it.
Totally appreciate your point
Totally appreciate your point and I always respect an opinion based on experience. I'm not one to make rushed decisions because of something that was on Amazon, hoping it will just work for £15. I made the decision to buy it based on an assessment on what it would do if used with care (videos, reviews) -- it was a conscious decision and not the "gullible" purchase of a "toy" as you suggest.
I used it after work yesterday. Process was to raise the cylinder to accommodate the sharpening strip, then lower it until it just touches the strip evenly across the span of the cylinder. I ran the cylinder backwards with a modified drill bit at about 100-150rpm and the edges of the blades are now sharp. I then coated with oil to protect form moisture. The sanding of the blades was very light and removed very little of the metal. I was very concious not to rush ahead with it.
Next step is to sharpen the bottom blade and re-seat the cylinder properly making appropriate adjustments. After last night's work, it manages to cut paper on every pass (improvement on before) but it was more of a 'clean tear' than a 'clean line'.
Update -- the mower is still
Update -- the mower is still cutting well, nice and sharply.
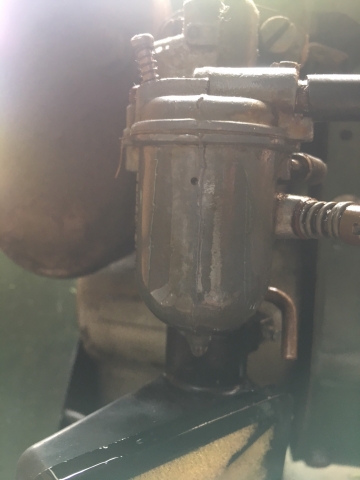
The carb has unfortunately developed a leak when running, so that fuel is dripping at a fairly fast rate onto the lawn. There's no trouble starting the mower and it accelerates smoothly and easily, but there must be as much fuel being squirted into the venturi as there is being leaked to the outside.
I have the Zenith TCA-2. I'm presuming it's the gasket seen near the top? The only other gasket I can see is the one at the manifold which is not leaking. Also, in picture 1 is the gold-coloured lever the choke?
Carb flooding.
Carb flooding.
More likely running out of the overflow hole visible in your image about 1/4” down from the gasket joint between the carb body and the float bowl. The correct fuel level is just below that hole and is controlled by the combined action of the float, needle and seat.
Check for a leaking float by giving it a good shake while listening for any fuel sloshing around inside. Then immerse it in recently boiled water and watch for any bubbles as the air expands within. Examine the top pointed end of the needle for damage - tip bent or grooved . Examine the needle seat for corrosion etc. If there is no obvious physical damage between the needle and seat , apply a bit of metal polish ( Brasso, Solvol-Autosol etc) and give the needle a “ twizzle” in its seat. Then wipe off all traces of polish
Then reassemble and turn on the fuel and watch for any sign of fuel from that hole. If the above fails to cure the issue , you may have to renew the combined float and needle and fit a new screw in seat to the carb body.

In addition to Wristpins wise
In addition to Wristpins wise words I found out the hard way that it is possible to fit the float bowl and have the needle valve not enter into the needle seating so flooding results!
Welcome to the club and forum
Welcome to the club and forum. Not sure about those clip on sharpening kits. At the best it will just touch up the cylinder but that still leaves the bottom blade; as another forum contributor says “ you wouldn’t just sharpen one blade of a pair of scissors , would you”?