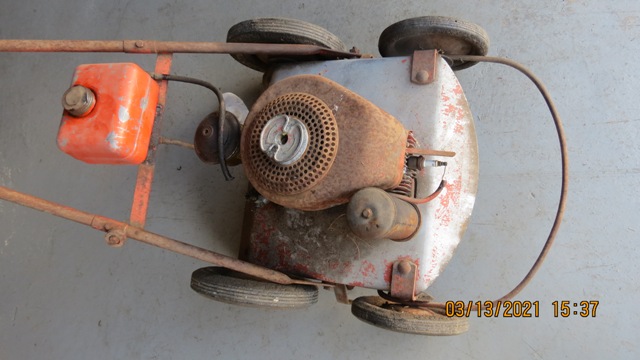
Old Jacobsen mower
I acquired an old Jacobsen lawn mower.
Engine Model # j-100-v Engine S/N 12398
This number is on the deck 18-9857
I cannot find any info on this machine. Any info would be greatly appreciated.
Forums
Thank you very much for your
Thank you very much for your reply. Now I know an approx. time frame. I am going to try to get it running. I have found a few pictures of similar mowers & the pulley was held on with a nut. It is not getting spark & I do not know if the starter pulley is threaded on. I don't want to twist too hard on it for fear of breaking the pulley.

Looks as though it might be a
Looks as though it might be a two-stroke engine. If you can post a couple of good images of the engine, perhaps with the top cowling removed , we may be able to identify the manufacturer and offer some advice re dismantling.
The starter pulley needs to
The starter pulley needs to be removed before I can remove the cover. I think the pulley is threaded on but am not sure. For fear of breaking the pulley, I do not want to twist on the pulley too much until I know it is threaded.
Jacobsen made their own
Jacobsen made their own engines, never worked on any fitted to a rotary mower, but they fitted them to a 22" greensmower and I have worked on one of those, but it was a long time ago.
I have looked everywhere on
I have looked everywhere on the web but cannot find much info. I assume it is a 2 stroke engine. The tag on the engine identification was j-100-v. Was the greensmower a 2 stroke?
I assume it is a 2 stroke
I assume it is a 2 stroke engine. The tag on the engine identification was j-100-v. Was the greensmower a 2 stroke
If there’s no oil fill plug or dip stick, you are fairly safe in that assumption.
Most small engines turn clockwise at the flywheel end so if the rope pulley is screwed on it’s reasonable to assume that it’s a right hand thread to tighten it and anti clockwise to undo it.
No plug or dipstick. That is
No plug or dipstick. That is why I thought it was a 2 stroke. The arrows on top of the pulley are pointing in a clockwise position. Are you saying I should turn the pulley in a clockwise direction to loosen?
It is a 2 stroke, a Jacobsen
It is a 2 stroke, a Jacobsen 2 stroke. Are you sure there isn't a nut down that hole in the starter pulley. Later versions had a recoil starter and the starter cup was retained by a nut. the nearest manual I could find was here:
https://www.mylawnmowerforum.com/threads/jacobsen-engine-service-manual…
But they are for slightly later versions
I feel you may get better help your side of the pond.
Er Um !
Er Um !
What I said
"Most small engines turn clockwise at the flywheel end so if the rope pulley is screwed on it’s reasonable to assume that it’s a right hand thread to tighten it and anti clockwise to undo it.
However, I think that Hortimech has probably come up with the most likely answer.
Thanks to all who have
Thanks to all who have replied to this thread. I have posted over on this side of the pond with no replies. One of the sites is mentioned in the above thread. I think my machine is an older version of the ones in the above link but if I can get the pulley off those manuals will be useful. There is no nut in the hole. There is a slot in the side of the pulley that may be for inserting a bar thru for turning it off. The arrows show the engine rotation as clockwise. If the pulley is threaded on, would it turn off in that direction?? (left handed thread)
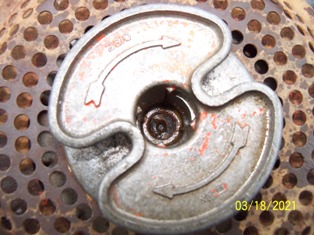
I take it that the arrows are
I take it that the arrows are the direction to wind the starter rope (and hence the direction of engine rotation), so you will need to turn it in the opposite direction to the arrows to undo it. This would be in line with Tecumseh and B&S engines.
As you are on the other side
As you are on the other side of the pond,you require American history not British.
Jacobsen first sold rotary lawn mowers in 1949, after purchasing a Company called Standard Manufacturing and Sales Company of Lebanon,Indiana in 1948 who produced their own range.
The engine being a 2 stroke Jake was derived from 1942 when all production of lawn mower ceased due to WW2.Jacobsens used their 2 stroke light weight designed engine as a back pack power unit for the United States Army.
Hope this helps
Kind regards
Andrew
Thank you for the reply. I
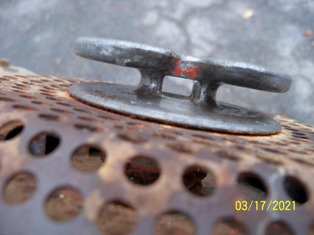
Thank you for the reply. I did find some history for the Jacobsen but not much else. I posted on two different forums over here but never received one reply. Your side of the pond has been very helpful. The starter pulley is threaded & I finally got it off. I am now working on removal of the flywheel. Per one of the manuals that was posted I put a nut on the threaded top of the crankshaft & hit it with a hammer while lifting up on the flywheel. It did not pop off. I am soaking it with penetrating oil. We will see what happens.
Do not do that, you could
Do not do that, you could damage the crankshaft. You need a 'knock off' tool, which is basically a piece of round bar, approx 2 inch long and approx 1 1//4 inch diameter, drilled and tapped at one end the same size as the crankshaft nut. Once you have this, you screw it onto the crankshaft instead of the nut, finger tight, then back it off slightly, then hit that sharply with a 2lb ball pane hammer whilst holding the flywheel. Do not be tempted to use a 2 or 3 legged puller, you will probably split the flywheel. Also the use of penetrating fluid is unlikely to be of much use.
If you do not understand the above, just say and I will try to explain it better, or you could try searching the internet for a video on removing a Tecumseh flywheel, it is the same process.
I understand except why is
I understand except why is using a nut wound down not quite flush with the crank shaft any different than using the knock off tool you speak off?
The threads are 7/16-20. I guess I can try to drill & tap a piece of bar stock. I do not have a lathe & doing that on a drill press is not real easy to hit the center of the bar. I looked for a coupling nut but could not find one.
I took another look at that &
I took another look at that & I understand having the knock off tool wound clear down the threads that there would be less chance of bending or breaking the threaded part of the shaft. I am going to try to make one.
It gives you more area to hit
It gives you more area to hit and you are less likely to give it a glancing blow, believe me, I have seen broken crankshaft ends when people tried to just use the nut. If it is 7/16th UNF, then this is the same as one of the Tecumseh knock off tools, so see here: https://www.amazon.com/Rotary-Flywheel-Tecumseh-670103-Thread/dp/B00CNU…
Though, do be careful , there are two sizes 7/16th UNF and 1/2 UNF and that one doesn't specify which it is.
The threads are 7/16-20. I
The threads are 7/16-20. I just made one out of a piece of bar stock I had. I threaded it on but am waiting for my nephew to come up. The mower actually belongs to him & I want him here before I bust something. We tried it with a nut & wacked it pretty hard but it did not pop off. Maybe we will try a bigger hammer tomorrow.
Thanks again for your help.
Though, do be careful , there
Though, do be careful , there are two sizes 7/16th UNF and 1/2 UNF and that one doesn't specify which it is.
670103 is the 7/16” one for a right hand thread - the one that you need.
https://www.dropbox.com/s/zaizywrkqxzu2ot/Tecumseh%20flywheel%20removal…
There should be slight play
There should be slight play on all mower crankshafts, up and down or back and forth in the cases, what you need to do is jam something quite tightly between the ally flywheel and the engine casting, so that clearance is taken up, using a "knocker" type correct tool, that clearance is your insurance policy, just sticking a screwdriver vaguely under will not do the job at all.Hard wood like oak or even a very hard plastic tree feller's wedge will suffice also.
Folk have been known to drive cranks out of the engine casing the other side, according to Mr Dempsey in his lawn mower repair book!!!
Good luck with it, but don't get impatient, give it thought, which costs nothing, damage always does...
Not wanting to start an
Not wanting to start an argument here, but don't do that either, just pull on the flywheel and hit the knock off tool smartly and as squarely as possible, it is the 'shock' that gets the flywheel off the crankshaft.
Not wanting to start an
Not wanting to start an argument here, but don't do that either, just pull on the flywheel and hit the knock off tool smartly and as squarely as possible, it is the 'shock' that gets the flywheel off the crankshaft.
No argument needed, that is the way to go, no wedges required. If you can get a grip under the flywheel with your fingers and take the weight of the engine or complete mower, a sharp smack on the knock off tool with a decent sized hammer is all that’s required.
" If you can get a grip under
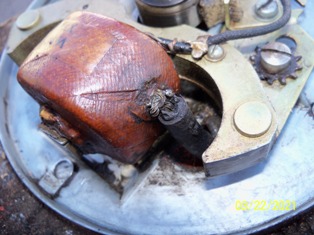
Well my home made knock off tool worked. I got the flywheel off without busting anything. Removed the points & cleaned everything up. Used scotch brite to clean the flywheel.The points had oil on them but were not pitted or burned. Set the points @ .020 & put it back together. Still no spark. I was checking for spark by grounding the plug against the engine. Is there anyway of testing the coil or the condensor? I am pretty much lost at this point.
The resistance of the primary
The resistance of the primary and secondary windings of the coil may be measured with a multimeter but obviously one needs to have values to compare with. The condenser ( capacitor) may be checked with an analog meter, but as with the coil, nothing beats a dedicated tester.
Back in the day , the Mercotronic, one of the testers of choice, came from your side of the pond. I’ve still got mine but it’s battery powered and the correct nine volt battery is no longer available so it gathers dust while I use a mains powered unit.
Before you go down the testing route, try for a spark off the end of the lead, no plug and no connector. Just hold the end of the lead about a quarter of an inch away from unpainted metal . Still no luck; check that the points faces are absolutely clean and closing squarely to one another. Also check that there are no stray strands of wire or missing insulating washers.
Thank you. I will try your
Thank you. I will try your suggestions tomorrow. I'd really like to get this thing running
I cleaned the points with
I cleaned the points with emory cloth & checked the wires. Where the plug wire goes into the clip on the coil it was just thru the hole and bent over & was not tight. I squeezed it with a pair of pliers. I would think the wire should be soldered at that point. I am afraid of destroying the coil if I solder it. I thought maybe epoxy or putting a connector on the end of the plug wire & attaching it to the clip with a small machine screw. As you suggested, I held the lead about a 1/4 inch from bare metal. I now have spark.
I now have spark.
I now have spark.
That’s good. As you say, there could be a risk with soldering against the coil. Depends a bit on your equipment and skill so perhaps cutting back the insulation a bit to get enough bare wire to thread through the eyelet and twist it back onto itself. With the voltage going to the HT lead probably in excess of 22k, you should be ok.
My soldering skills are next
My soldering skills are next to nothing. The hole in the clip is not big enough to accept the complete wire. I will have to split the strands and wrap it together. I have to say thanks again for everybody's help.
The HT wire is about two thou
The HT wire is about two thou's thick, on motorbike Wipac etc systems we are told to simply wind the HT multi strand wire inside the little factory soldered on loop provided. Old Villiers coils used a spring loaded piece of brass to simply sit on top of the factory soldered on brass connector /contact. I don't think applying a hot soldering iron to such old equipment is wise, but it's your machine and your choice. Good luck with it anyway.
Definitely not going to
Definitely not going to solder. I twisted it & got it pretty tight. I am in the process of cleaning the tank & sediment bowl.
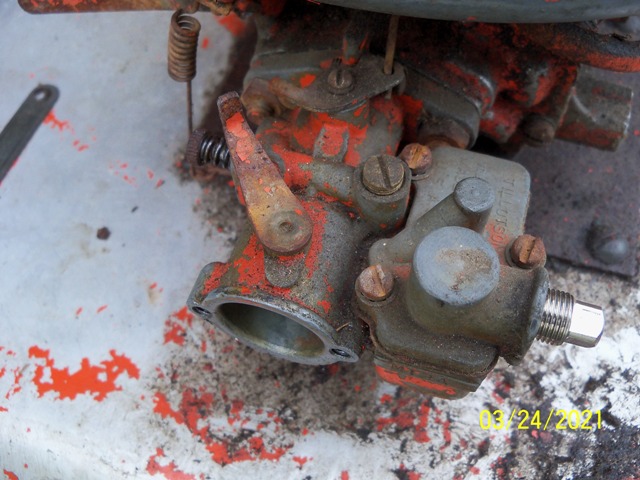
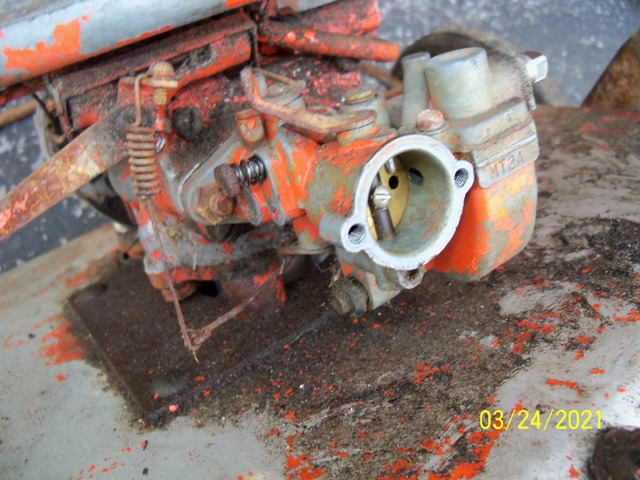
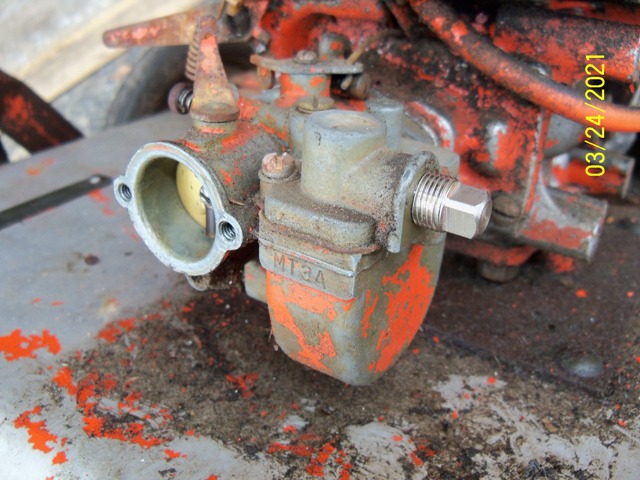
Don't know what to do about the carb. I am hoping to find a kit for it. It is a Tillotson MT-3B. I don't want to open the carb until I have the kit to put it back together. By the looks of the tank & sediment bowl, the carb is probably pretty ugly inside.
If you put some pics of the
If you put some pics of the carb up others may be able to help.
Here are a couple of pics.
Here are a couple of pics.
First of all I want to thank
First of all I want to thank everyone who replied to this thread. With the knowledge provided on this website & another website, this is what I have done to the machine,
I cleaned the points, gas tank, sediment bowl, air cleaner & muffler. I did not do anything to the carb, Thought I would try to start it before messing with the carb. I put a new plug & fuel line on it. Mixed up some gas with non detergent 30w oil with a 16 to 1 ratio. One pull & she fired up & purred like a kitten.
Thanks again.
Hello Sam
Hello Sam
Welcome to the forum, a good looking mower, early 1950's could well be one of Jacobsons first rotary models, certainly the earliest advertisement I have come across was June 1951 when their 18in Rotary was retailing at $120.
I have found reference to your model in 1952, (below) although your fuel tank has moved a bit North I think! they do state new design features, which would perhaps indicate an earlier model?
Ransomes introduced their first rotary 'The Cyclone' in the mid 1950's I believe, so the companies Jacobson & Ransomes were perhaps on a par at that stage, obviously later to become one with Textron taking over Jacobson in1975 then Ransomes in 1998.
Unable to add any more about your specific mower, but perhaps one of our members from your side of the pond can help.