Qualcast 35s - maintenance tips
Hi all,
New joiner here - this seems to be the go-to place for these types of questions and advice.
I've recently bought a used Qualcast 35S from someone local to mow my ~100m^2 garden - a longer-term project to improve the lawn quality and something for me to tinker with...
Model: CLP35S
Serial: 006387A
Year: 1996
Engine: AQ148
It looks to be in good working order and I managed to complete the year's 1st cut last weekend. However, there are a few niggles I'd like to work through and, given the state of the weather, I think there'll be plenty of time to work on it in the shed!
- Left side (viewed from behind) plastic cover is missing a portion at the front, so grass clippings are getting in. Replacement ordered.
- Height adjustment knob broken if you turn it to 2mm or lower - again, replacement ordered.
- Cylinder (QX one) looks well used and the previous owner says he used a self-sharpener on it. The advice here seems to be that these are useless so I'm taking the cassette to a local grinding specialist to get that sorted.
That leaves general tuning etc.
I've noticed the blades sometimes don't start turning when the clutch is closed. Similarly, the mower is either racing forward or stationary, with the slightest squeeze on the lever. Both suggest the cables need adjusting. Indeed, one was all the way tightened, the other all the way out.
Would anyone have a service manual for this model and / or engine? ie, clearances, initial setting of clutch cables, regular maintenance checks etc? I have the 'Operating Instructions' one from justlawnmowers.co.uk, but this is light on the detail beyond filling with oil.
Many thanks,
Tristan
Forums

Thanks - yes, I've been
Thanks - yes, I've been reading this and using it for guidance. I think the drive mechanism is different but certainly the principles are there. On the pulleys and setting of cable length I guess it a bit of trial and error.
Tristan

From your reply to the ops
From your reply to the ops manual that wristpin has posted it seems as though your mower could be a later model, your reference to a plastic cover in the left side for instance makes me wonder.
One way to be certain and help us to guide you is to post us a photo or two of your mower.
If I'd read your original
If I'd read your original post properly and taken on board QX I would have realised that you need a later manual. I think that it is just a bit too modern for my "Library". Your machine would have been made during the Bosch ownership of the brand and, to my knowledge, there wasn't much detailed information about other than dealer service bulletins dealing with specific issues.
Issues concerning either slow or abrupt take-up of the belt drives can result from corrosion on pulleys, worn or incorrect belts or cable adjustment. The use of "genuine" belts can often solve drive issues resulting from the use of "pattern" belts even those of nominally the correct size.
I will have a look through any relevant service bulletins and post scans of any that look as they may be of assistance.

When the Club visited the
When the Club visited the Stowmarket factory in 1997 (or possibly 98) they made a big noise about the "new" QX system so that probably means it was either new that year or the previous one. Clearly, older manuals won't cover this.
I am sure Wristpin will come up with some useful info from his technical archives.
When the Club visited the
When the Club visited the Stowmarket factory in 1997 (or possibly 98) they made a big noise about the "new" QX system so that probably means it was either new that year or the previous one. Clearly, older manuals won't cover this.
OCL Admin
Thank you "admin" for reminding me that time flies !!!!
You are right about the date of the start of QX production as the attached bulletins show. Also looking at my old workshop records they show that we first started stocking QX drive gears in 1998. I think that the succession of early bulletins suggest that either the QX generation were not properly tested in a real-world situation or that the tolerances achieved in pre-production machines could not be held on the production line.
I have just scanned everything that I have on the QX generation of Suffolks, Qualcasts and Atcos and hope that you may find an answer or two to the issues with your machine.
https://www.dropbox.com/s/aeehg9ssysh03xg/Suffolk%20Qualcast%20QX%20iss…
Many thanks wristpin! This is
Many thanks wristpin! This is marvellous and very useful to many other owners, no doubt.
In fact it's thrown up another issue with mine! I had thought, by design, the rear roller would only roll forward under drive, and would freewheel only backwards. According to these documents that isn't the case and seems a prominent fault?
Tristan
With all the bail bars
With all the bail bars released the machine should be free to roll in both directions. That is only possible if the release of belt tension allows the relevant belt to spring off the pulley so that it can rotate without friction. The release of belt tension is achieved by the use of the correct length and section of belt and cable adjustment. This may be assisted by pins or guides that restrain the slack belt and “ encourage it” to spring clear of the pulley on the drive side.
Club member Hillsider has
Club member Hillsider has found this for you but was unable to persuade it to upload.
https://www.dropbox.com/s/rz1yexh30qf3shd/Qualcast%20Cylinder%20Mower%2…
Thanks all.
Thanks all.
I took the cylinder to John Bark here in Oxford and had a good discussion on the problems with the 35s in general!
On the rear roller not rotating forward, I made sure the belts weren't catching anywhere and:
- Manually turning the drive pulley results in the roller turning as expected
- Manually turning the roller results in a jam - no pulley tension anywhere
John recognised this behaviour and suggested, as was suggested earlier, the pinion / planetary gear system. Parts 50/03, 70/02 and associated bushings / bearings. Most likely the bushings or plastic gear are worn...
I'll give it a go taking it all apart and see what the issue could be whilst the cylinder is being sharpened. Nothing ventured etc! I'll post some pictures as I go.
That is sound advice from
That is sound advice from your man. If you have the stamina to wade through those service bulletins you will find that the issues are covered.
In brief!
The original design of support bearing for the pinion flexed in the side plate allowing the teeth of the pinion to ride up those of the ring gear within the end of the roller. It was replaced with a support bearing with a much larger footprint which, as well as supporting the pinion better, also reduced the possible flexing of the side plate. The ring gear was originally crimped or swaged into the end of the roller and does not usually have issues but I've seen a couple of cases where it has come loose. Later ones were retained by three set screws.
The second issue is wear of the roller bearings allowing it and the ring gear to move relative to the pinion. It is sometimes possible to detect this wear without dismantling. Place the machine on a smooth flat surface, stand behind it and gently lift it by the handlebars while watching the roller. If there is a small delay between the machine lifting and the roller leaving the ground, you have worn roller bearings!
The roller rotates on a "dead shaft" that runs from one side of the mower to the other. The shaft itself remains stationary. The roller bearings are of a self-lubricating nylon type material fixed to either end of the roller drum with large pop rivets. Those bearings do wear and are replaceable but you will need a heavy duty riveting tool to apply new rivets. The nylon bearings came in two types but they were interchangeable - just a bit confusing when new ones were different to existing ones. Type 1 were just normal looking flanged bushes but type 2 looked like bevel gears but performed the same task - the gear teeth being for when used on the wider machines with a two-piece roller and differential. Either type performs the task of supporting your single piece roller on the dead shaft.
There was a third type incorporating a bronze oilite bush but I believe that they were only used on the larger Atco variants.
The dead shaft itself may be very slightly worn due to dust and grit becoming embedded in the nylon and acting as a file. If the shaft shows signs of wear may be rotated to present an unworn section to the thrust side of the new bearings - not usually necessary.
Thanks Wristpin - I'll try
Thanks Wristpin - I'll try those tests over the weekend.
I spent some time totting up the cost of replacement parts, then spotted complete rear-roller assemblies, albeit used, on eBay for less than half the estimated cost. So I've the best looking one I could find on the way.
Crossed fingers that you’ve
Crossed fingers that you’ve got a good ‘un, and not bought more worn bearings etc.
Brief update: I can now roll
Brief update: I can now roll the mower forward. I simply swapped the pinion gear + mounting bracket from the eBay roller and hey presto, sorted.
Now on to the next issue - ensuring the cables are set correctly
That’s good. At least with
That’s good. At least with the cables you can see what’s going on and make minor adjustments as needed.
Hi, I think my 35S Classic is
Hi, I think my 35S Classic is also suffering from a worn pinion, but I can't for the life of me, see how to remove the roller pulley. It's only held on with one large nut, but there is nothing to grip/lock it from turning when I try and undo it. Is there some sort of special lock tool I need?
Many thanks,
Craig
There was a thread on this
There was a thread on this subject a while back. I suspect that the nut/pulley that you are referring to is actually on the pinion . Until that pulley is out of the way the end of the roller shaft and its nut is hidden.
This is for an Atco Balmoral but parts of it are the same as for your machine - I think!
https://www.dropbox.com/s/q2gwx9uk7imo5um/Balmoral%20bulletins0001.pdf?…
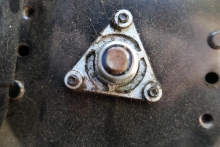
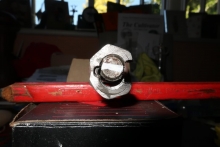
That's just like mine, nut I
That's just like mine, nut I in figure 2 holds pulley A on and I'm assuming the thread it's on its the end or the pinion. The pulley has two holes in it, do I need a special tool to insert in these to lock the pulley, or is it a bit set of grips required to remove nut I?
Thanks for the help.
Thr pulley's centre hole has
Thr pulley's centre hole has two flat sides which engage two flats on the shaft so that the shaft and pulley turn as one. However, if the nut has not clamped the pulley to the shoulders on the shaft it may have "fretted" and worn its centre hole round allowing it to rotate on the shaft. If the shaft and pulley are as they should be, just holding the pulley with your hand will allow you to undo the nut, but if the pulley is freewheeling on the shaft the only solution is to cut the nut off. The forum thread that was running some weeks ago covered that situation so I'm re-posting some images that are somewhere on the forum. The focus on some is a bit iffy.

Thanks again Wristpin, both
Thanks again Wristpin, both nut and pulley turn as one so either mine was last tightened by a gorilla, or I just need to, quite literally, get a grip!
All else fails, out with the Dremel it is.
Welcome to the Club and forum
Welcome to the Club and forum. The attached manual may be a bit more comprehensive that whatever you have.
https://www.dropbox.com/s/da2qfs0i4fgvfk2/Suffolk%2C%20Qualcast%2030%20…