cutting cylinder adjusting
Would somebody please explain the best way of adjusting the cutting cylinder in relation to the bottom blade for best cutting performance.
Many thanks
Gerry
Forums

Many thanks wristpin
Many thanks wristpin
Bit of a thread resurrection…
Bit of a thread resurrection! I wonder if anyone can help - ive searched t'internet but can't find anything. My Anzani Lawnrider is now all back together and ready for it's first cut since its rebirth. Ive had the cylinder and bottom plate ground and im at the adjusting stage.
Here's my question - the cylinder adjustment im quite happy with, in terms of how it works and what i need to aim for. However the bottom plate is also adjustable, in that it can pivot up and down. So the cutting face moves through an arc. I can't see any other examples of this, so not sure whether the optimum setting is low (i.e bottom plate closer to the ground) or high. Is the idea of the adjustment to cater for worn or different sized cylinders? Or is it to enable a variety of cutting angles between the blade and cylinder, or maybe to further adjust cutting height?
I guess the logical thing would be to start at the mid-point of its adjustment but im curious as to what the adjustment is actually for!
Many thanks!
I’m not surprised that you…
I’m not surprised that you are a bit puzzled by that set up. I’ve got an Anzani Powermow which shares most of the same cutter unit with the Lawnrider with the adjustable bottom blade carrier. I have no idea why it was designed like that, just seems to be an unnecessary complication. If you start with the premise that the smaller the contact patch between the moving and stationary blades , the better , and adjust it accordingly. Hopefully the bottom blade has been ground with a bit of relief to aid that as well.
The other issue is that to get a good finish on the lawn the bottom blade needs to be level in relation to the rear and front rollers so that what ever height of cut you select the cut will remain level - left to right. It’s actually not as complicated as I may have made it sound. However, as far as I know , a Lawnrider doesn’t have a conventional rear roller, only the single narrow drive roller so any left to right levelling would seem a bit hit and miss.
Ah many thanks. I found…
Ah many thanks. I found quite a good technical doc last night that basically says the same - that horizontal seems best. I have included the link below- it goes into a lot of detail and is actually quite fascinating but i was just extracting the key points! My lawn is very much not a golf course but it would be nice to know ive set the mower up as it should be.
http://golftechs.us/Downloads/Reel%20Certification.pdf
Yes the Lawnrider is a weird one. Mine has two narrow-ish drive wheels at the front behind the cylinder, but the main rollers are at the back. The additional complication i guess is that the cutting part pivots to account for variations in terrain. For now im setting it at the highest cut and will go from there. I think that's still going to be lower than i normally cut it with the rotary Hayter so may have to gradually shorten the grass height before letting rip with the Lawnrider.
Tomorrow should be the big day when i see what it does to my lawn!
As an aside i bought some new oak rollers from Mike Floody - superb service and would heartily recommend. They finish the mower off nicely.
Plenty of good reading there…
Plenty of good reading there.**As well as for my own machines for sale etc I grind a steady number of cylinders and bedknives for other repairers servicing domestic and bowls club machines, and almost without exception the cylinders are tapered - often appreciably so.
** A very similar article used to be on line from the Toro Universty but when I last looked for it the link appeared to be broken, so this article is a good refresher.

Hi Chris Great to hear there…
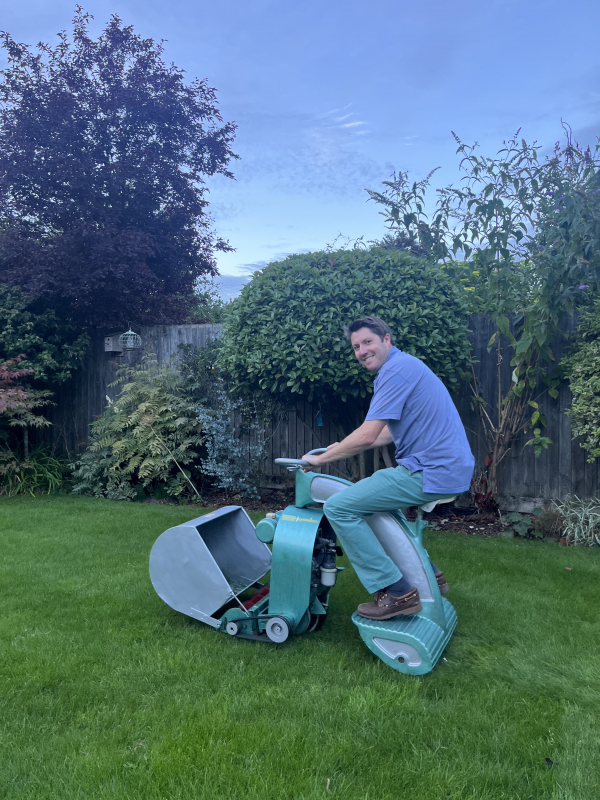 Hi Chris Great to hear there’s another Lawnrider enthusiast out there. I’m just in the final stages of my restoration (picture of me giving it the first ever test drive) and I have the same issue as you in that I need to adjust the reel to bottom blade. I’ll see how I get on.
What a fun machine though - can’t believe they didn’t take off (apart, perhaps, from the fact mine doesn’t feel the most balanced of machines!).
apart, perhaps, from the…
apart, perhaps, from the fact mine doesn’t feel the most balanced of machines!).
My sentiments entirely! I think that it fell into the category of “ a good idea at the time” but in use, had its drawbacks. Flat smooth lawn without too many island beds etc, may be, but anything else - no!!
Several decades later, another brave effort to break with traditional design, the Dynamow, failed for similar reasons - more drawbacks than advantages over conventional designs.
Start off with a reground
Start off with a reground cylinder and refaced bottom blade. Check for a little slack in the drive chain or belt to allow for the movement of the cylinder.
Disconnect the plug lead.
By eye adjust the cylinder to just off the bottom blade then adjust one end so that it just hits. Back it off a fraction so that it clears and repeat at the other end.
Take a one inch wide strip of dry copy paper - 80 or 90 gm and offer it between each moving blade and the bottom blade, left ,right and centre, while turning the adjusting screws a fraction at a time to achieve a clean cut.
If the cylinder and bottom blade are in good condition it should be possible to achieve this without undue pressure between the blades . With experience this can be done by feel and sound.
If, having carried out the above procedure you are nearly but not quite there it may be worth starting the machine and spinning the cylinder while spraying with something like WD40 or Duck Oil while tweaking the adjusting screws a mere fraction. Anything worse and its re-grind time.