ATCO commodore B14 question.
Afternoon all,
i have recently bought a ATCO commodore b14 to restore and to use in my garden.
the cutting cylinder needs to be removed for a sharpen and a re spray but I don't know and can't find any information on how to remove it.
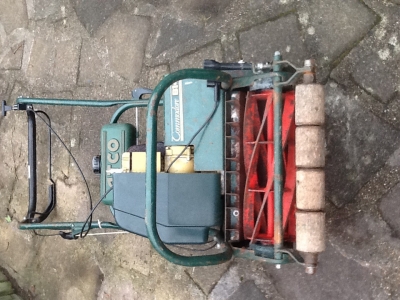
a quick picture of the mower in question.
so question is..... How do you remove the cutting cylinder? Anything I need to be aware of in the process?
many thanks
ryan
Forums

Depends slightly on what
Depends slightly on what drives the cutting cylinder, it probably is a chain, but it could be a toothed belt. Whichever it is, you need to remove the sprocket/pulley from the end of the cylinder and it is lefthand threaded, so you need to turn it in the opposite direction to normal with something that will not damage it.
Once you have the sprocket/pulley off, it is pretty easy to get the cylinder out. Remove the grass delivery plate from behind the cylinder by remove the top two bolts and loosing the bottom two bolts ( you will have to tilt the machine backwards to get at these). remove the three bolts that you will find behind the sprocket/pulley (these go through the sideframe into the cylinder bearing housing) There are another three bolts at the other end of the cylinder, remove these. loosen the tierod across the front of the machine (just behind front roller), this will allow the sideframes to spring apart slightly. You should now be able to drop the cutter unit out as an assembly, though it might be a slight struggle. If you don't want to struggle at all, you will have to remove the entire right hand sideframe.
Once you have the unit out, just remove the two bolts at either end of the bottom block, then lever off the the two bearing housings complete with bearings.
You just rebuild it in reverse order. Once you have done a few, it only takes minutes, but it will probably take you about half an hour.
These images may be of help
These images may be of help in relating what you have in front of you to Hortimech's instructions. On the later machines the throw / deflector plate is not clamped to the back of the sole plate but retained in a lip that is part of the chassis stiffener / strengthener so be aware that if you need a new throw plate there is a choice of deep or narrow ones depending on the age of the machine.
Re my comment regarding the two different arrangements of stiffener plate I can't find any images to support it so I'm wondering whether I was confusing it with the choice of deflector plates - time has passed!
https://www.dropbox.com/s/wp6qn4owidtodrt/Atco%20Commodore%20cutter%20u…;
The bottom blade also
The bottom blade also requires to thrown out and replaced with a new one. I've seen these for around 20 pounds also.
ive seen there is a row of bolts that hold the bottom blade on. So will I not have to undo those if the whole lot comes off as one?
the mower is having a respiratory so all panels will come off so regarding chains or belts will this determine the age of it. I'd imagine chain being an older model?
im going to take some bits off and have a closer look. Then I'll report back with hopefully some uploaded pictures.
the mower doesn't look like it's seen maintenance for a while as the engine didn't have any oil in. I'll also whip out the spark plug and see what that threats me with.
many thanks for your help guys and gals :)
Ryan
I ego pictures built I'm
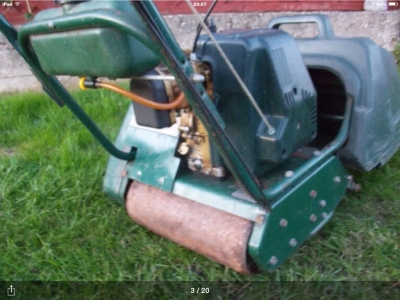
I took somepictures but I'm currently on my iPad so pictures will come later. I took the drive cover off on the left hand side of the machine to find both chain and toothed belt. But looking at it the belt runs from the top and runs down to the left hand side which I think drives the cylinders then the two chains must drive the roller. It does look abit complex though.
Ryan
If it has a belt it is a late
If it has a belt it is a late model. The bottom blade can be refaced if not too worn or knocked about and should be left screwed to its carrier for refacing. Even if fitting a new bottom blade it is helpful to true it up once fitted to the carrier - saves a lot of messing around shimming it to achieve a good cut.
Take plenty of images with the iPad to assist with reassembly!
You need to reface the bottom
You need to reface the bottom blade even if you fit a new one, if you don't, it is like sharpening only half a pair of scissors.

the mower doesn't look like
the mower doesn't look like it's seen maintenance for a while as the engine didn't have any oil in. I'll also whip out the spark plug and see what that threats me with.
Good advice given re the requirement to regrind the bottom blade but the thought strikes me that in the light of the comment re no oil in the engine it could be wise to fill the engine with oil and check that it is a good runner before committing too heavily into breathing new life into the cutting mechanism.
The oil that was in it well
The oil that was in it well it had less than 50ml. When I collected it the guy started it and it sounded very clattery so what I have done, I've done some car engine oil in which is 5w30. I know it's not correct but it's given me the chance to start it, check for leaks and strange noises. I put a rough 200ml and the oil is now mid way up the threads on the filler. The oil is quit e black even with new stuff I used to top up temporary is now a blackish colour. So as I have another 500ml of 5w30 from a car service I did I'll use the rest of the oil to flush out the old stuff and then put either some SAE30 or anything equivalent to it. I. Changed the spark plug last night and that had some oily sludge on it and also was black.
Ive had the mower running today for around 30minutes to get it warm going up and down the Rev range. It seems to cough slightly at max throttle which could mean a dirty fuel filter in the tank and possibly a dirty carb.
i would add pictures but I have no idea how to. Is there a how to on this site for this?
Many Thanks
Ryan
Almost certainly the 5W30 oil
Almost certainly the 5W30 oil that you have used will contain a detergent to keep carbon particles in suspension in the oil as required by modern engines, this will turn black as it is busy cleaning your engine.
Until we know the engine you have I would prefer not to suggest a grade of oil but you are probably correct with your assumption of a 30 grade oil.
Re adding images there is a section accessed from the forum home page (Forum Guidelines) that deals with this very subject .
Well the engine it has is a
Well the engine it has is a Suffolk four stroke petrol engine type A114-1a with a dellorto carb. The correct oil or this in accordance with the operation manual is a multi grade oil. A lot of people say to use SAE30 grade oil so I think that is what I'll use unless someone can tell me where I can get the specific oil mentioned above.
thanks for the information. I'm going to start a build thread on this so I don't clog up this thread with loads of different questions.
many thanks
Ryan
10/30 or 10/40 oils are
10/30 or 10/40 oils are readily available ; often marketed as Lawnmower oil but if the engine is worn and using oil I'd go with the detergent SAE 30 - again marketed as Lawnmower oil. However don't confuse it with the non- detergent SAE30 marketed for Classic Cars .
Going back to the original
Going back to the original question.....
pin the picture I have inserted into this post you can see a panel with around seven bolts holding it on. I've taken them all off along with a couple of hidden one and the panel still won't come off. Not only that the three rear bolts hold the roller in place which I didn't know until I told the last bolt out and the roller suddenly moved.
So it's all bolted back together for now. What else holds the panel on. I think it might be the push handle assembly. There are two bolts which go directly down. Not sure if you can see in the picture.
I have no idea what is behind this but should help me to take the cylinder out.
i know one of you has explained it to me on how to remove it but have any of you got any pictures of removing it. Not necessary from my model but it would help me out.
Many thanks
You don't need to take the
You don't need to take the side plate off but you may need to slacken the bolts enough to allow it to spring outwards a little to let the cutter unit to drop out. ( once you have removed the bolts in the. Top platform and from within the chain case)
Ok. So what hold the cutter
Ok. So what hold the cutter on the right hand side if I don't need to remove the panel then? I'm only going by an operators manual with the drawing in the back giving me some idea on how it splits down. There are two drives one chain one belt. The belt being at the back closest to the cutter. Would a c-spanner be able to undo the sprocket that drives the chain I'll need to split the chain and slacken the belt tensioner right then I can remove what ever else that holds the cutter in place.
How to I remove the belt drive sprocket?
sorry for all the questions but I just don't want to make a mountain out of a mole hill.
Ryan
From your last post it occurs
From your last post it occurs to me that we may have a difference of opinion of what constitutes left and right? It is convention to define left and right from the operator's position so in the case of your mower the left is the drive side with the chains and/or belt and the right is the non drive side..
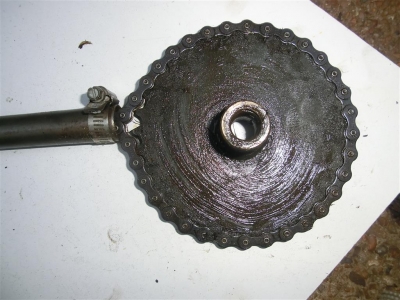
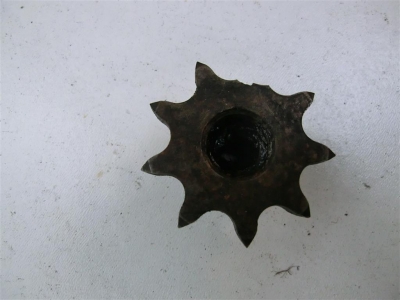
If you now go back a few posts to my Dropbox images of the general layout of the cutter unit and chassis and in particular the image of the cutting cylinder and its sprocket/toothed pulley you will see that the end of the cylinder shaft is threaded. From this you can deduce that the sprocket screws onto the shaft and that because when viewed from the left of the machine it is driven in an anti-clockwise direction it will be a left hand thread so that it tightens in operation. The image of the general layout also gives a good indication of what bolts/hex head screws need to be removed/slackened to allow the removal of the cutter unit once the sprocket/pulley has been unscrewed.
To undo the sprocket you need to hold the cylinder from rotating and turn the sprocket in a clockwise direction - the sprocket may be very tight. Everyone has their own way of doing things but however you do it bear in mind the opportunity for cutting or pinching fingers etc and act accordingly. Text books will say safety glasses and work gloves should be worn. Holding the cylinder from rotating may be achieved by passing a stout piece of wood between the blades with enough protruding to rest against the front of the engine platform; position the wood at the extreme left of the cutting cylinder.
It is then a question of gripping the sprocket sufficiently firmly to apply the required force safely and without damaging it; possibly with a chain wrench . It's a long time since I've stripped Commodore and I can't remember ever stripping one with a toothed belt drive but it may be that the manufacturer has helpfully provided a hexagon cast or machined into the sprocket/pulley for the application of a suitable socket and breaker bar - if not and if you don't have access to a chain wrench you may need to improvise.bearing in mind the the force needed and precautions to avoid damage to both the sprocket and yourself.
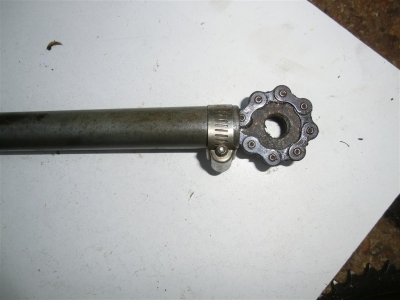
My home made adjustable chain wrench.
What can happen if you attempt to undo the sprocket with a hammer and drift!!!
.
The cutting cylinder comes
The cutting cylinder comes out as a unit with the bottom blade . The assembly may then be disassembled to separate the cylinder, it's carriers and the sole plate ( bottom blade carrier) .
On earlier machines the process is complicated by a stiffener plate bolted to the sole plate and then to the underside of the engine platform. If the machine has not seen regular maintenance/ dismantling all the hex head screws holding the stiffener to the sole plate are likely to be difficult to remove so it is possibly easier to unbolt it from the engine platform and get the whole assembly onto the bench and tackle it there . On later machines the stiffener was just that and was not bolted to the engine plate.
Back in the day there was an issue with the cutter unit cutting perfectly when ground and assembled on the bench but being stressed and going off cut when reinstalled into the chassis. Atco even went as far as issuing a service bulletin specifying a tightening sequence for all the screws and bolts involved in reinstalling the unit. I looked for my bulletin the other day to assist another forum member but unfortunately it seems to have walked! However, I will scan and post some parts lists later which will give you a good idea of the relative positions of the components.