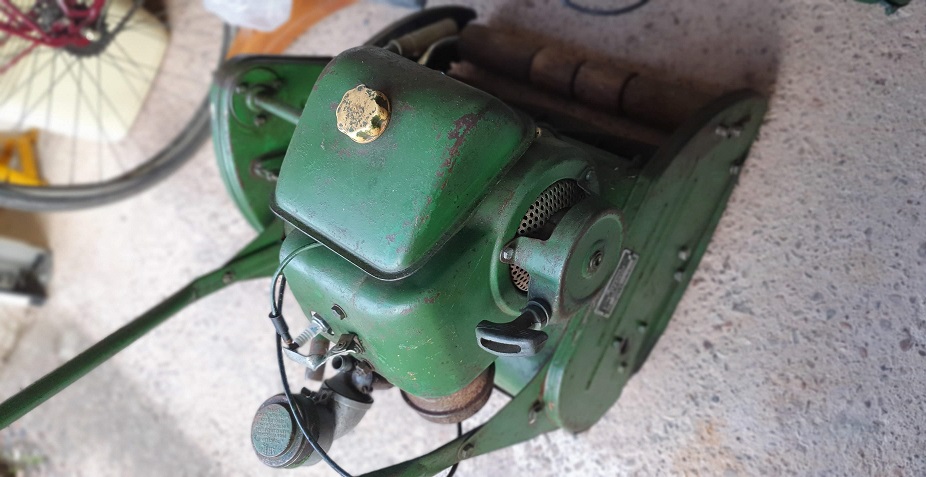
A brace of Ransomes Marquis - Restoration
The finish line was in sight for my Atco / Suffolk Super Colt and I wanted to get something lined up for my next project. I spotted a Ransomes Marquis 18" non runner due to no spark (here we go again!), and when I went to look at it, the chap also had a running Marquis which was a slightly newer model, but had a fuel leak at the carb. Needless to say I ended up getting them both in the back of the car, with assistance!, and brought them home.
I'm not going to go to the lengths I went to with the Atco - as good a learning experience as that was, I now want to keep the mowers cosmetically as they are, bar a couple of little touch ups here and there, but overhaul them mechanically to get them both running well. Hopefully I can use one of them as my regular mower as the 18" cut will hopefully make things easier around the garden, and I do like the look of these mowers.
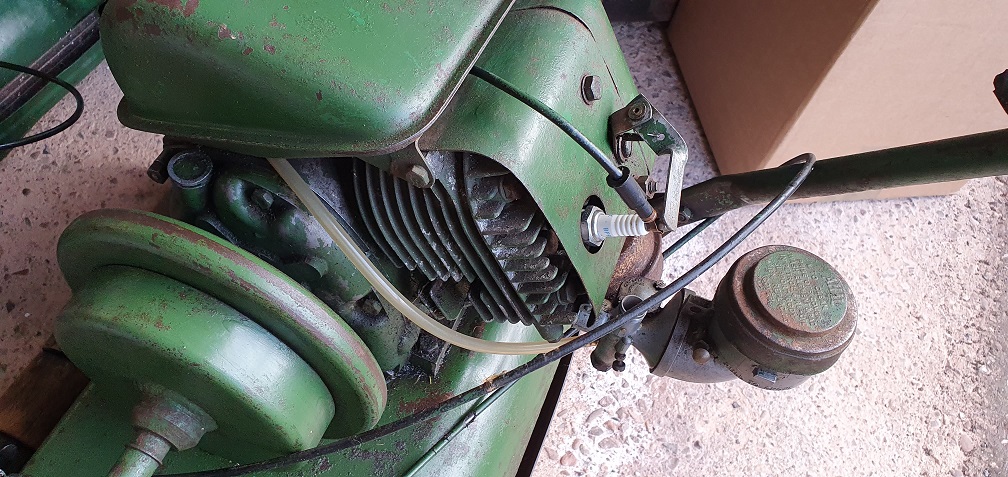
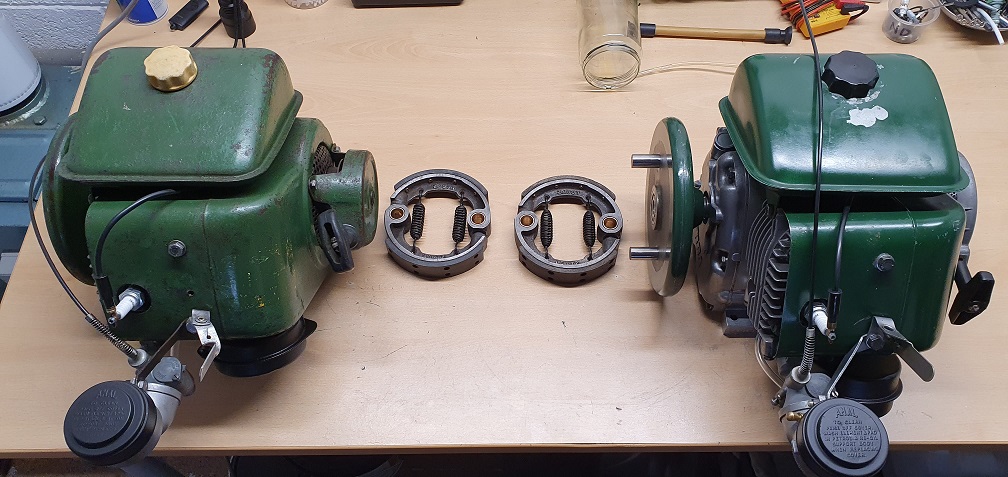
I would like to get an idea of manufacture date for both, and one should be easier as it has the plate on the side which says Mk4, but they both have the same BSA marked F12 Sloper engine
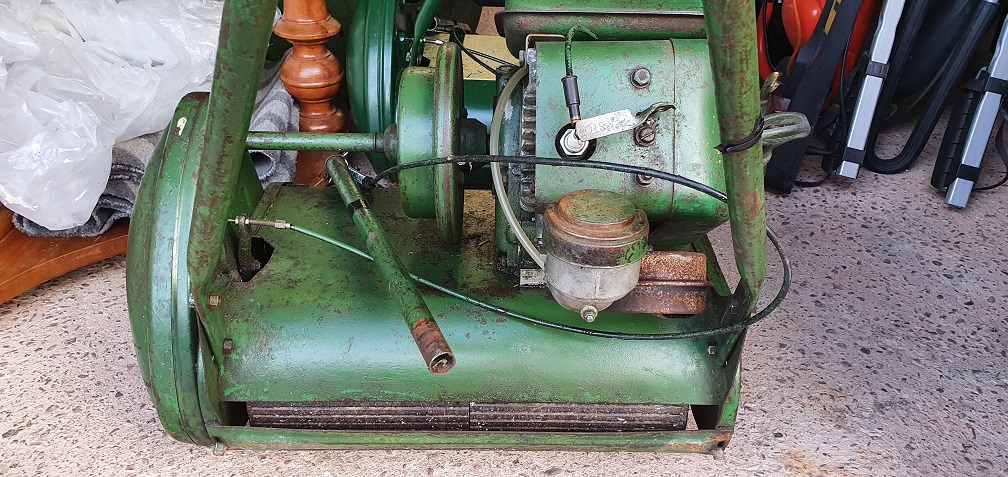
Mower 1 - Ransomes Marquis 18" Mk4 - Reg No. DC 398

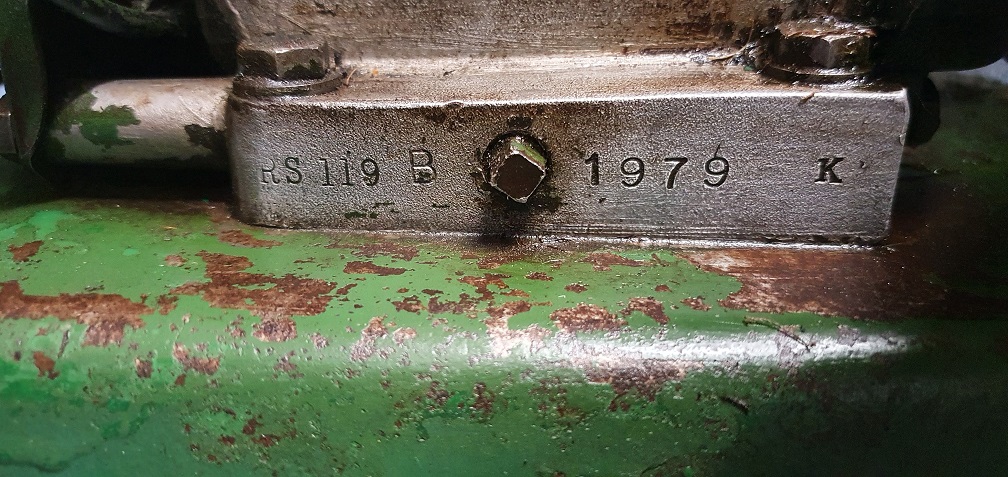
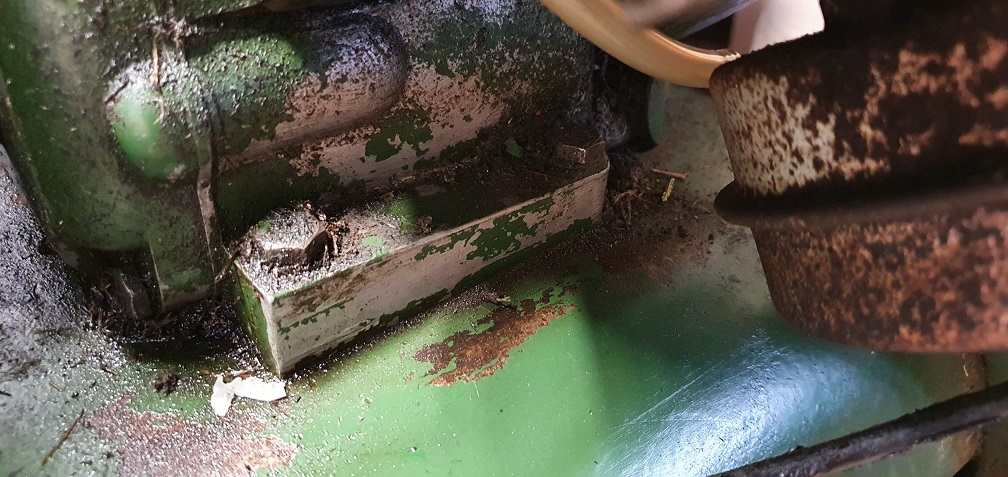
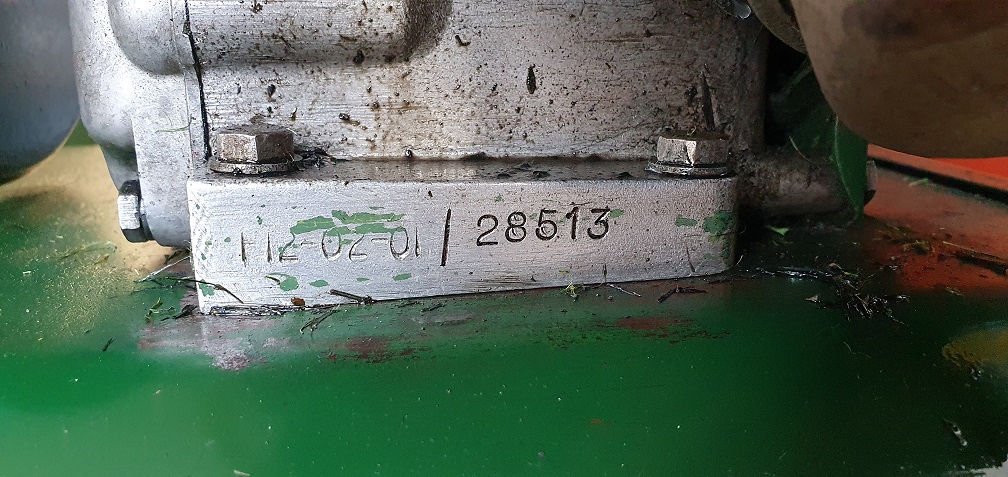
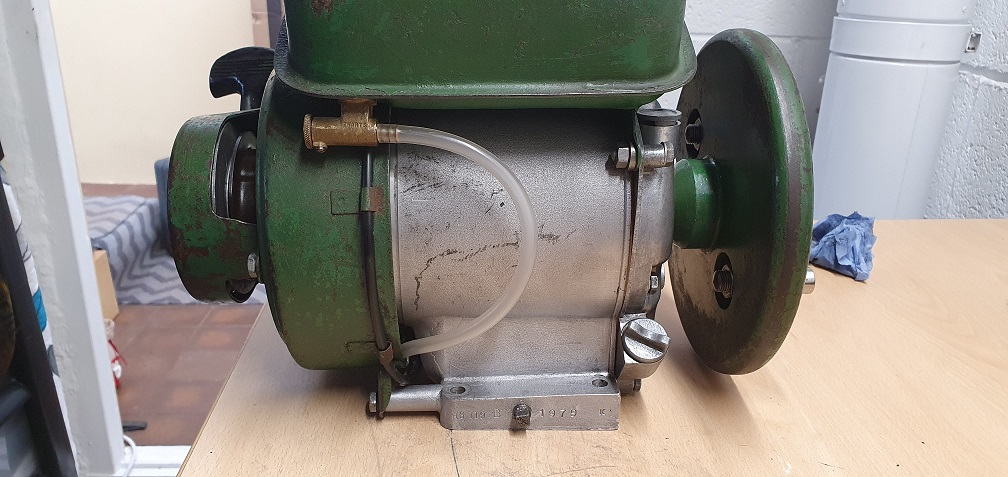
No numbers on the exhaust side of the block like the other mower, however the sump drain plug side has the following - RS 119 B 1979 K
Mower 2 - Ransomes Marquis 18" Mk??- No ID Plate

Forums
Hi Villiers98, thanks for the
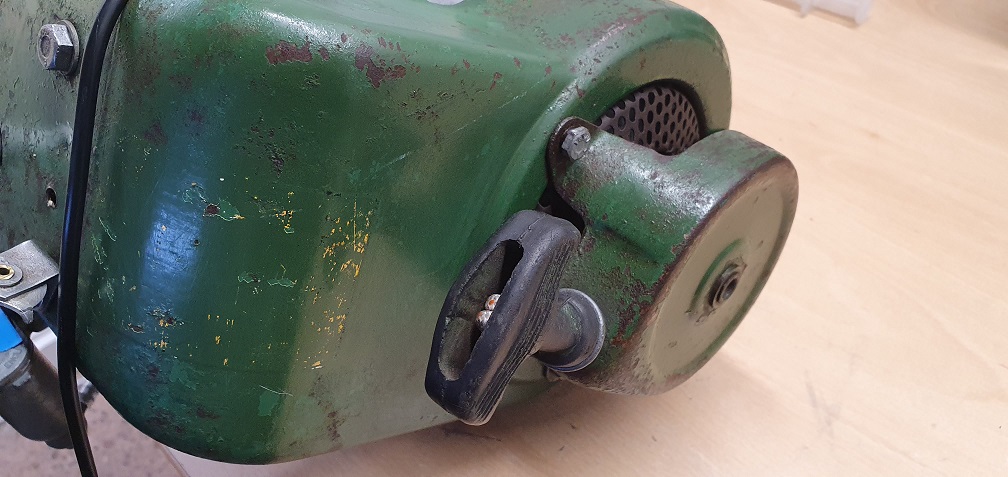
Hi Villiers98, thanks for the info, there isn't much in the way of pictures online when looking into the Marquis throttle levers. Several different types seem to come up when looking at complete mower pictures. I suppose it was one of those things where they all work the same, so as long as it was the correct sized bracket to mount to the bar, then any mower throttle lever would do when replacing/servicing/restoring over the years.
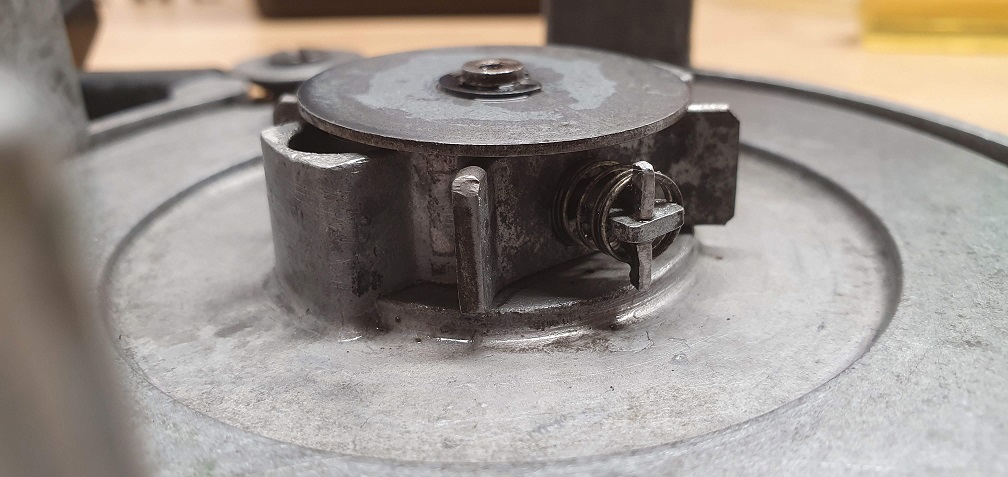
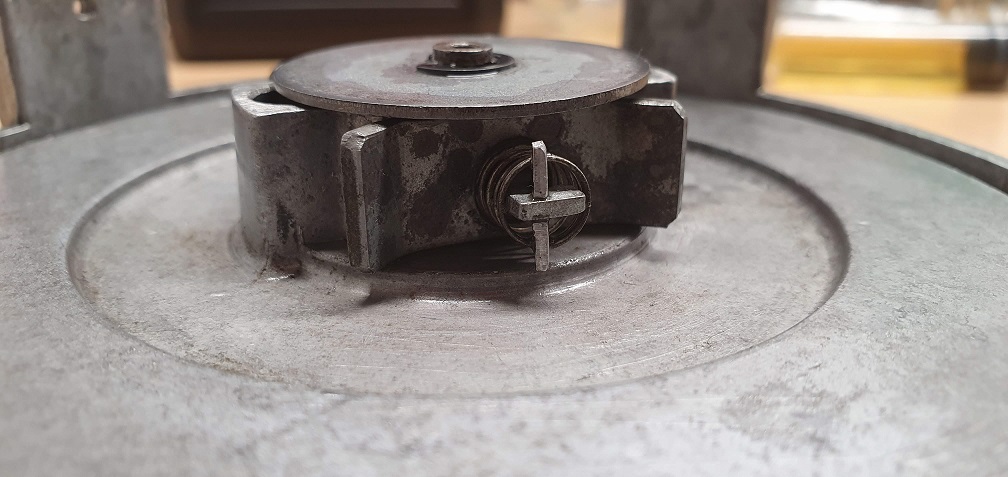
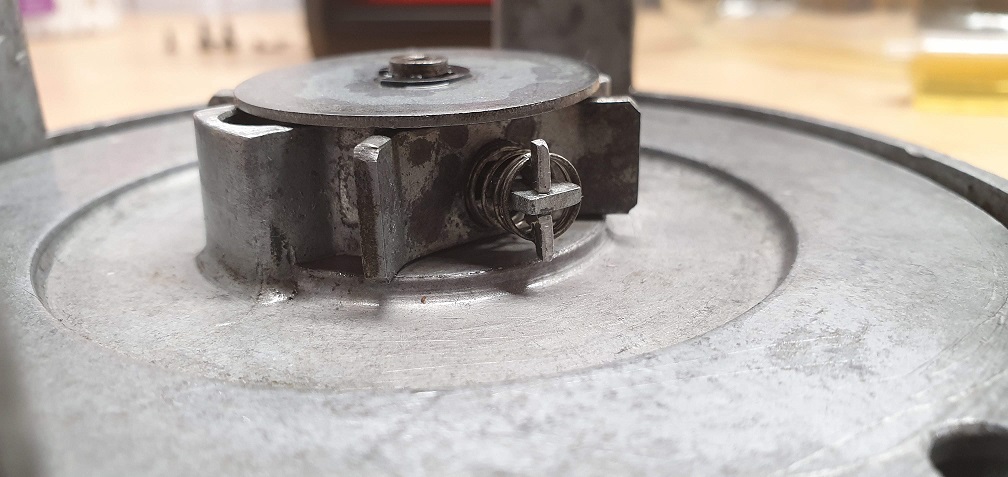
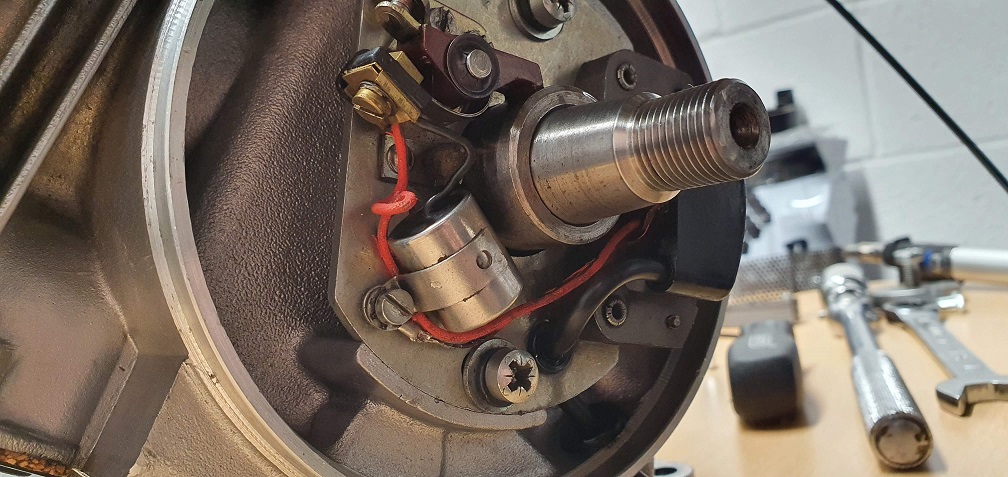
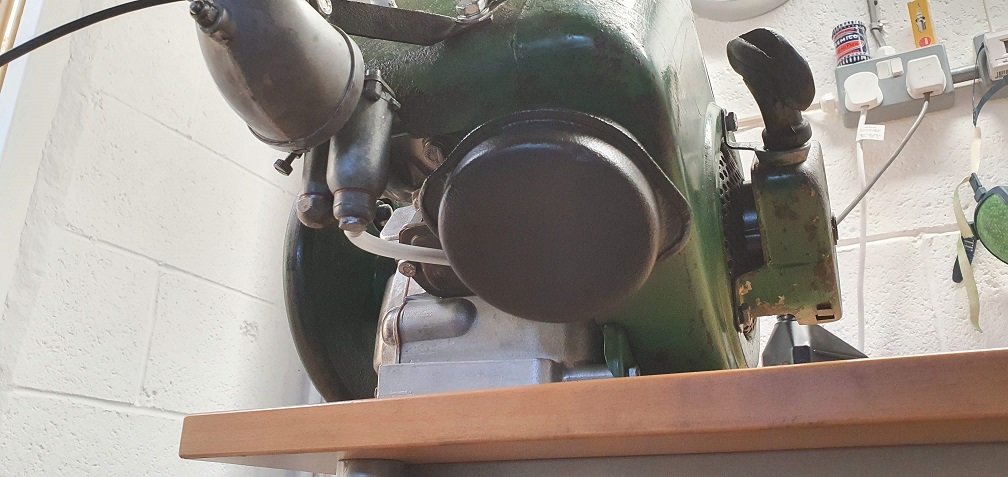
A few more pictures of the assembly
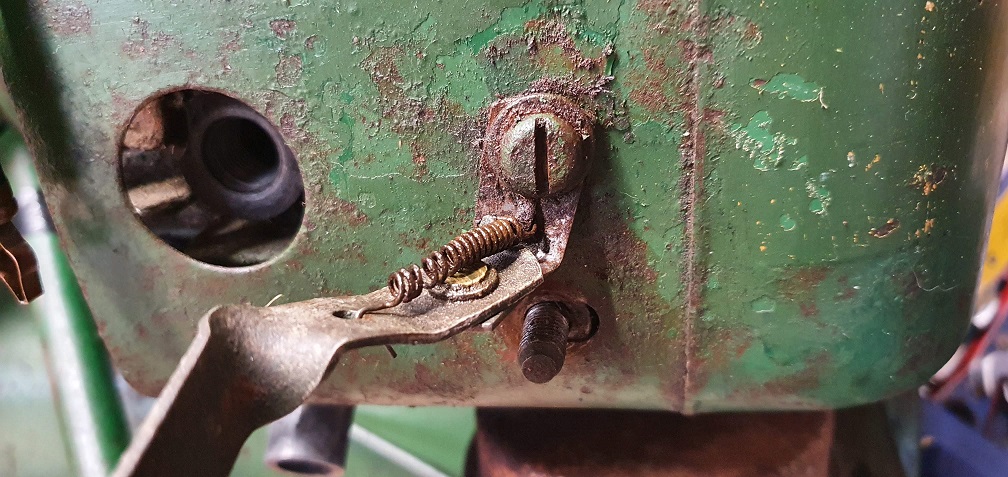
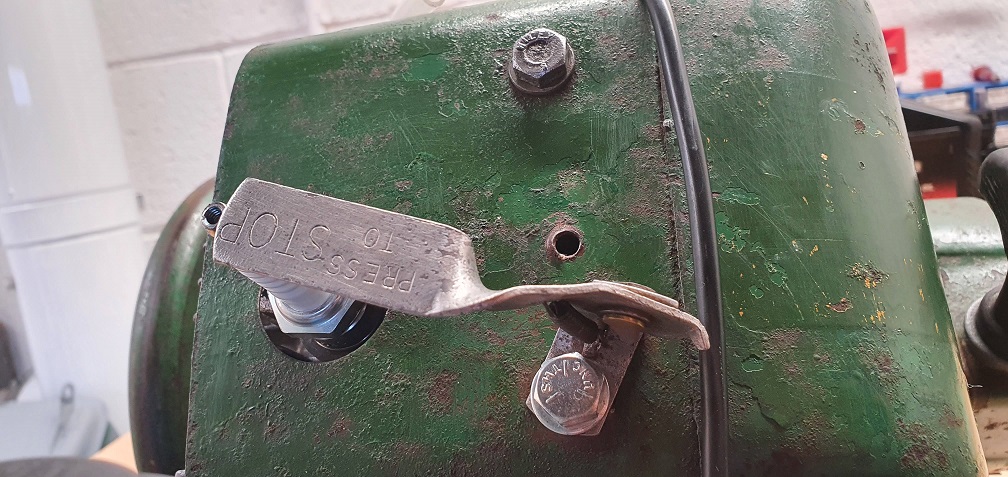
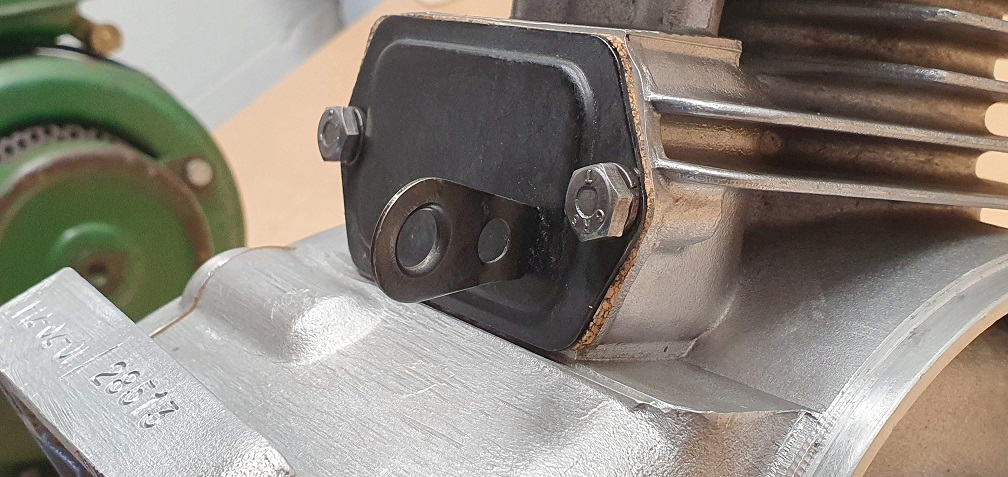
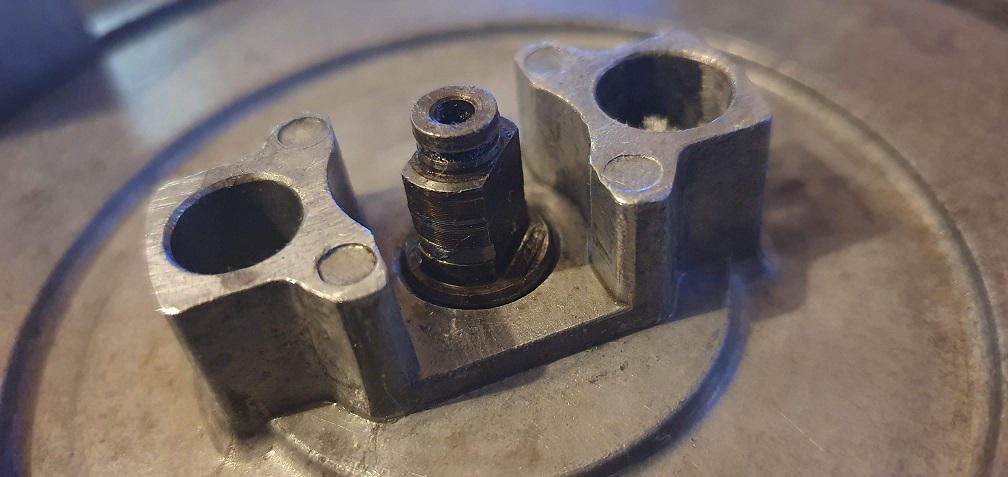
After removing the incorrect threaded stud in the block, I ordered a new 5/16" UNC 3" bolt and cut it down to the correct length. A test fit to check the reach and position of the ignition kill lever and all good - no more large self tapper screw as per post #1, just a hole sadly
The cowling shows what I believe to be the original BSA yellow sticker underneath a coat of green paint
New HT lead cut to length and cap screwed onto the end
So next will be painting the exhaust silencers and fitting the correct one to this engine, then this engine should be ready to put some petrol in, mount to the chassis and fire it up to check all runs well before refitting the clutch shoes. Then on to cleaning up the clutch drum and check over and clean up the mower chassis itself......

Image No2. Put those pawls
Image No2. Put those pawls back in their slots !!!
Just for my own reference, I
Just for my own reference, I'm including a link to my other thread where I overhauled the 2 Amal carb's for these 2 mowers - which is part of this overall rebuild -
https://www.oldlawnmowerclub.co.uk/forum/history-and-technical/technica…
Image No2. Put those pawls
Image No2. Put those pawls back in their slots !!!
On the ball as ever - nothing gets past you does it!! Thanks - already done before reassembly :)
A few pictures of the rebuild
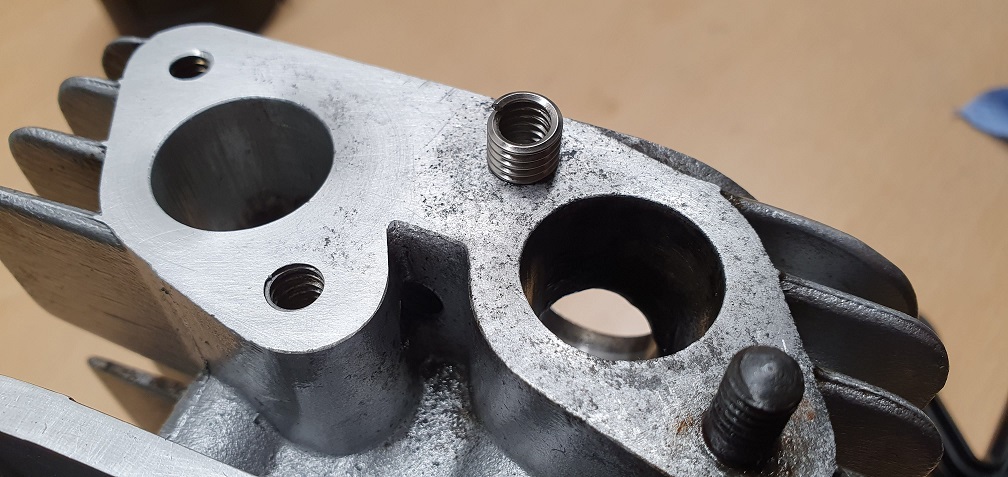
A few pictures of the rebuild of the second sloper engine. Going back to that troublesome sheared exhaust bolt + extractor tip broken off inside it, I opted for the spark erosion process in the end. I was able to request that the spark erode a hole of 6.7mm diameter and it was a very neat job

This allowed me to tap the hole with the correct thread to allow the use of a thread insert - which would in turn allow the original sized 1/4" UNC bolt to be used, to keep things looking original (Thanks to Angus for the thread insert suggestion)
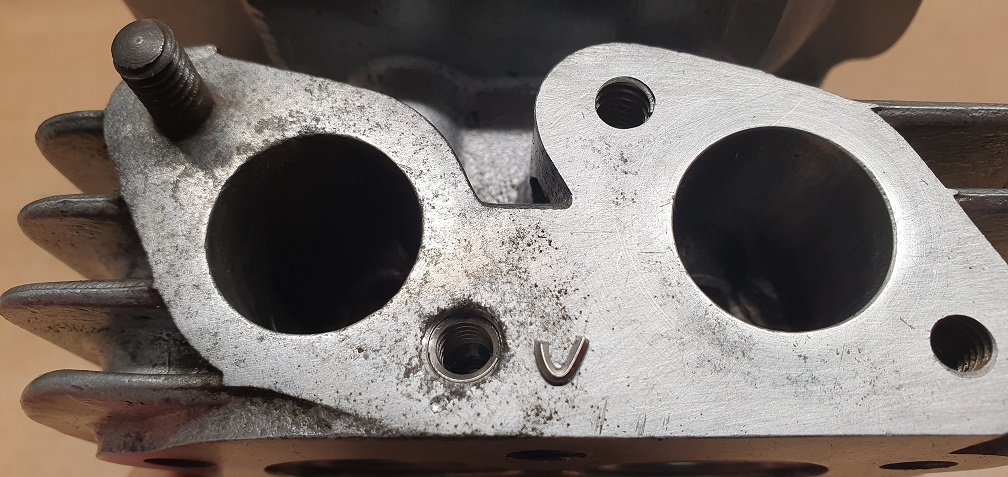
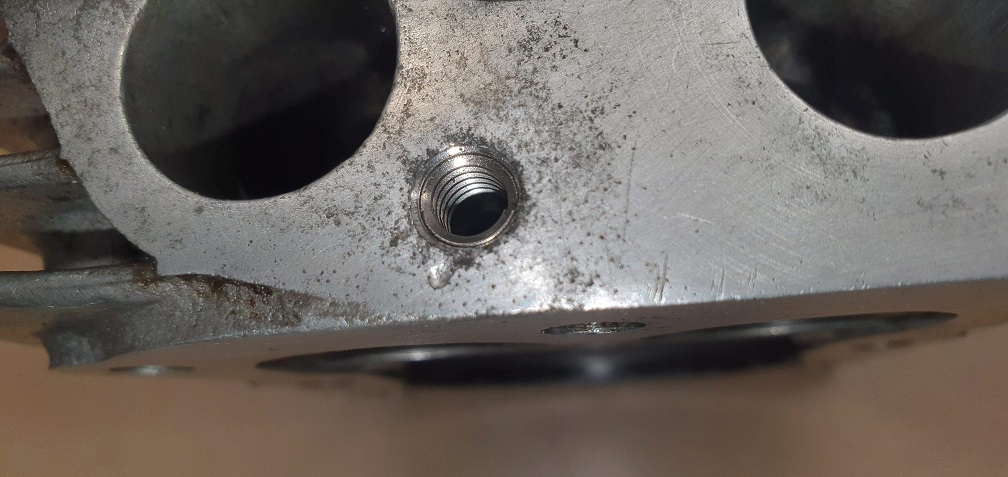
Insert ready to be screwed into the freshly tapped hole
Tang snapped off and retrieved from inside the hole with a small magnet tool

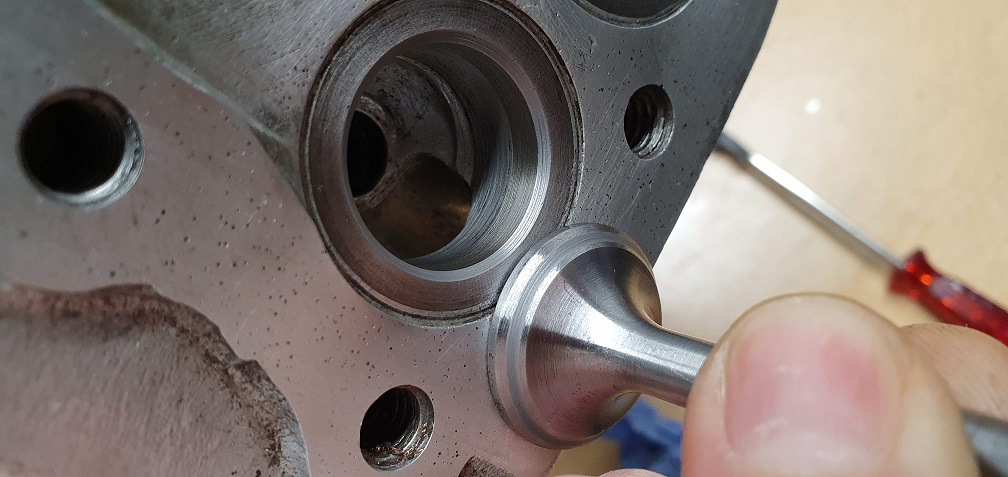
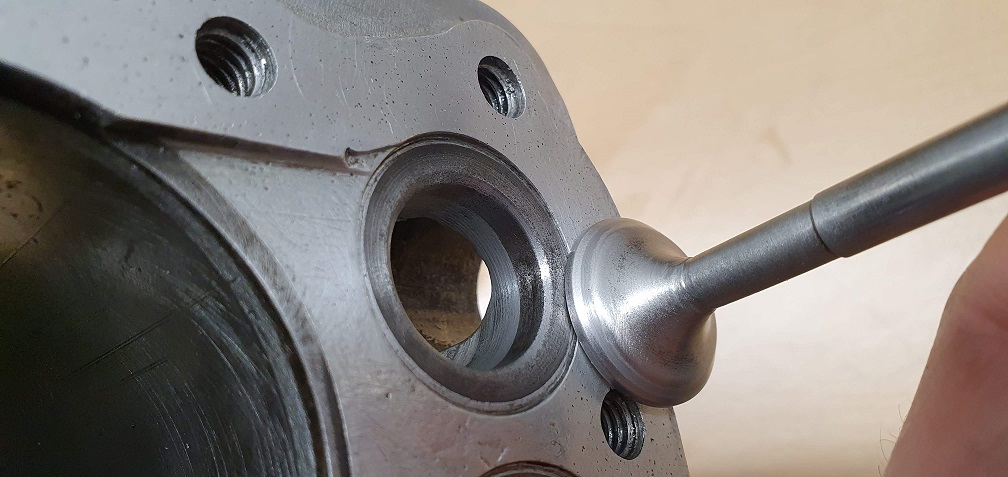
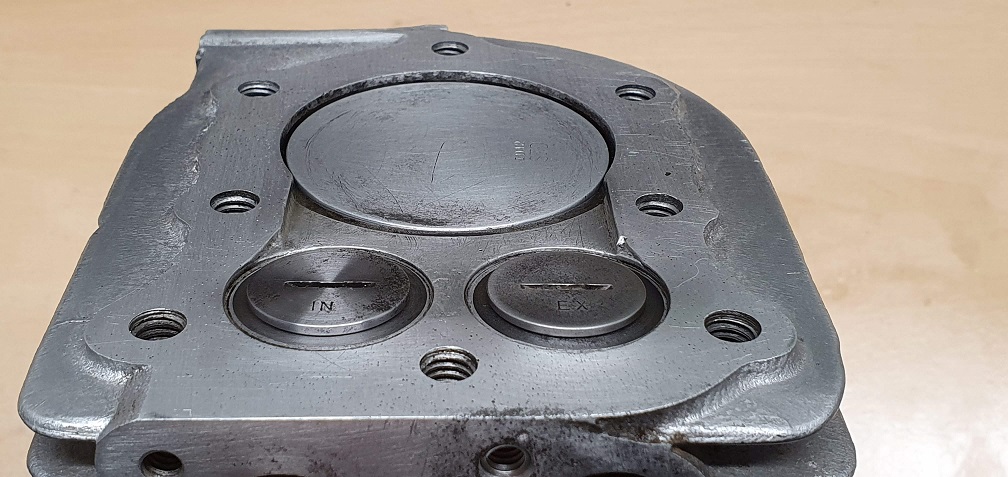
Valve faces cleaned up
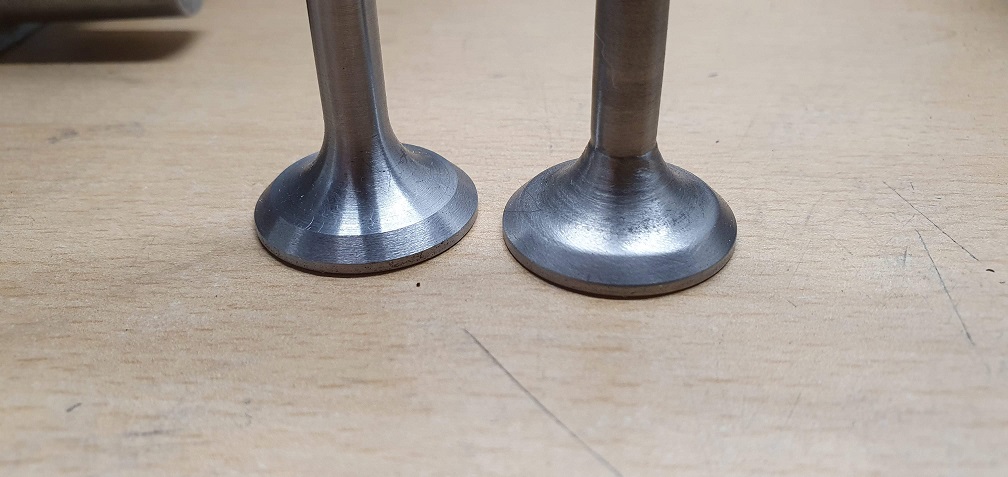
and after lapping
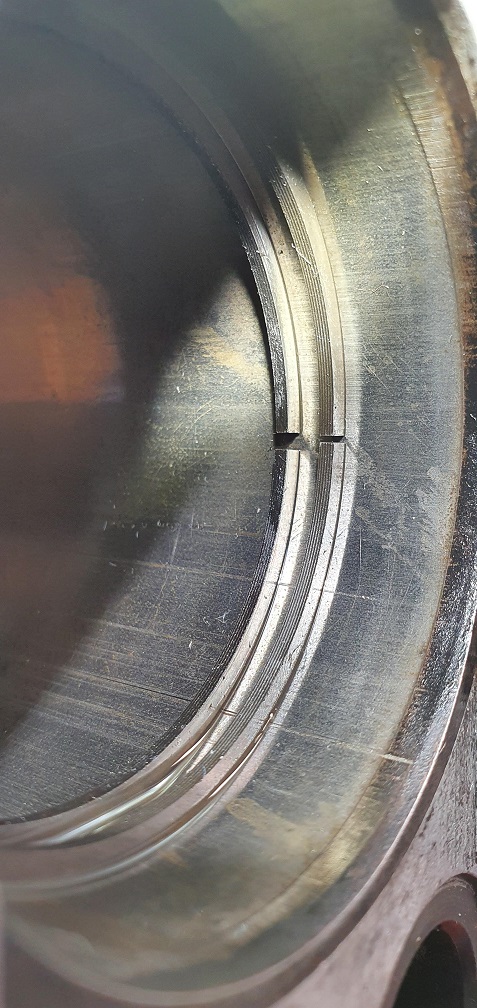
Showing the gap in the old piston rings compared with the new rings
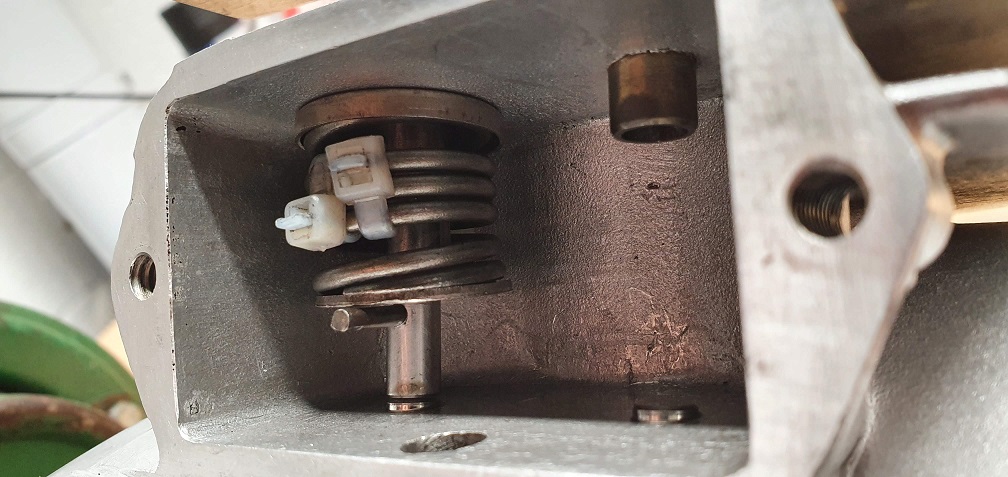
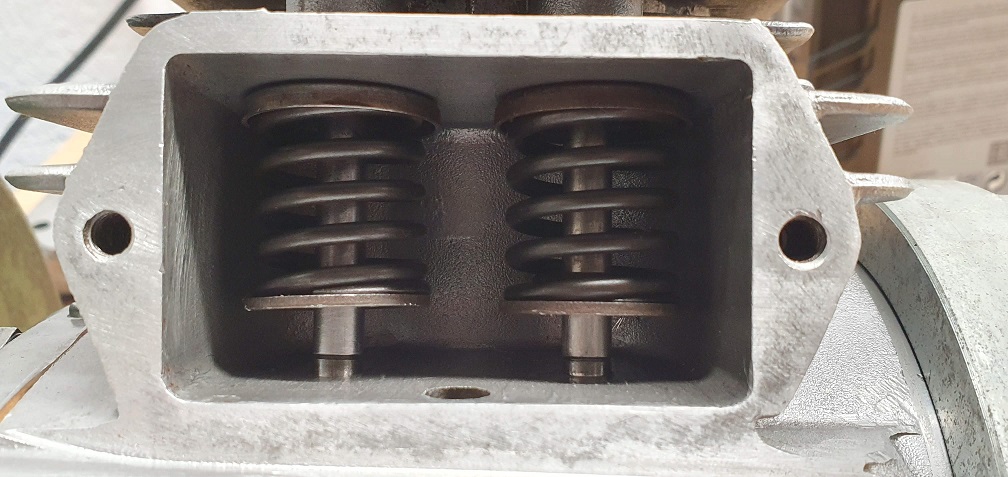
Being the newer of the 2 engines, I was expecting to find the small horseshoe shaped valve spring platform retainers, but this engine also uses the small cotter pins like the other earlier engine. I wonder at what point they started to use the horseshoe clips and valves instead?
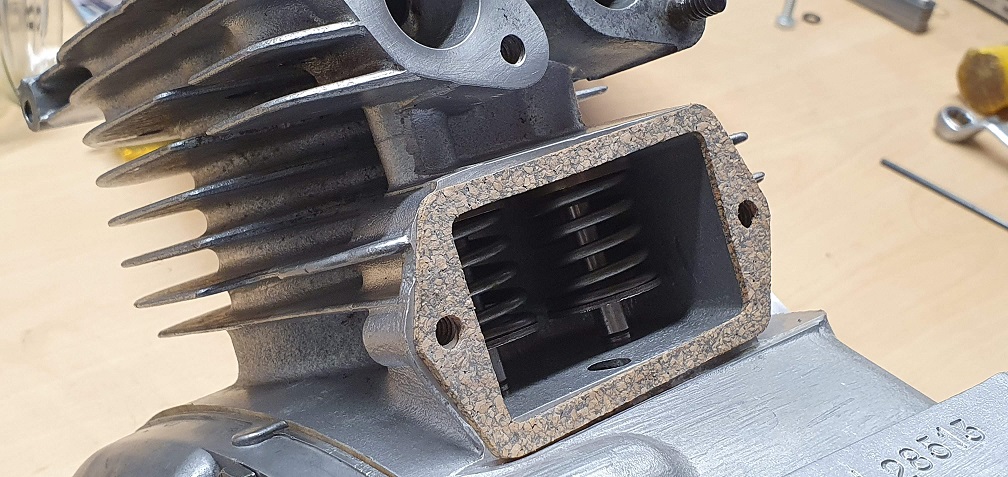
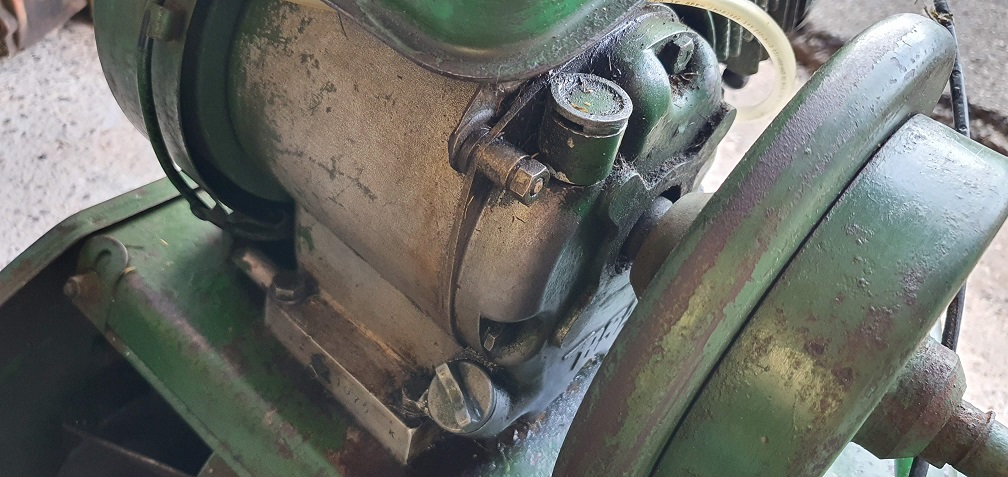
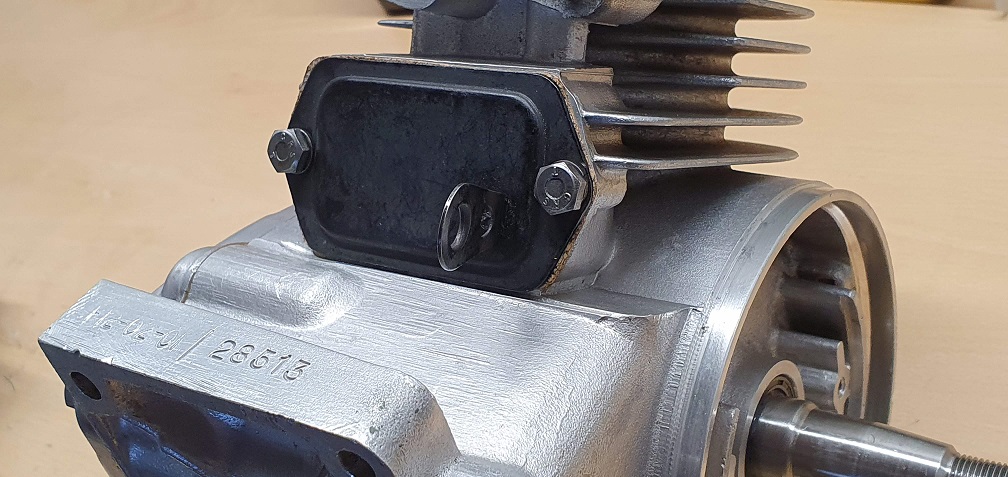
Valve chest cover with fuel pipe support on this engine
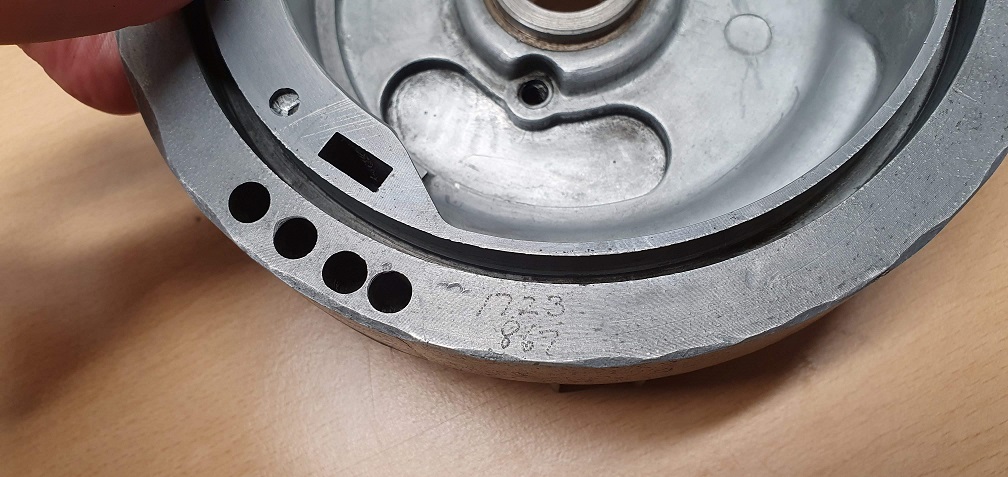
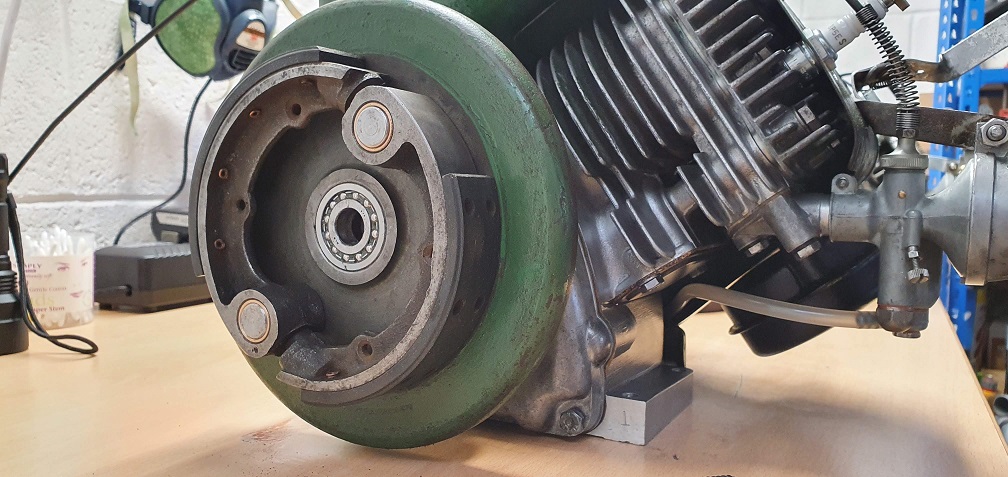
The flywheel clutch shoe posts needed a good clean up on this one as well
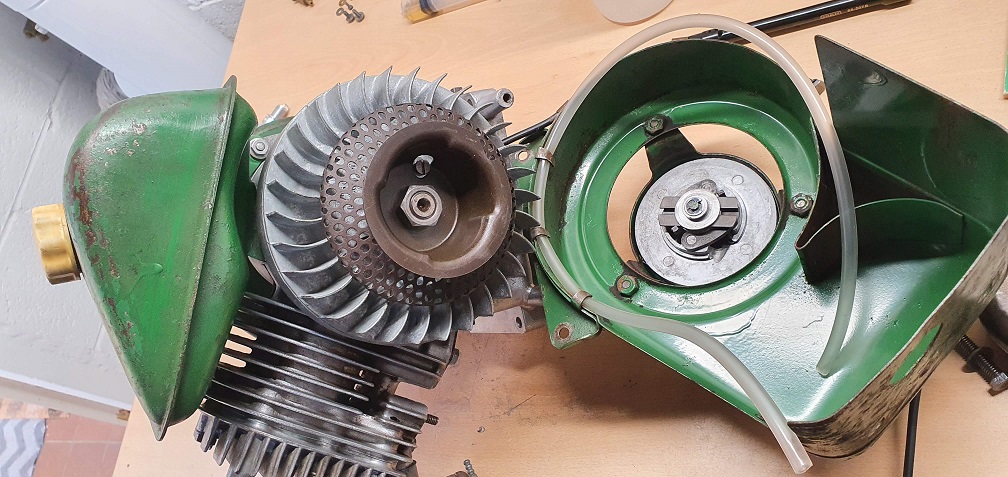
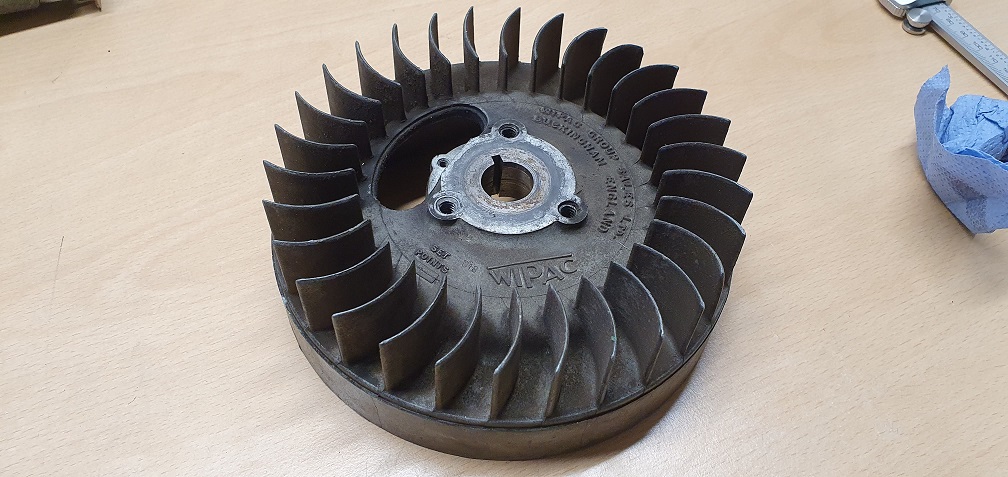
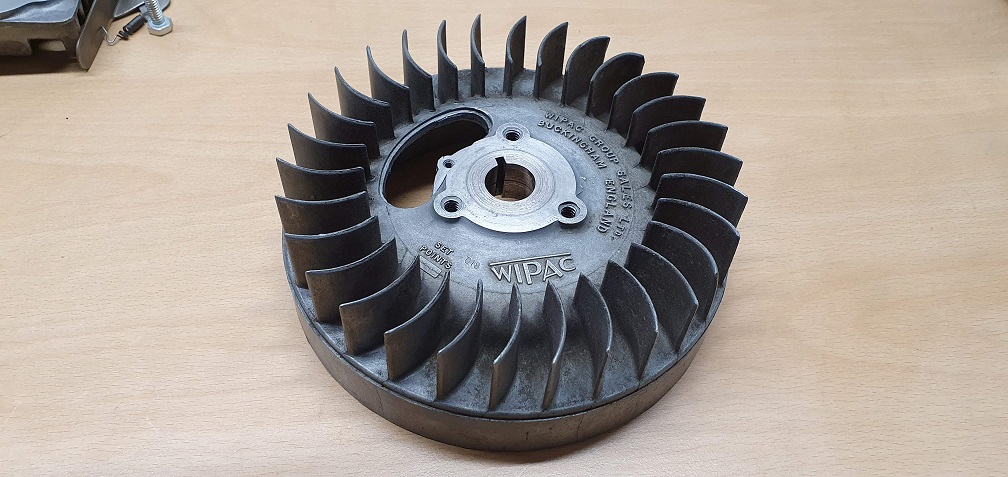
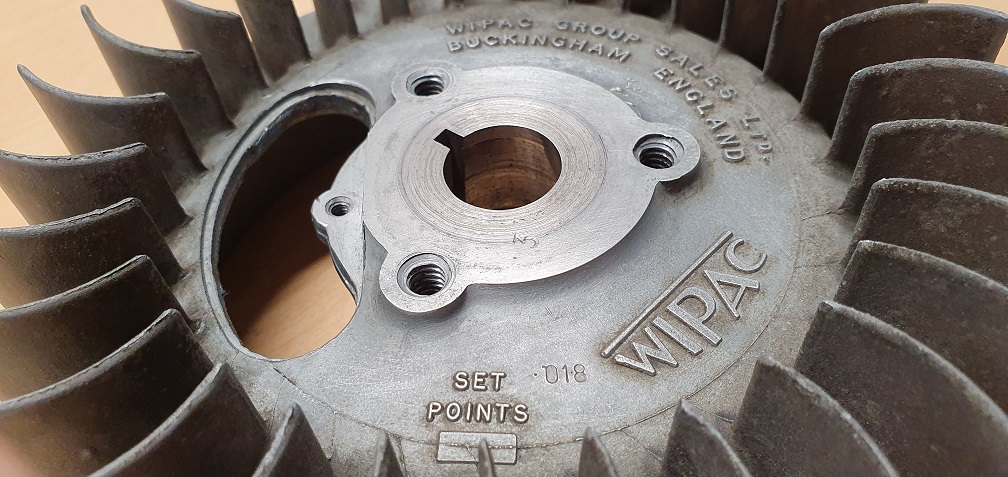
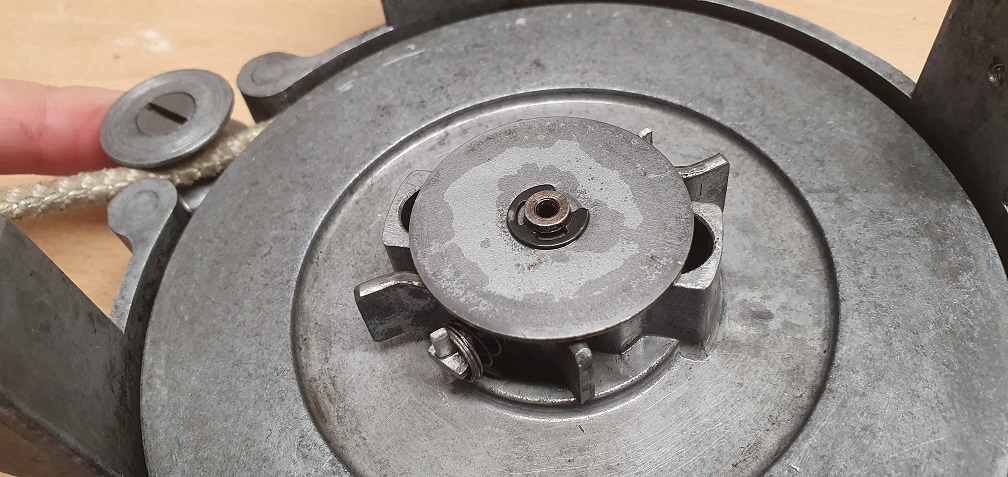
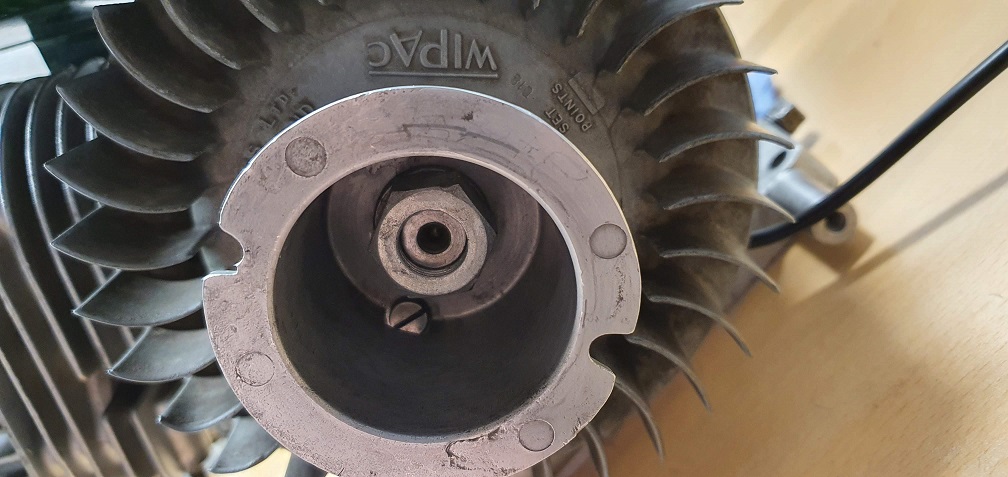
and the magneto flywheel

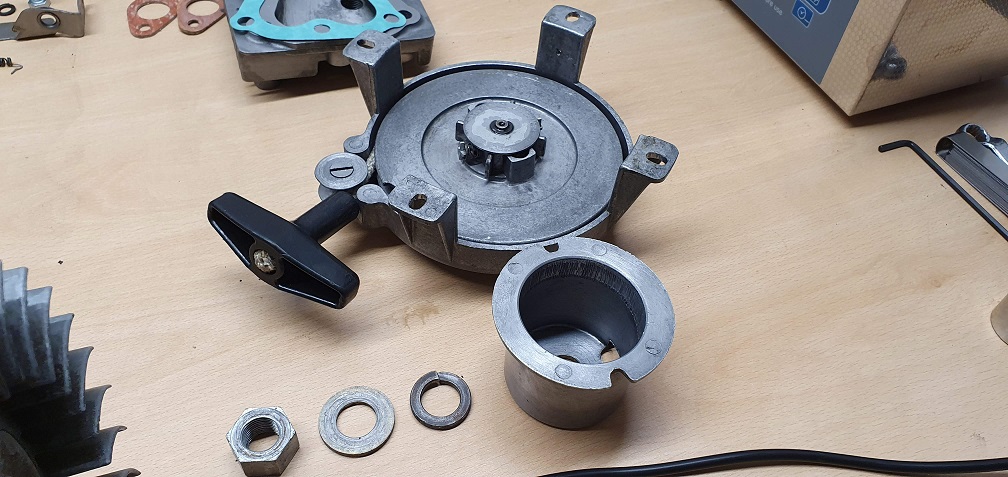
Now the SIBA recoil starter is quite a bit different to the other one, and uses a different starter cup mounted on the flywheel.
On the other engine, the starter cup went straight onto the flywheel, using a locating screw in the notch and then a spring washer followed by the nut.
On this engine, there was an additional thick washer between the flywheel and the cup - but I can't see that in the parts list. Perhaps it shouldn't be there? Has anyone seen this washer present on the SIBA starter and can confirm if it should be between the flywheel and the cup? Not sure what it would be doing there - if anything I would think it should go under the spring washer instead?

Never seen a washer in that
Never seen a washer in that position. I wonder if someone had a slipping starter and was trying to find a bit more bite for the pawls by moving the cup out?
I agree with Wristpin, that
I agree with Wristpin, that flat washer has been added by someone, might it be possible to see inside the starter cup ?
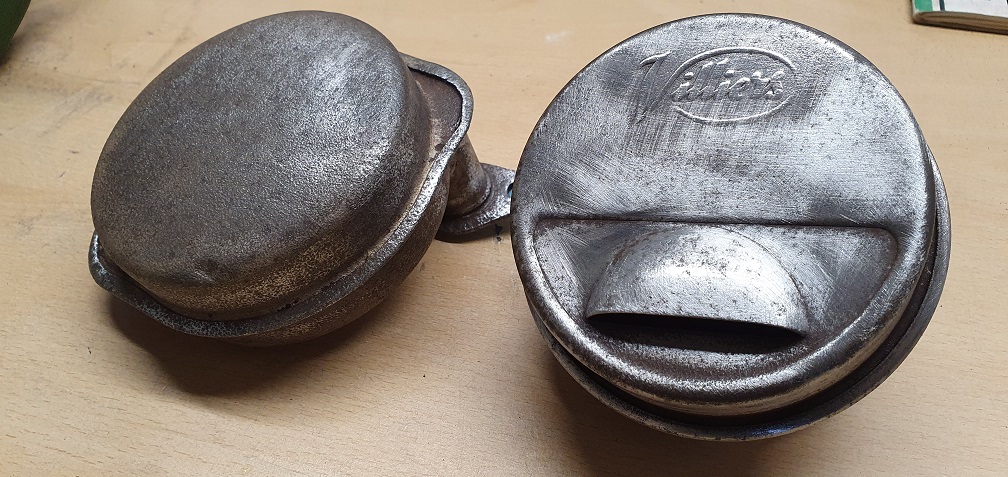
Thanks both - I've taken some
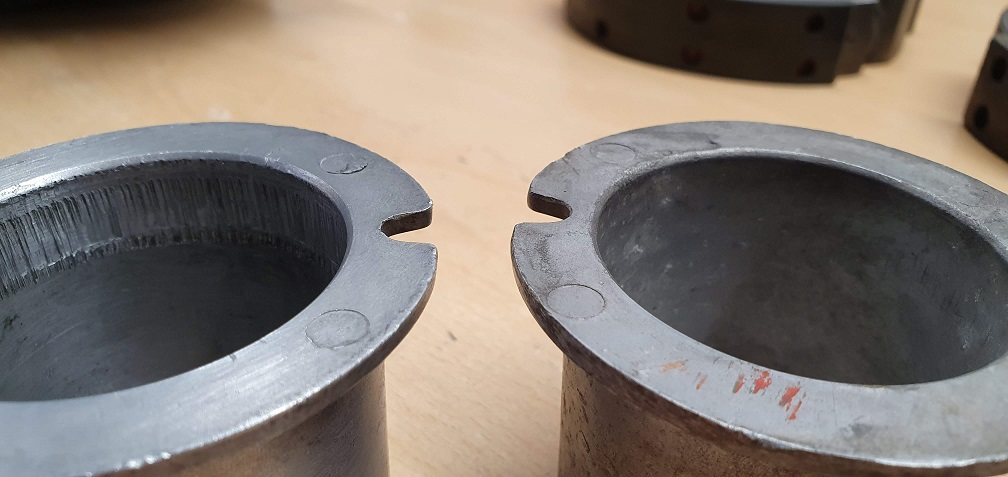
Thanks both - I've taken some pictures of the starter cup. The SIBA cup is a smooth cylinder shape compared with the other starter cup which has ramped sections for the pawls to engage with
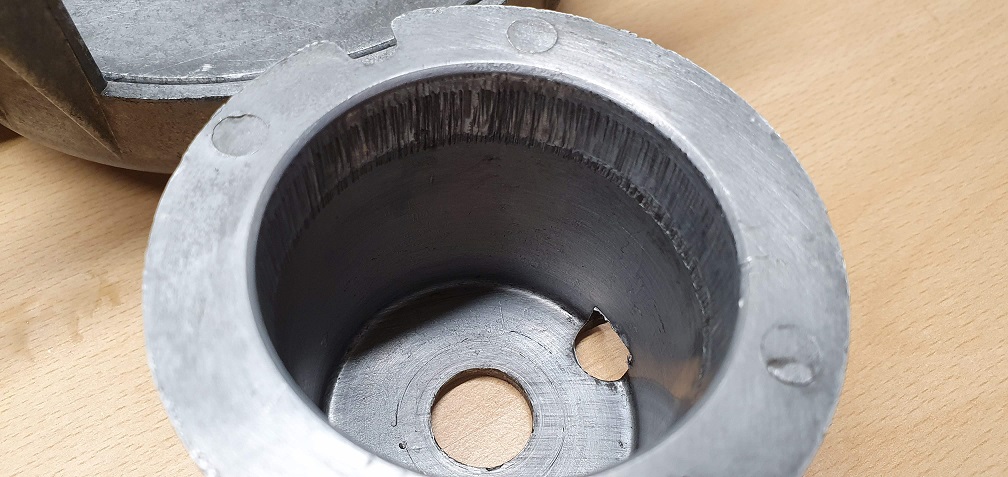
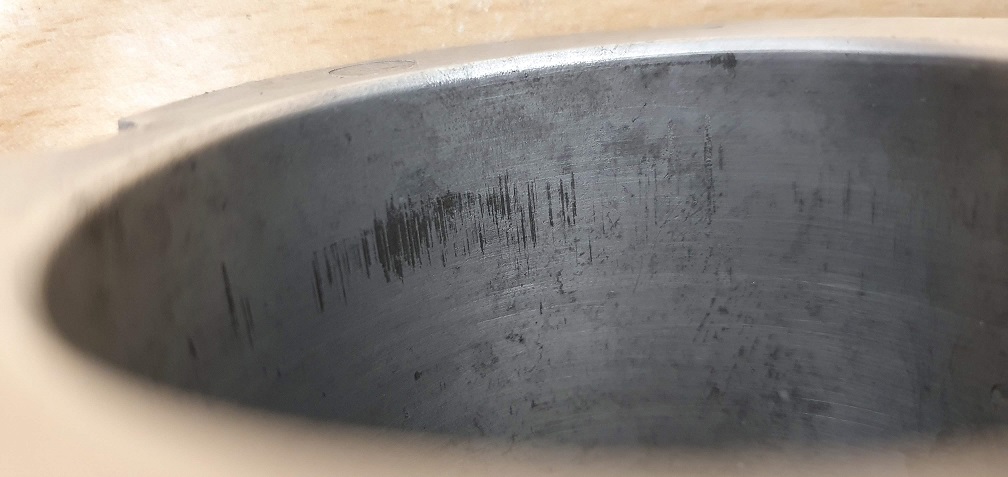
Do these pawl bite marks look at the correct height within the cup? Given the height that the pawls sit off the face of the rope wheel, I can't see how the pawls could get any further down inside the cup, even with the washer between the flywheel and the cup, so perhaps just a washer fitted in error during a previous flywheel removal/inspection?
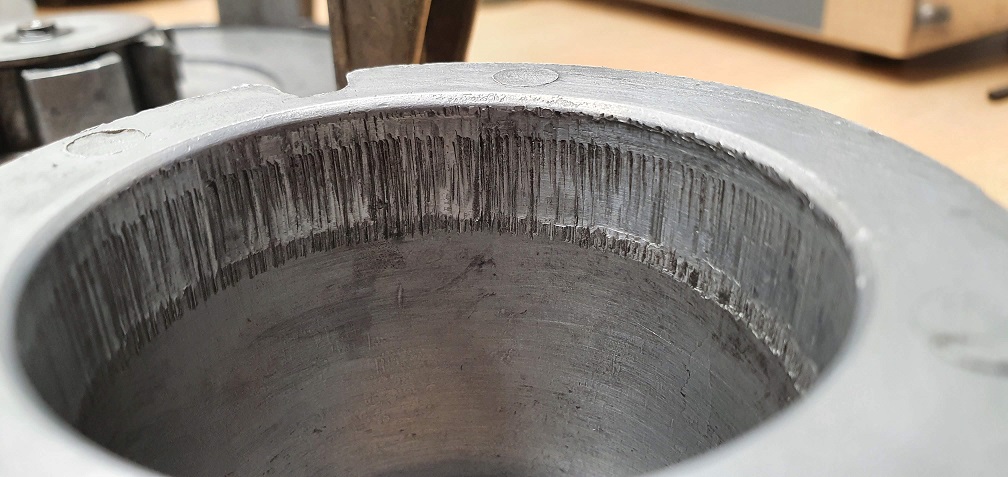
From here, it looks like you
From here, it looks like you need to find a new cup and you will also need new pawls. If you look carefully, you can see where the pawls are 'bitting' into the lower edge of the worn portion, this would only be caused by the cup being moved outwards by the washer, somebodies attempt to fix a slipping starter.
There are a couple of dodges
There are a couple of dodges that may get it working “ for now” , but as H says , definitely a new cup and probably new pawls; although carefully putting a new edge on the pawls may suffice. I would try just a new cup first. Note that there are two depths of cup, so order the right one !
Ah I see what you mean, that
Ah I see what you mean, that's a pain. I'll have to reach out and see if anyone stocks this particular starter cup. Looking at the two different starters, this SIBA one uses the cup with part number 30176, whereas the other starter uses the cup with the ramped sections, which is part number 87-1659.
I can see pawls for the SIBA are available to buy, but I'll get a close up picture of mine and post it here - I suppose the ends blunt off and wear, the same as the inside of the cup surface, from the contact/slippage.
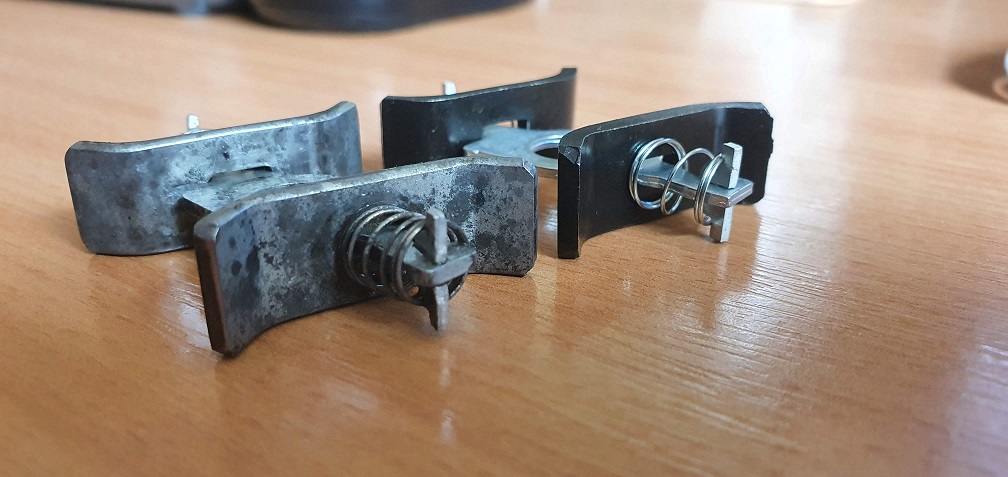
Some pictures of the pawls.
Some pictures of the pawls. Don't look in too bad shape to me at least, still have flat edges at the ends with minimal wear
It wouldn't be the first time
It wouldn't be the first time I've taken a good file and sharpened these pawl ends up, it definitely makes a difference. You need to get the angle fairly right though, about 15 to 20 degrees normally.
From experience, it isn't
From experience, it isn't that you need to 'dress' the pawls, it is that you need to 'lengthen' them. If you do not replace the pawls, you risk the premature wear of the cup again.
Just a random thought, in the
Just a random thought, in the interest of saving this starter cup due to available parts for these mowers dwindling, would there be any possibility of getting some sort of metal lining fitted over the worn section, say an inch wide? That would get the inside diameter fo the cup on the contact area back to what it should be, and if thick enough, would cater for the slight wear on the pawl length? Kind of like a large split bush but not split, and hammered into place just below the rim using an interference fit?
Possibly, but it might not
Possibly, but it might not need to be metal. Sthil used a similar starter where the 'cup' was a nylon insert in the flywheel. You are not going to make anything worse by attempting a fix.
I was thinking a soft alloy
I was thinking a soft alloy strip bonded into place with whatever two part epoxy of flexible sealant is the flavour of the month - Sikaflex comes to mind. That said a “ plastic” strip cut from a milk carton might be an option. Not too wide though as the cups are , I think, very slightly tapered, and cutting a strip to match the taper would involve , what I seem to remember from technical drawing classes , developing a cone; but it was long ago.
A while back back, George at Villiers Parts was advertising new cups, but even then it was a case of “ when they are gone they are gone” , and they are no longer on his website.
Ah nylon could be an option -
Ah nylon could be an option - I stripped and rebuilt a 2 stroke Fuji Robin hedge trimmer last year and that used a nylon 'cup' but also used a nylon pawl as well. I wonder how a nylon sleeve / bushing fitted inside the alloy starter cup here would fair with the steel pawls? The inside of this cup is 2" exactly in diameter at the pawl engagement section, and measurements show it has a very slight 1.5 degree taper from top to bottom. The bite marks only extend down into the cup by approx half an inch so the insert wouldn't need to be much wider than that.
The Stihl I referred to,
The Stihl I referred to, used steel starter pawls and a nylon 'cup', so a 'repair' with a nylon strip may be viable.
That's good to know, thank
That's good to know, thank you. I'll investigate the nylon option and see what I can come up with. If that doesn't work out, perhaps aluminium - using something like a 2 inch diameter aluminium hose joiner cut down in length to around 3/4 inch - something like this:
https://www.sibbons.co.uk/product/2-aluminium-hose-joiner/
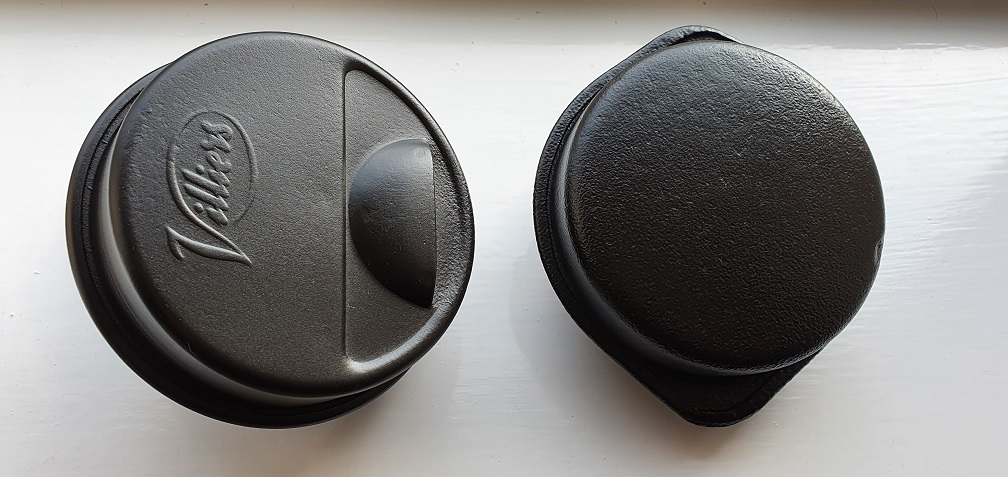
I managed to secure the last
I managed to secure the last alloy starter cup that Villiers parts had in stock, and it arrived today. Also a new pawl assembly is on it's way to go with the new cup, for good measure.
I am still going to attempt to repair the existing starter cup as it seems very wasteful when parts are in such short supply, and hopefully with a suitable repair, will be a good spare to keep should I be tempted into restoring any future Marquis, now that I've got a soft spot for them :)
The new cup even came with some spider eggs inside, free of charge
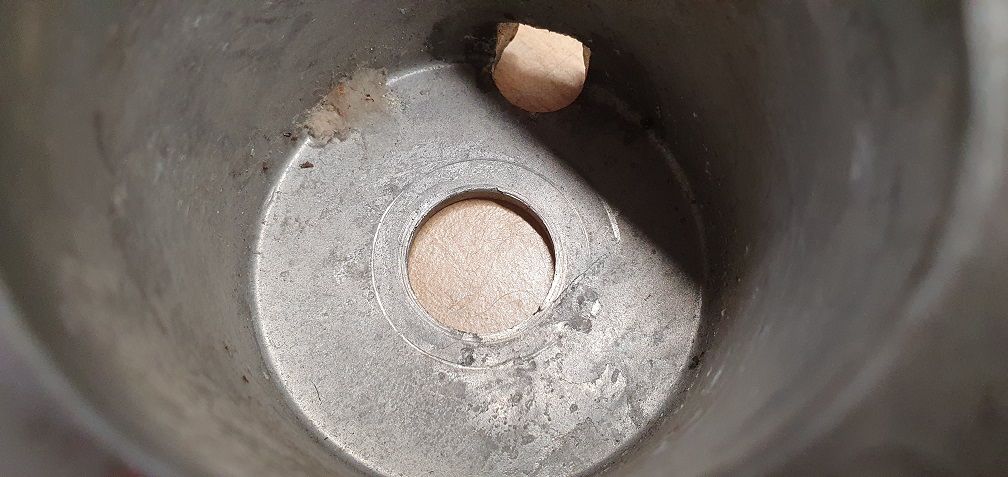
There do appear to be some usage marks oddly, like the spring washer witness mark above, perhaps tried on for size at some point in it's life...

Previous bite marks form pawls, or just manufacture process marks?
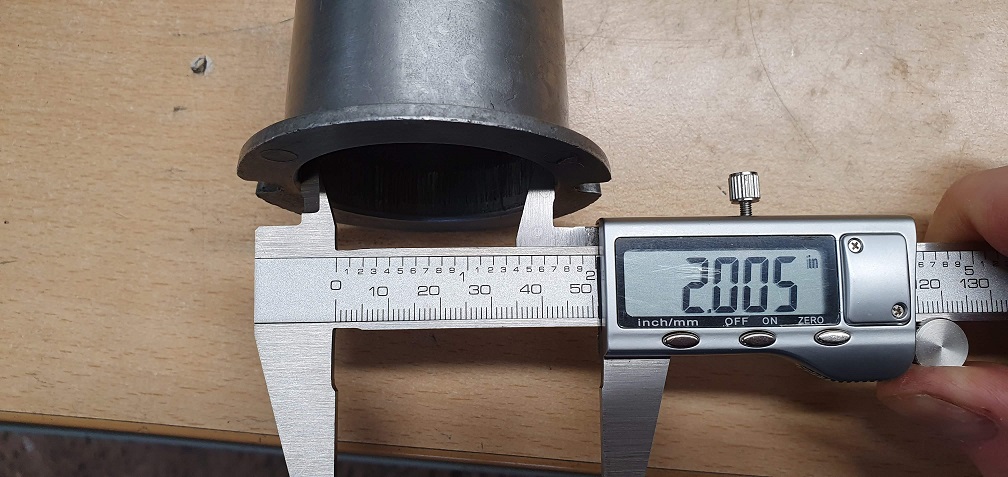
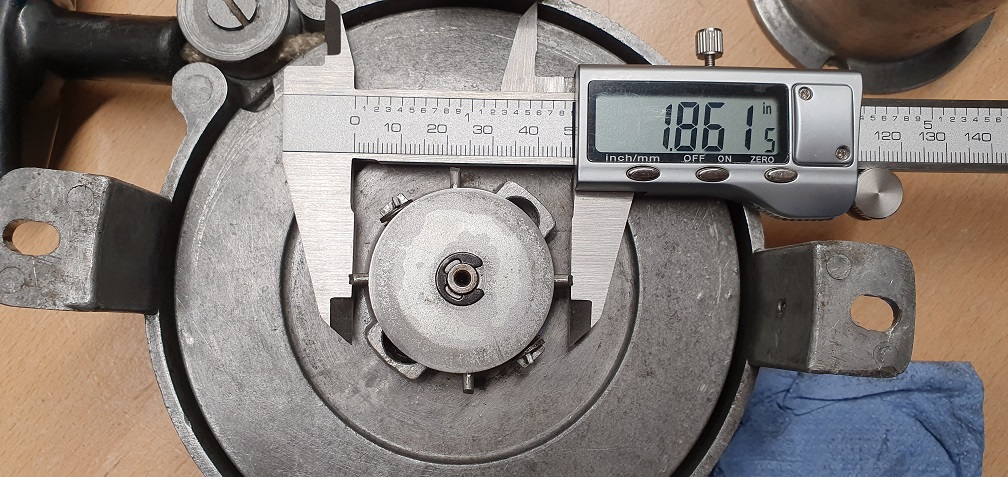

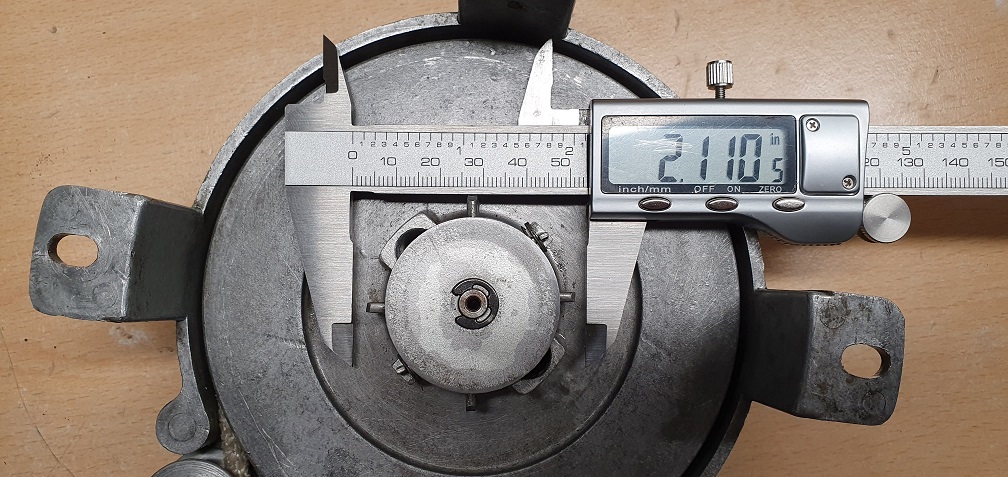
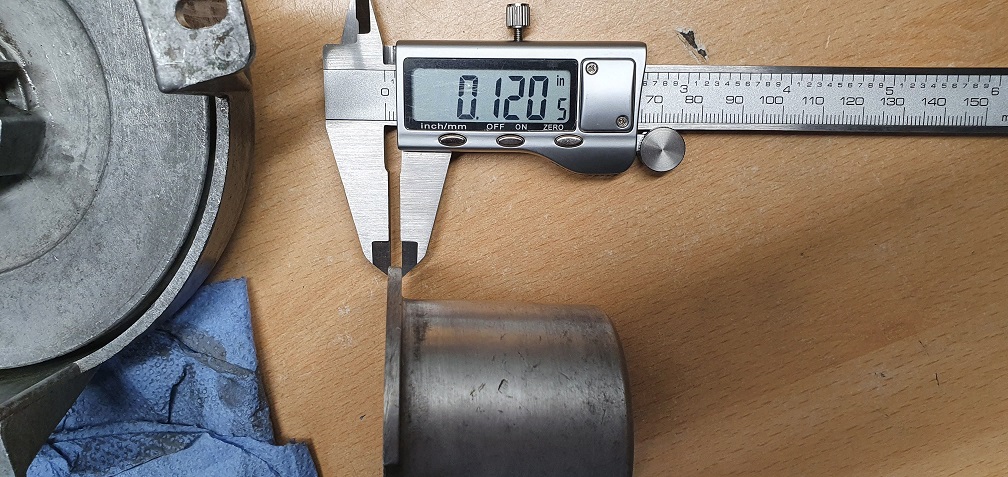
So in terms of some sort of sleeve or liner, I doesn't look like it would need to be very thick at all in order to provide a new surface for the pawls to bite into during starting. At rest, the pawl diameter/reach is 1.861", when manually forced and held extended at the limit of their travel, they are 2.281", and during normal extension by pulling the rope, they reach 2.110".
Given the pawls do actually still manage to bite on the tests I've conducted, I could probably get away with using the current cup and pawls 'as-is' but I think it would be worth a repair venture just to refresh the lifespan of the cup and pawl combination.
My new pawl assembly arrived,
My new pawl assembly arrived, part number 86/9433, and I was surprised to see it was in a factory sealed Stihl bag
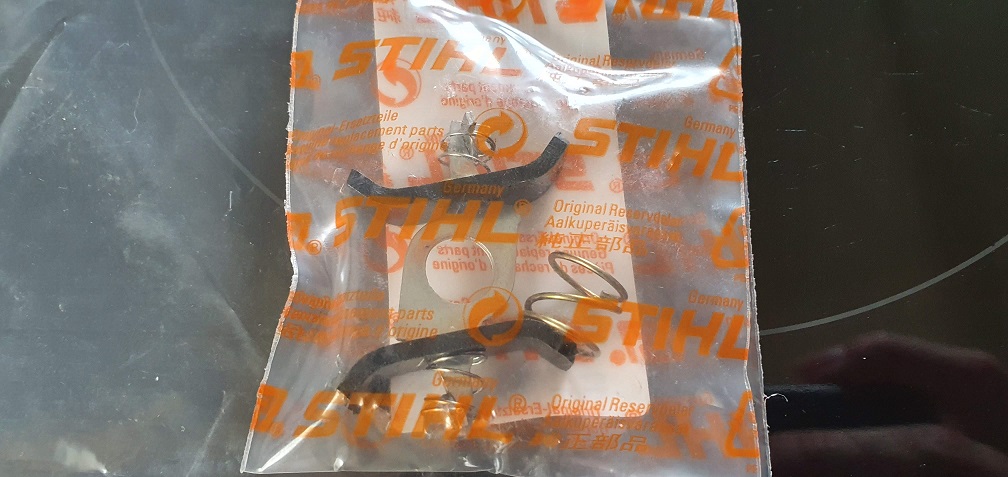
It is identical to the one Stihl use, which has a Stihl part number of 11061904600 and called 'Friction shoe' - so going back to Hortimechs post further up, I looked up the relevant Stihl part to see which models it fits. It fits various models, but chainsaw model 070 or 090 are examples.
Interestingly (for me at least) the Stihl application also uses an accompanying ring/sleeve/insert in the starter cup for the pawls to bite into or grip - available in metal and nylon(?)
You can see these pawls in action starting at around 3min50s in this video - https://www.youtube.com/watch?v=ERjhb36SeuQ&t=230s
The metal ring is available here - https://www.lsengineers.co.uk/ring-stihl-part-no-0000-961-5115.html
The nylon version for the brushcutter range instead of the chainsaws is available here - https://sawzillaparts.com/proline-starter-ring-friction-shoe-for-stihl-…
Perhaps the chainsaws use a metal ring insert due to the extra force if it is harder to turn over? Now I'm wondering if either the metal or nylon ring would fit inside the F12 starter cup and provide the solution I'm looking for? Both versions come with what looks like a serrated inside rim surface, presumably to assist with the pawls finding grip.
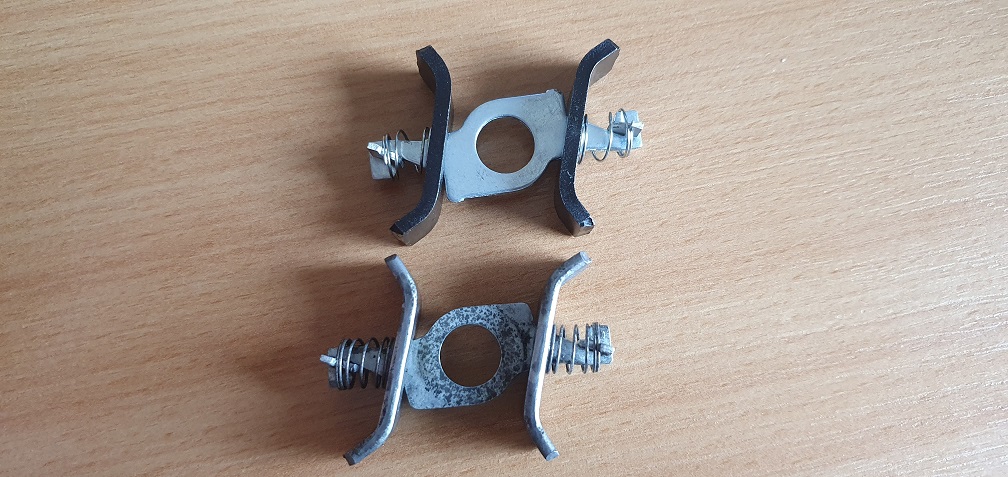
The new pawls have an angled leading edge - perhaps how my original pawls would have looked when new
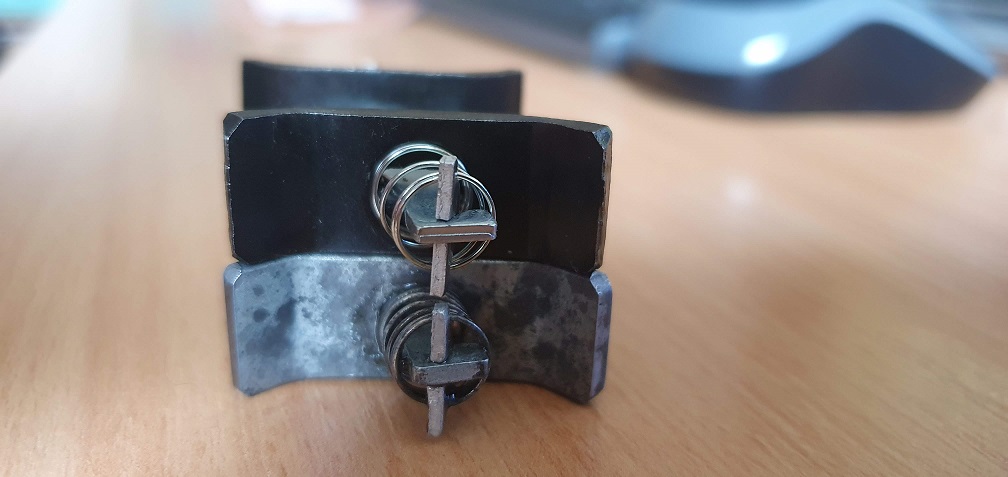
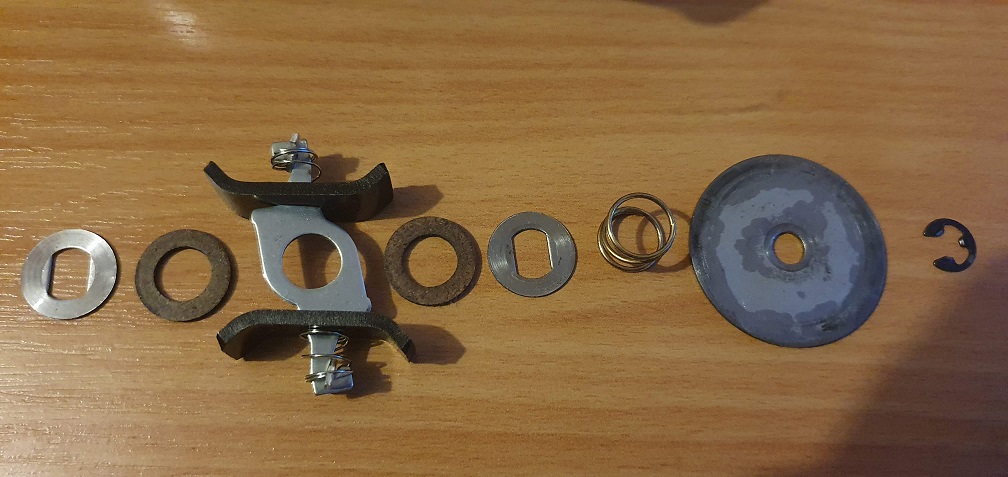
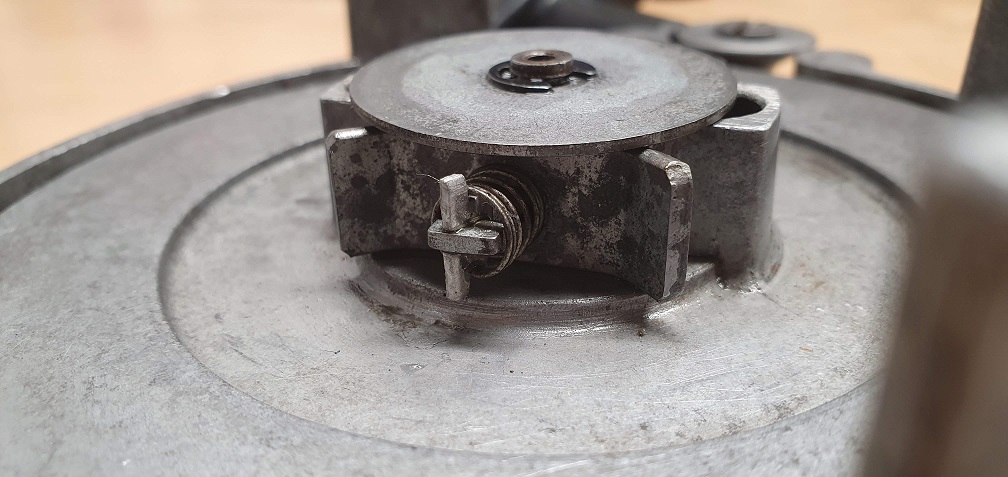
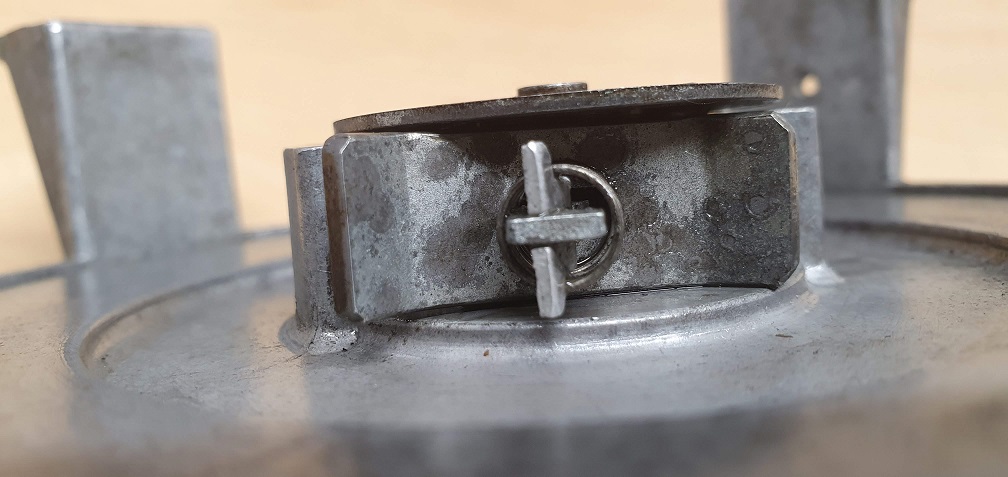
When rebuilt around the static middle post, in the above order, you can see how it works. Pressure pushing down from the large washer on top of the spring, held in place with the circlip, produces the gripping force on the centre of the clutch assembly through the cork(?) washers either side. As the rope is pulled, the pulley revolves around the static centre pin and the pawl assembly starts to follow, until the pawl centre assembly comes up against the metal posts on the pulley, at which point the clutch assembly is forced to slip and the pawls extend outwards at one end. That's my understanding anyway. Fitting the new part, I noticed it had the word 'TOP' engraved on one side of the pawl assembly, but fitting it this way is incorrect on the F12, as the pawls retract when pulling the rope. The Stihl flywheel must revolve in the opposite direction. So turning it over and refitting, a quick test fit and the pawls now grip the new starter cup, phew! Now I can get on with the rebuild while mulling over the repair of the old starter cup/worn pawls.....
That's my understanding
That's my understanding anyway
Basically, what you are accurately describing is the workings of an inertia starter. That is one that relies on the inertia or resistance to turning of one component to actuate it - in this case to expand the pawls to grip the cup or drum. Other than wear the enemy of inertia starters is lubrication reducing that resistance. In use, the pawl carrier and the two washers with the “doubleD” centr hole become polished and as a result the friction or inertia is reduced. A quick fix for a lightly worn starter is to just draw those washers and the pawl carrier across a sheet of fine emery cloth to create some light surface striations to aid grip. Also useful is a thorough solvent cleaning of the friction washers to remove any absorbed oil or grease .
Thanks Angus, that's very
Thanks Angus, that's very useful to know. Things are starting to make a bit more sense now - the friction washers and metal washers were very oily, and without realising quite how it worked on my initial strip down and rebuild of the starter months ago, I didn't clean up this oily film. I now see how that will reduce the friction so I'll give it all a final clean up to assist in friction creation before fitting. I wonder if the previous oil and probable lack of friction contributed to the wear on the pawls and cup - it sounds likely.
In terms of the ring insert, I suppose it would depend on the inner diameter of the Stihl starter cup as to whether it would fit the F12 starter cup. The inner diameter of the ring could be too small also, if the pawls don't have the exact same length of travel as the F12 due to the metal posts on the pulley. Probably best to come up with a similar ring/sleeve idea based on all the F12 cup measurements.
For now though, a few more progress pictures - new cup fitted
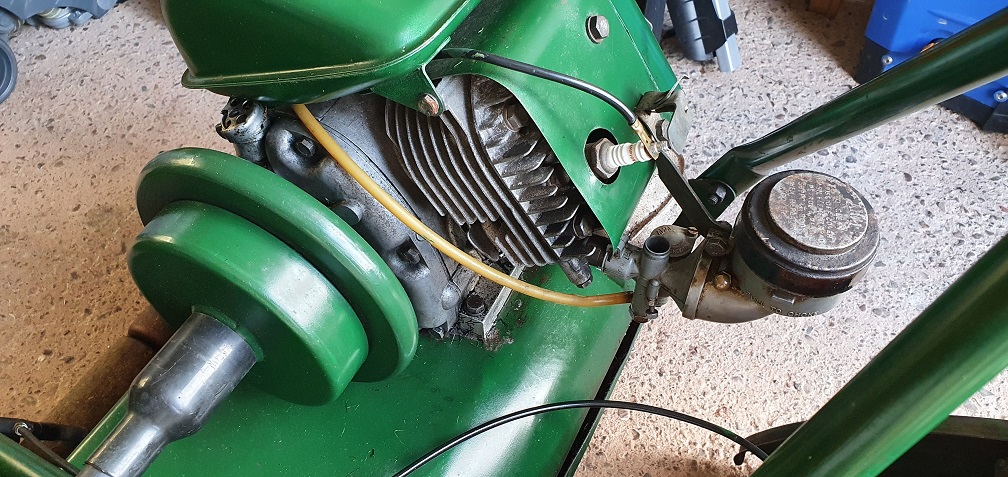
Routing new fuel hose correctly like on the other engine
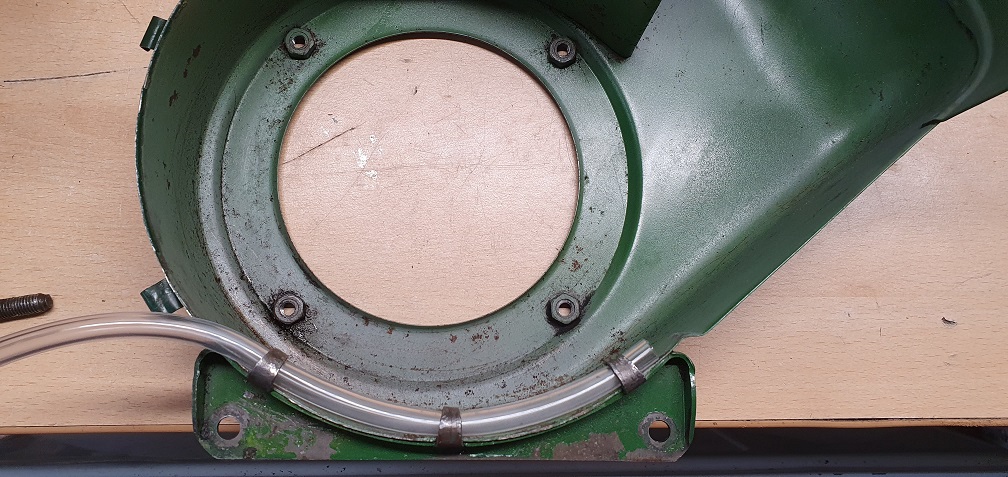
As the 3 fuel pipe clips were fairly squashed I used a small 5/16" diameter dowel to help get them back into the correct shape with some careful manipulation - keeping in mind clearance with the flywheel again
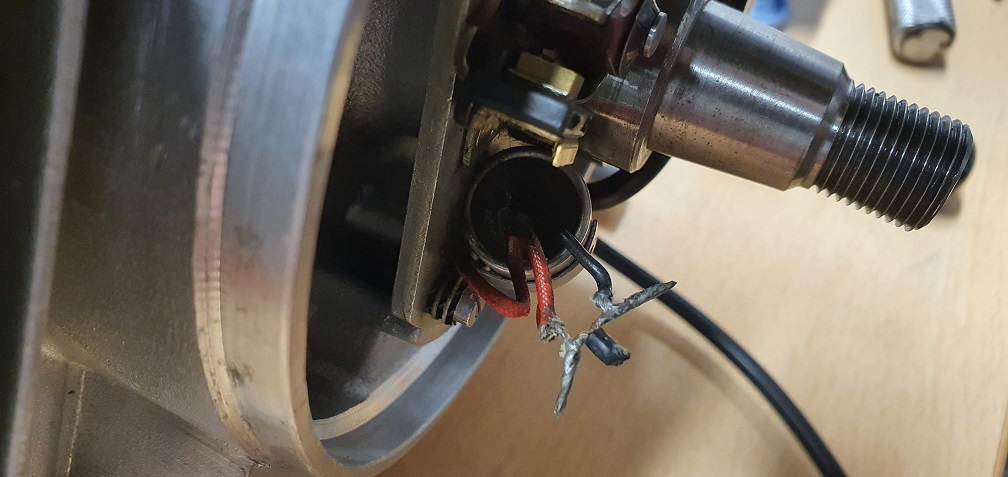
After test fitting the cowling and fuel hose I thought I better check there was a spark - this mower I saw running when I bought it so I knew before strip down it was running ok, but with everything being stripped down and points cleaned etc I wanted to double check. Glad I did, as there was no sign of any spark! Took the flywheel back off to have a look and see what was going on. I figured it was possible that the condenser or coil could have been on their last legs when it was running, and just happened to have now failed. I checked the wiring from the condenser to the points - a bi of a strange method of joining the red wire from the coil to the condenser wire, but I suppose it was doing it's job....
I removed the extra bit of wire which was holding the red and black together as I didn't see the point of it being there if the small brass clamp on the points would be holding both separately
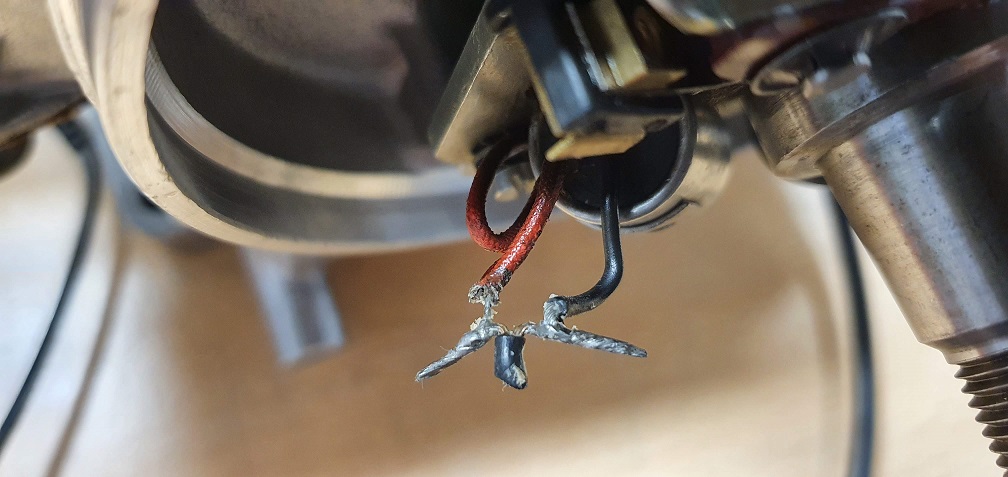
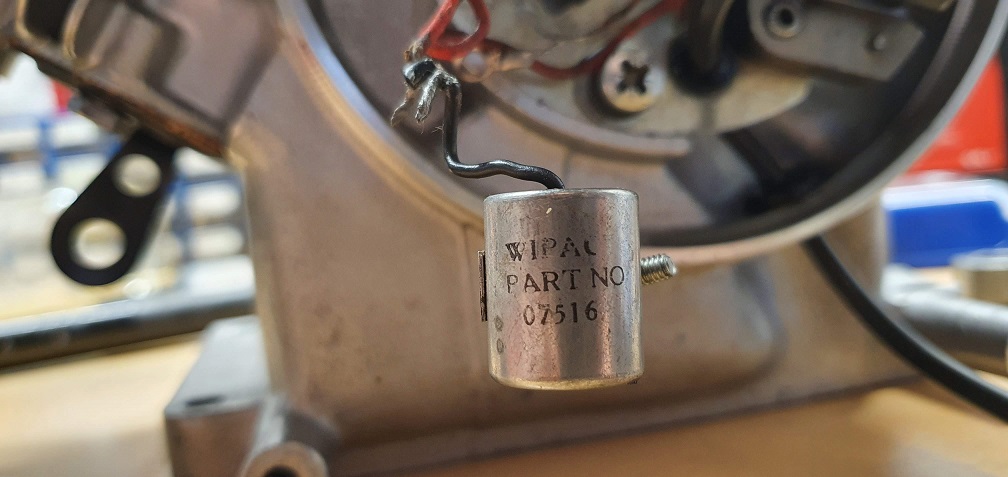
With the condenser removed, I tested it with my meter - I know it's not a real life test as such, but it showed that the condenser had charge, was able to watch it discharge, and then take a charge again and hold it. Only using tiny voltages but it seemed to be doing what it should, so I refitted it and that's when I noticed the ground connector from the coil to the condenser had snapped - the solder connection must have barely been holding on

So I re-soldered the connector on to the end of the wire and refitted everything and checked continuity and all looked good
Refitted the flywheel and re-tested everything - producing a spark again thankfully! 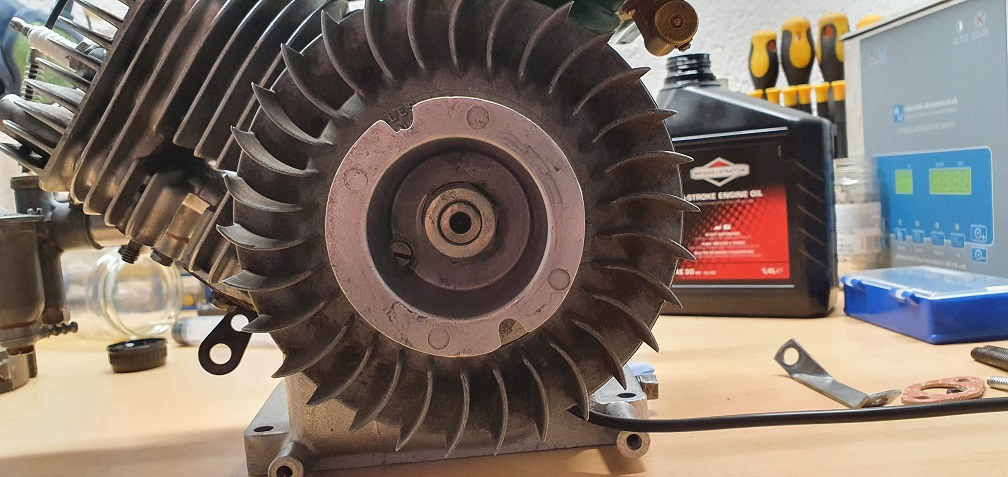
I decided to clean up both exchausts and remove as much oxidation as possible and go with the BBQ/stove matt black paint to make them look a bit tidier
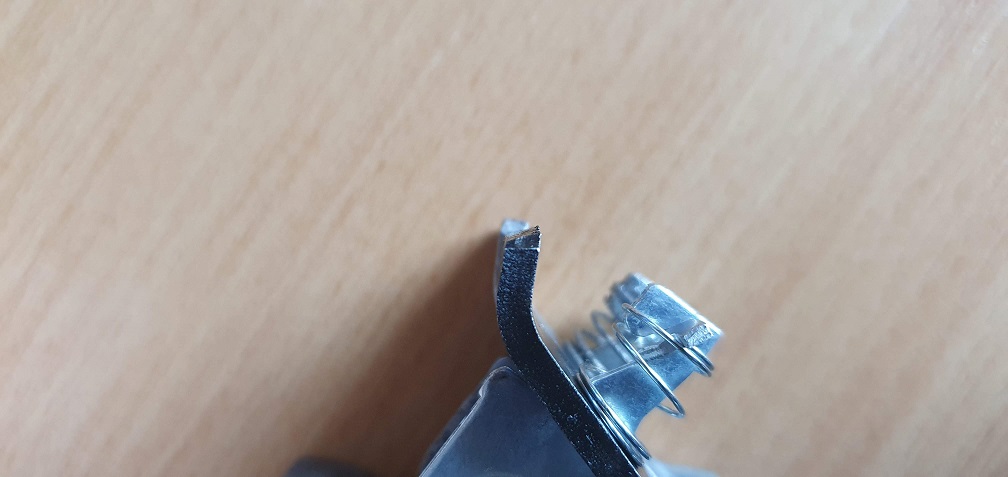
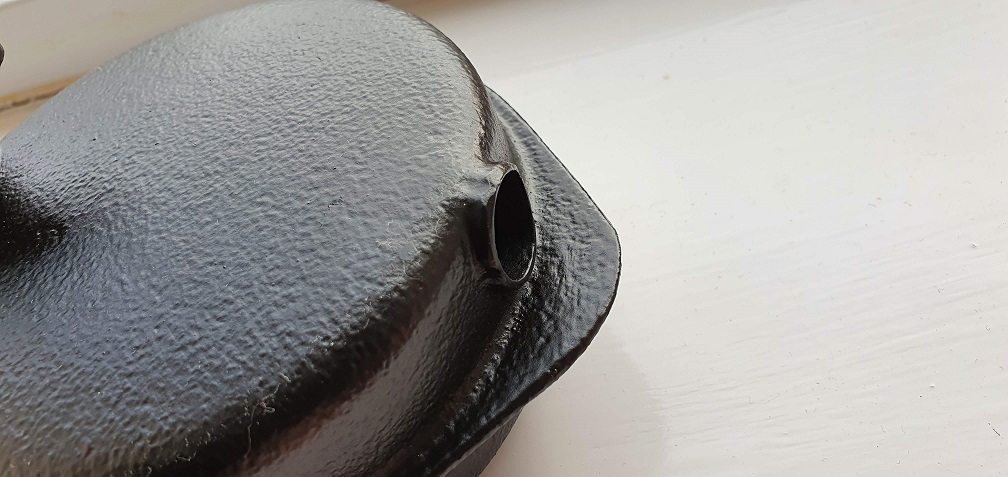
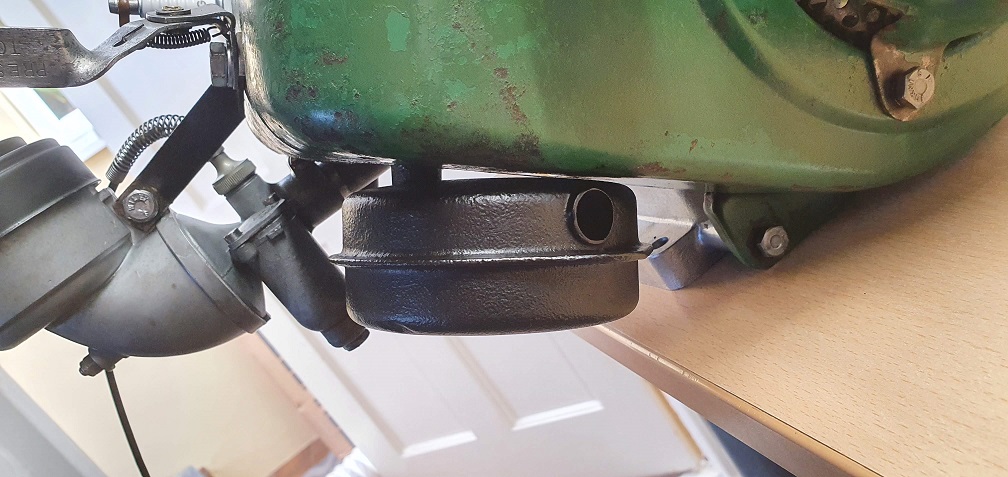
I also trimmed down the dog eared end of the outlet pipe on the older one
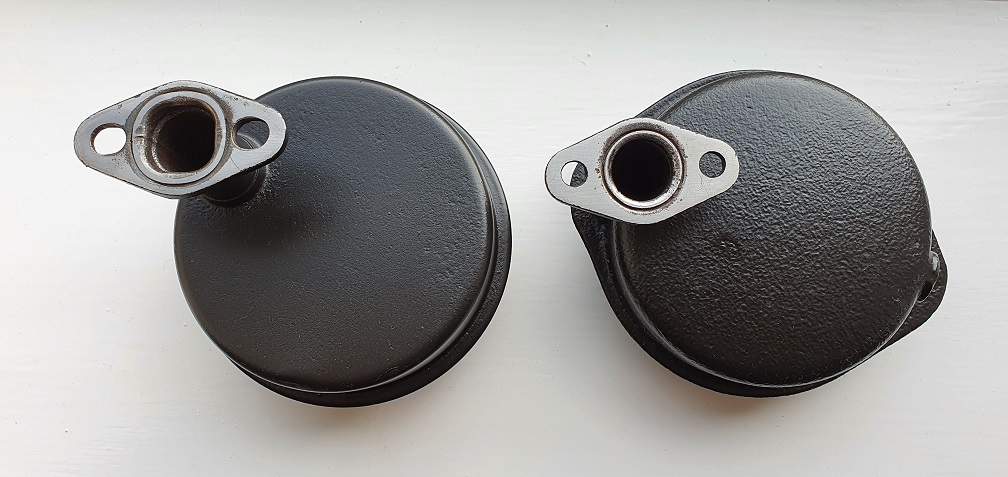
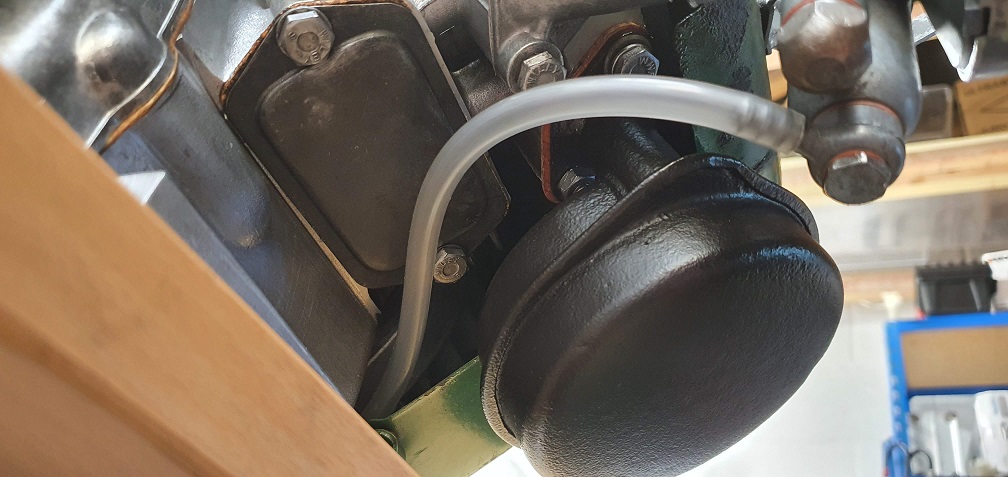
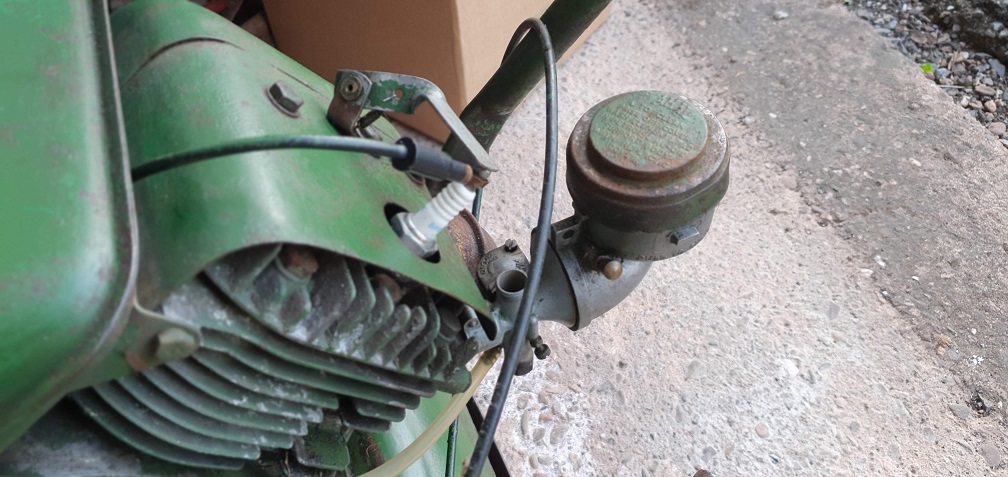
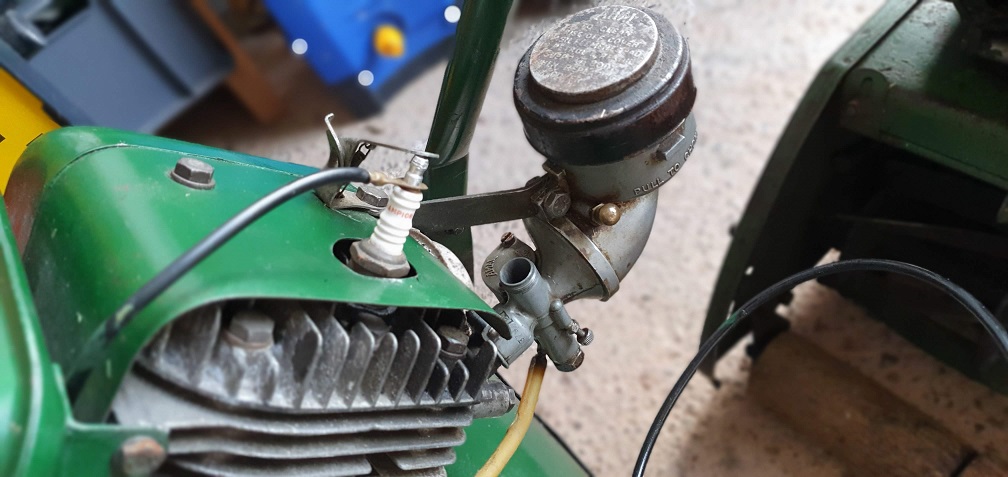
The angle of the fuel banjo helps to direct the fuel pipe out and around the exhaust. I'm not sure how hot the valve chest cover is likely to get, but the fuel pipe is close to it - perhaps why the later version of the valve chest cover has the pipe bracket to hold it away form the valve chest cover.
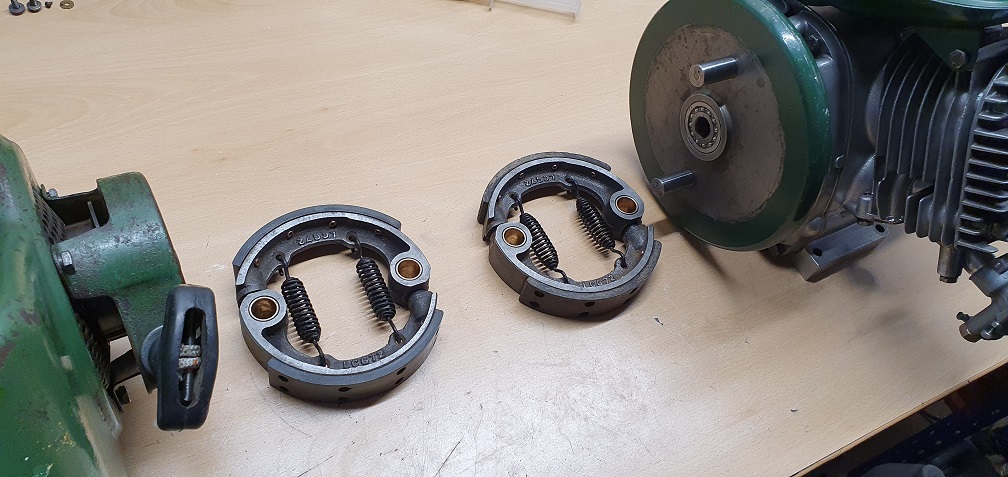
Also cleaned up some more parts that will never get seen - just because - the clutch shoes next
Getting there...
The Stihl I was referring to
The Stihl I was referring to goes back to at least the 70s, it was a stone disc cutter, which everyone referred to as the Stihlsaw and this was based on an earlier chainsaw (TS8 ?). My brother was a builder and I was always repairing the starter on his Stihlsaw.
Also cleaned up some more
Also cleaned up some more parts that will never get seen - just because - the clutch shoes next
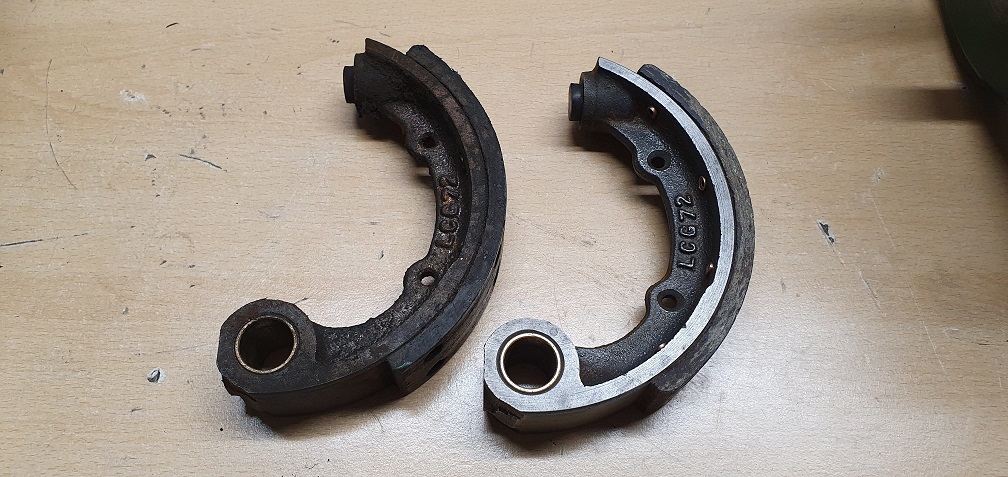
Bear in mind that old clutch linings will probably contain asbestos so don't over do the dry cleaning and remember that there's a right and a wrong way of refitting them.
Yes, face mask work during
Yes, face mask work during the cleanup as didn't fancy inhaling anything nasty! The correct way for the shoes being the pivot end leading - as looking at the clutch flywheel face on, it rotates anti-clockwise, like this?
It's good to see such
It's good to see such rebuilds so clearly and going so well.
Yes, the ends of those new Stihl pawls do look angled, about 10 to 15 degrees as I said ! Otherwise I doubt they'd grip, they approach the inside of the drum/cup like a chisel I think.
it rotates anti-clockwise,
it rotates anti-clockwise, like this?
Spot on. The beauty of a well set up Marquis is that it can be controlled with just the throttle leaving the landroll clutch for box emptying and emergency stops. Put them on with the free end leading and you will have a horrible snatchy clutch.
Thanks, it should provide a
Thanks, it should provide a useful resource / reference for others looking to restore these engines - especially if they don't have experience in this field. If it helps to prevent a sloper engined marquis heading to the scrapheap and get restored instead, then great :)
I came across a post on here where Wristpin had kindly posted up a picture from a Ransomes reference showing the clutch shoe orientation - with the pivot end leading, and that's how these 2 engines had them before strip down as well. Before refitting them, I want to fire up both engines to check all is running ok, which if it stays dry today, I may be able to achieve
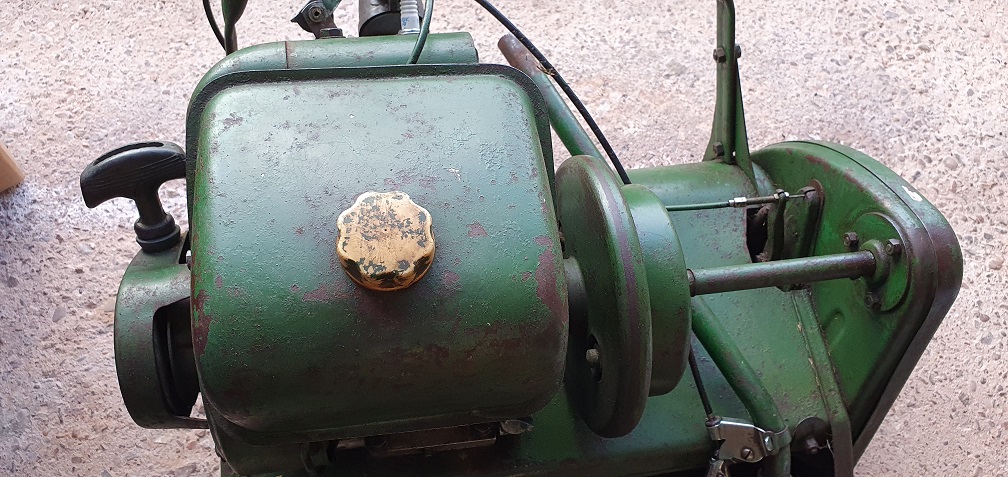
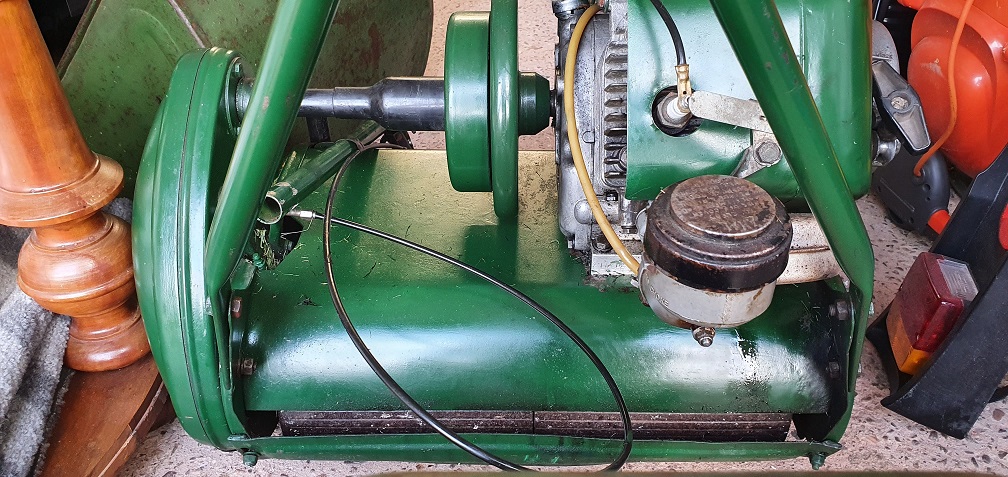
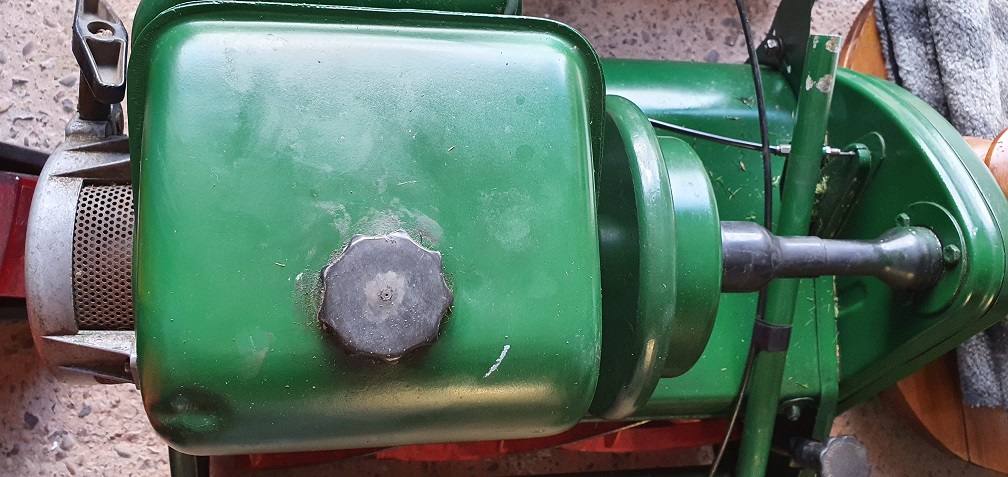
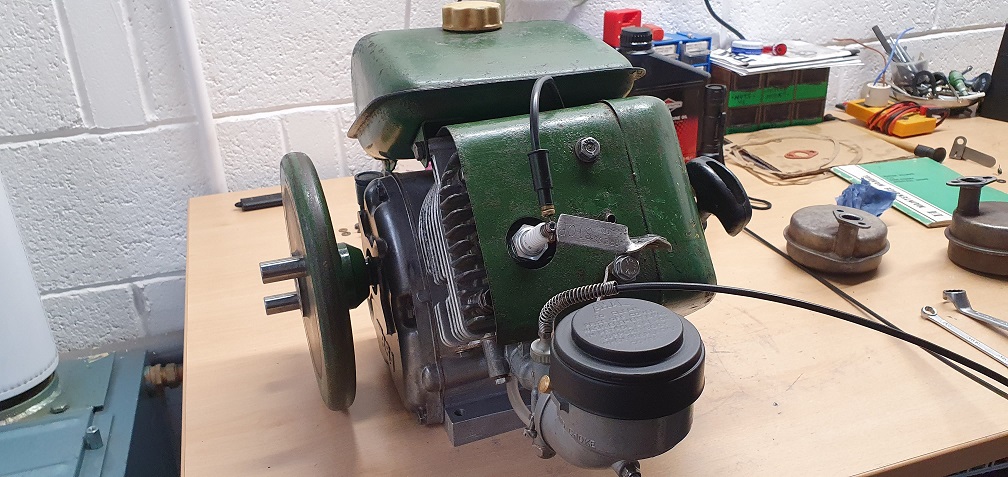
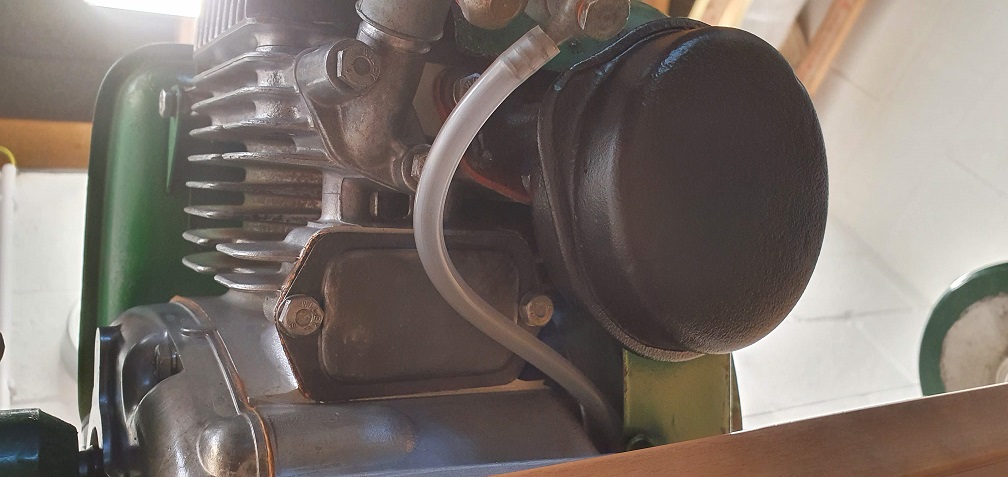
Villiers branded exhaust refitted, SIBA starter and grass shield fitted

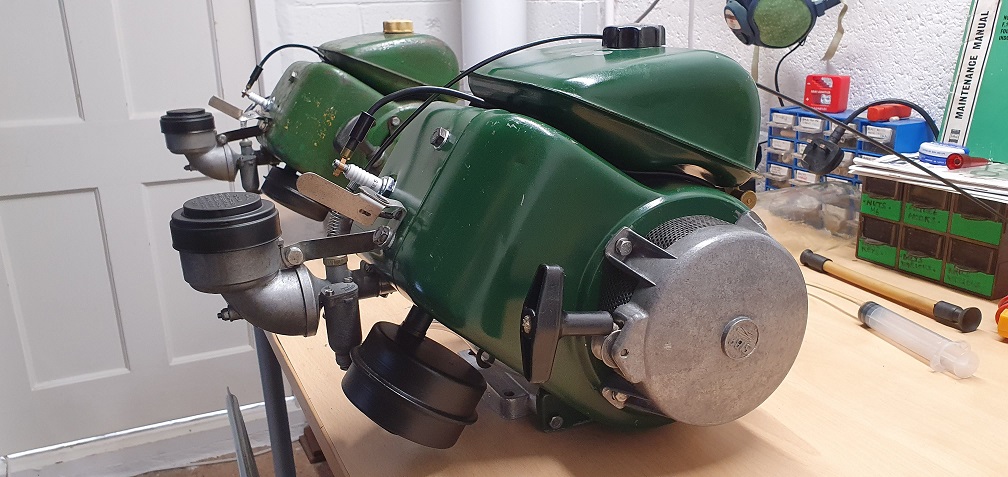
It's so much quicker reassembling one of these engines when you've just done another one!
So there we have it, both engines sorted. The only thing I would like to do is replace the spring on the newer ignition kill lever, as it has been overstretched in the past, so the lever doesn't snap closed or move at all under spring tension

I'll have a search around and see if I have any springs that may be suitable
Just the small matter of the
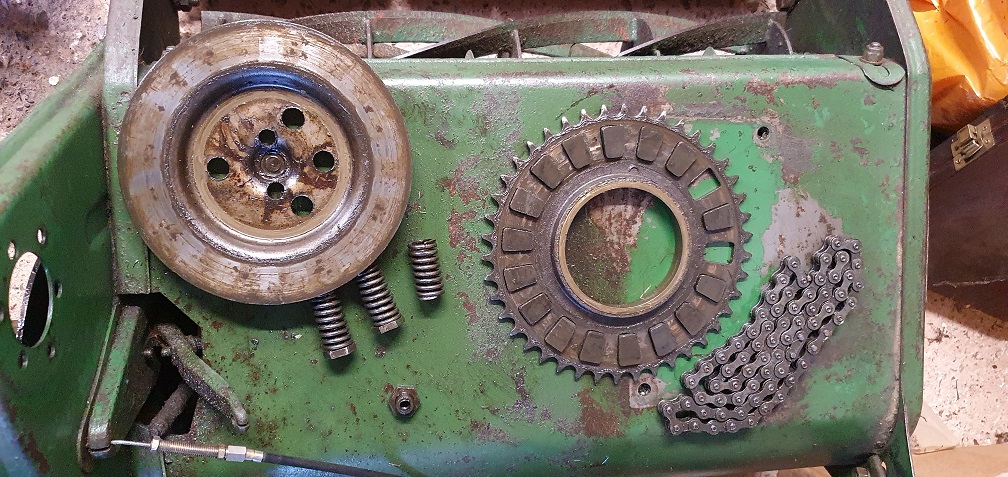
Just the small matter of the actual mowers themselves to overhaul now that the engines are sorted. Starting with the mk4
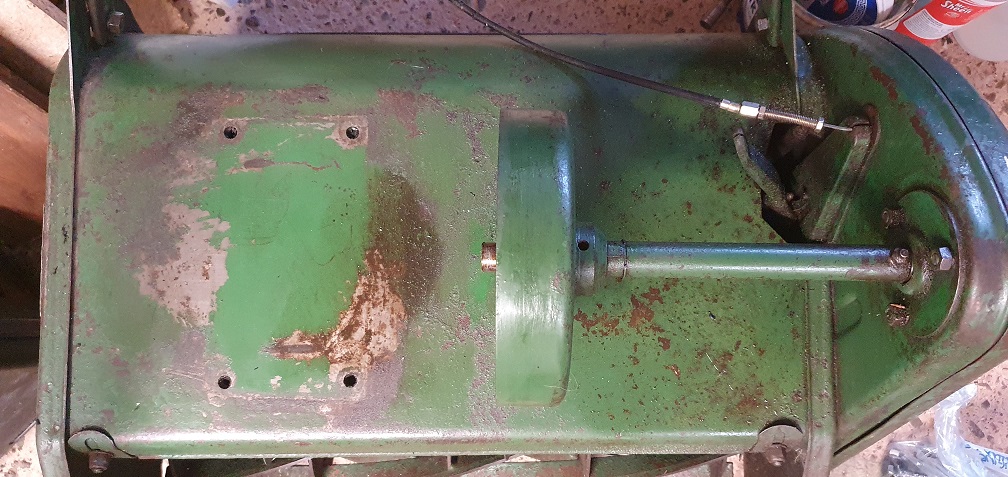
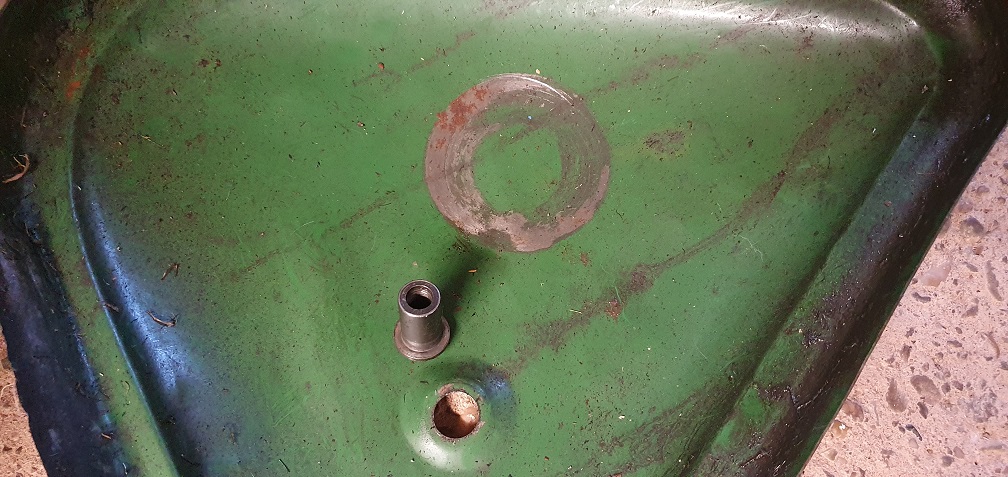
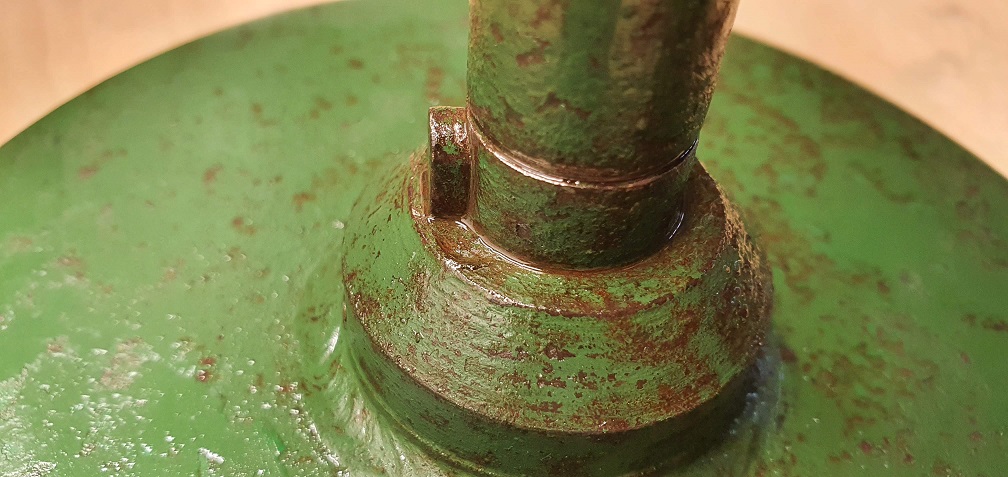
I can finally see what is probably the original shade of green on this one, underneath where the engine was mounted. Everything will get a good clean up, although there is some exposed metal....

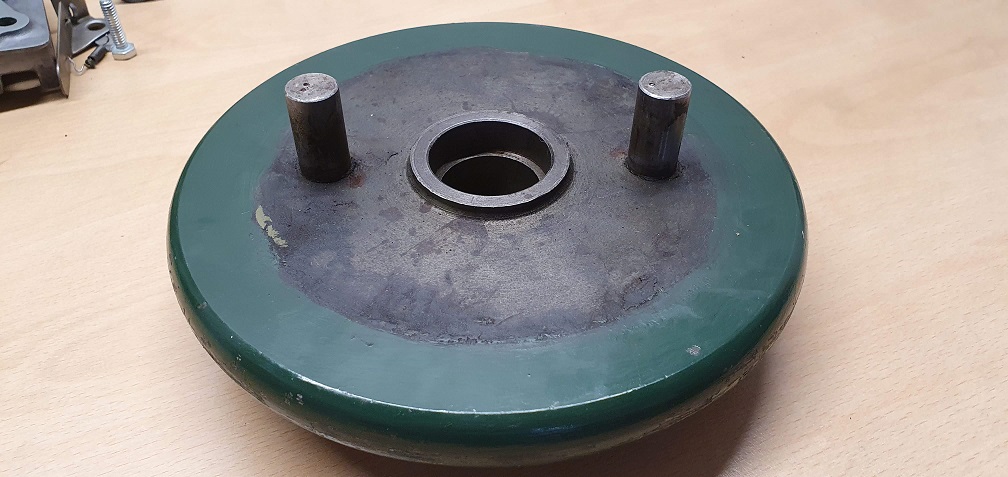
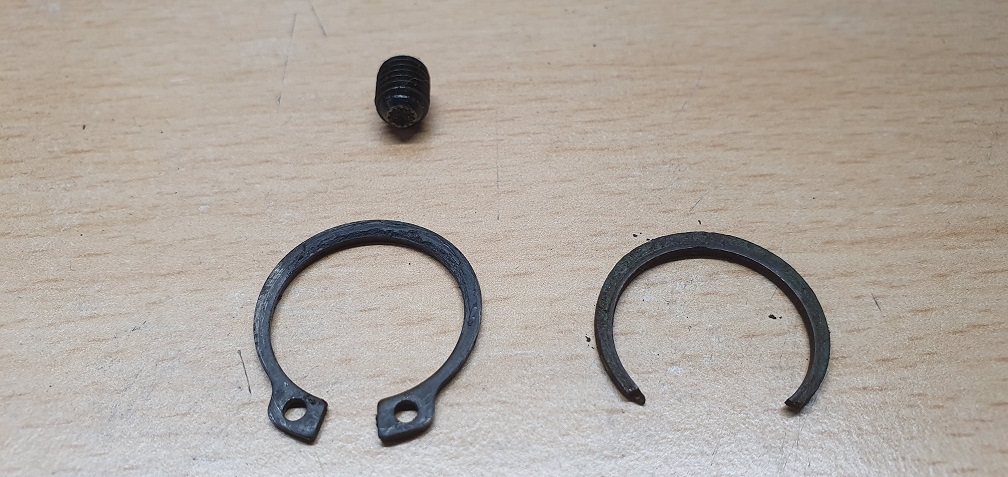
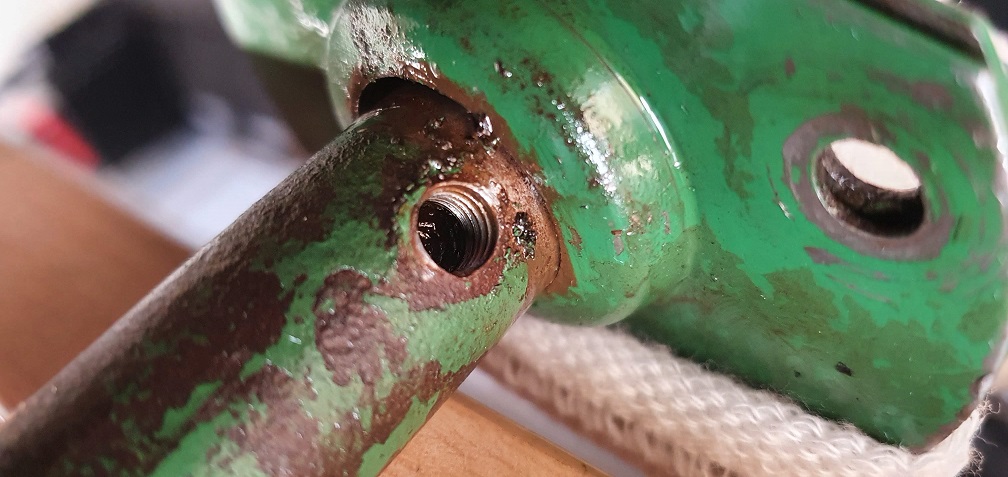
A missing grub screw and broken circlip - although the clutch drum seems pretty well seized in place where it is
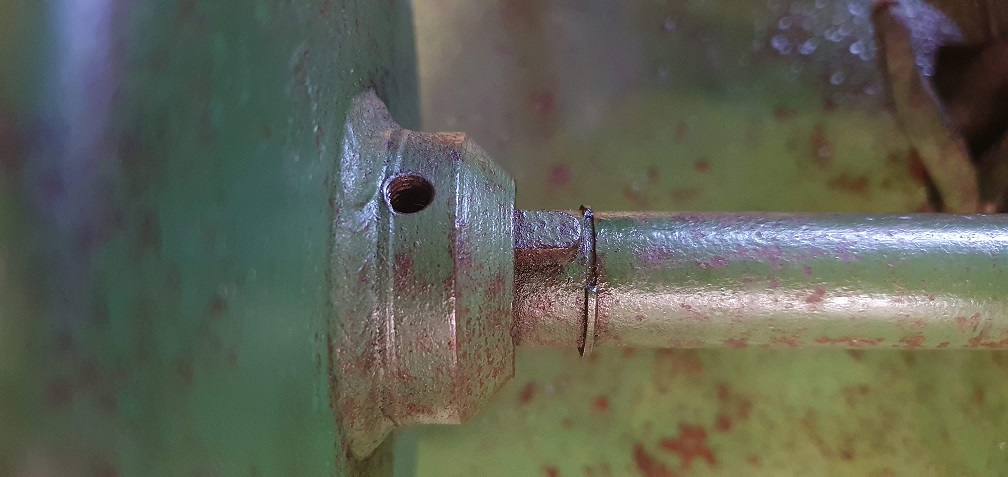
so neither item (grub screw GSF2020JE and circlip GSF1056AX) appears to be essential in the current state, however I want the mower to be complete so will source replacements. The other mower has both grub screw and circlip so I can check sizes before ordering and probably not need to use the original part numbers for these 2 bits.
Not sure if it would be worth freeing the clutch drum from the shaft or not, or just leave it in the position it's in. It was covering the clutch shoes fine with a small gap between its outer rim face and the clutch flywheel face so position wise it's fine - it may just need removal in order to slide the new circlip on though...
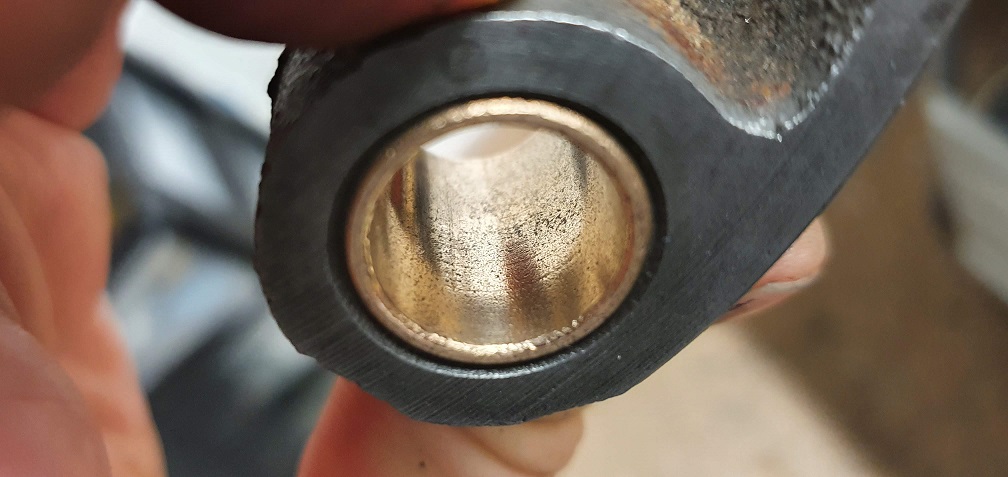
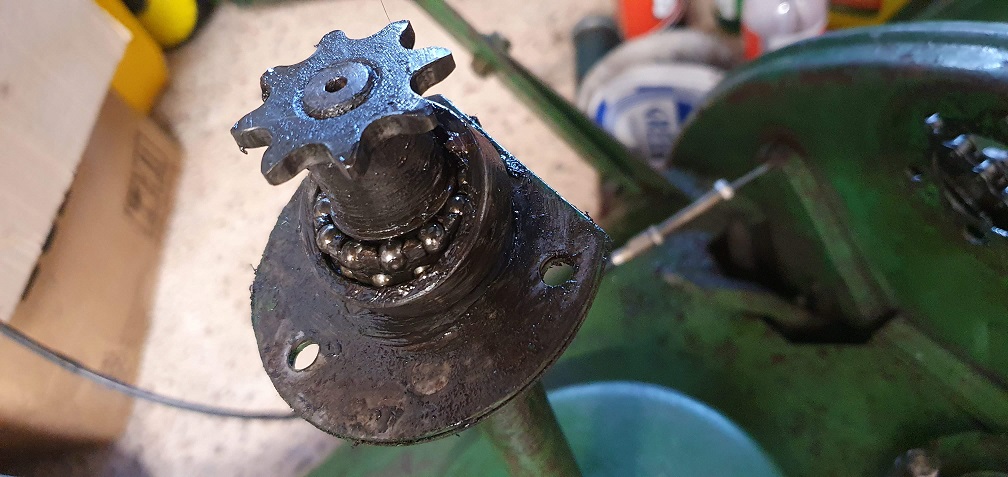
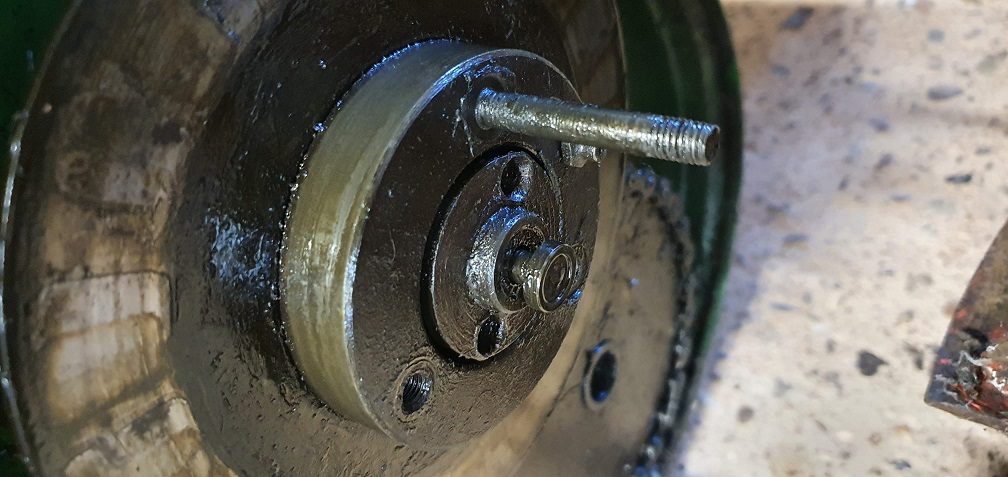
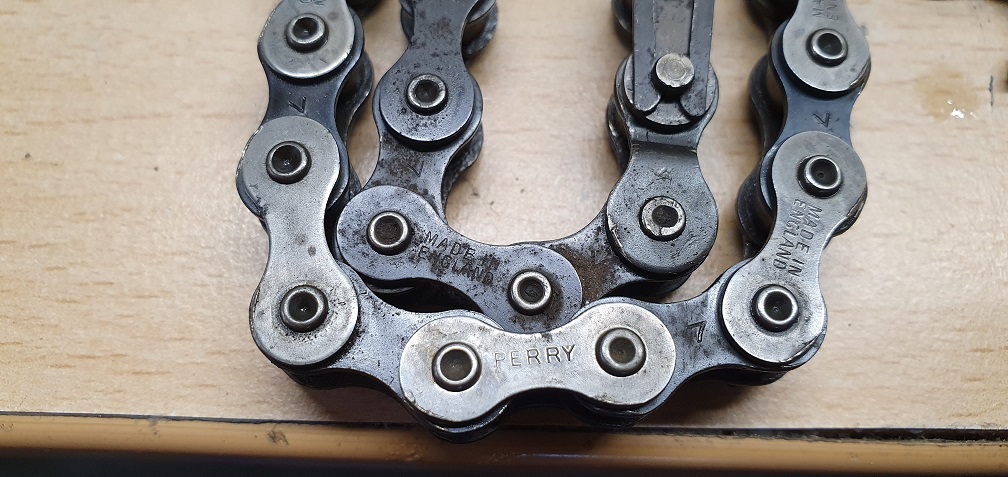
On the other end, it looks like another RL5 self aligning bearing - the same as the clutch flywheel and the cutting cylinder bearings. It feels a bit notchy so I want to remove it and flush the old grease out and check it for wear, and replace if necessary. A normal right hand thread on the drive sprocket from what I've read, so as there is no precious paintwork to worry about here I can hopefully get a good grip on the shaft with some stilsons and possibly my bike chain whip or old piece of chain on the sprocket and then grip that with another pair of stilsons. In terms of refitting the bearing, or a new one, what dictates how far along the shaft the bearing sits? Should it just butt up against the sprocket?
Actually how would you go about refitting the bearing onto the shaft? I can see that once it is fitted, you could use a bearing puller to pull it down to the correct position where it butts up against the sprocket. Would a deep reach socket the same diameter as the inner race work to tap it on, if the shaft was held in a vice for example?
You need to be able to easily
You need to be able to easily move the drum on the shaft (you will find out why when it comes to refitting the engine, it doesn't half help if you can see what you are doing). As to fitting the new bearing to the shaft, the easiest way I found was, fit bearing into housing then place the bearing on a vice with the jaws opened just a little bit more the bearing id, place the shaft into the bearing and tap it down with a soft or dead blow hammer, then refit to chassis, fit and tighten sprocket, fit circlip to shaft and move it down near the bearing, slid clutch drum down shaft and refit engine, fit key to shaft, move drum into position and tighten grubscrew, finally move circlip to correct position.
Brilliant, thanks for the
Brilliant, thanks for the detailed explanation, I'll get the drum/shaft soaking with some release fluid and see about getting it free, and get the sprocket and bearing off for cleaning/inspection. I'll also (hopefully) remove the grease nipple to flush any old solidified grease out, to ensure oil can get through it ok.
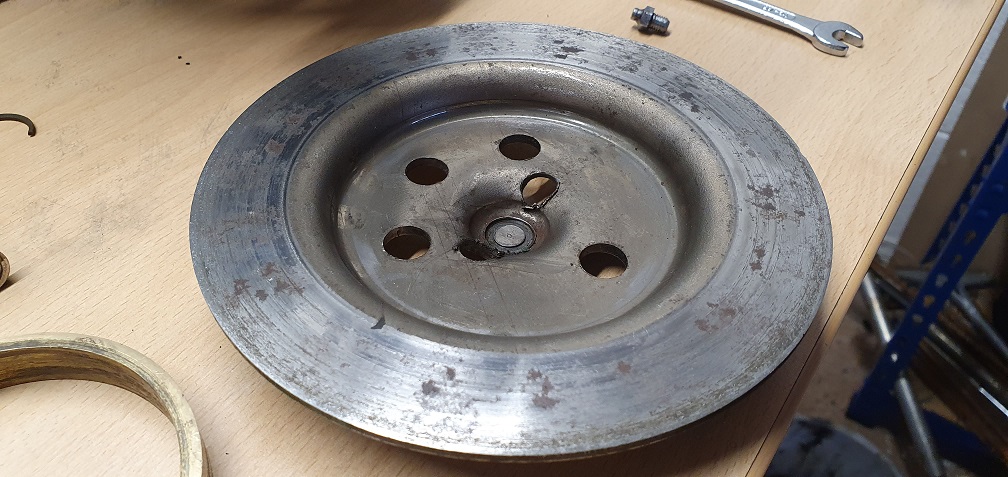
The chain cover has the paint worn away on the inside, although it doesn't appear dented or caved in - could it be contact with the 3 nuts on the end of the tension springs if they haven't been tightened up enough? One of the nuts does sit out further than the other 2. Is there any guidance on how far these nuts should be wound onto the threads?
The chain cover has the paint
The chain cover has the paint worn away on the inside, although it doesn't appear dented or caved in - could it be contact with the 3 nuts on the end of the tension springs if they haven't been tightened up enough? One of the nuts does sit out further than the other 2. Is there any guidance on how far these nuts should be wound onto the threads?
Maybe the clutch has been loose at some time. When reassembling the clutch just make sure that the three spacers are correctly positioned and then do the nuts up until full tightened against them.
Going back to your concern re positioning the top shaft support bearing, there is a small upset on the shaft and winding the sprocket on tight will pull the shaft through the bearing until it abuts the upset.
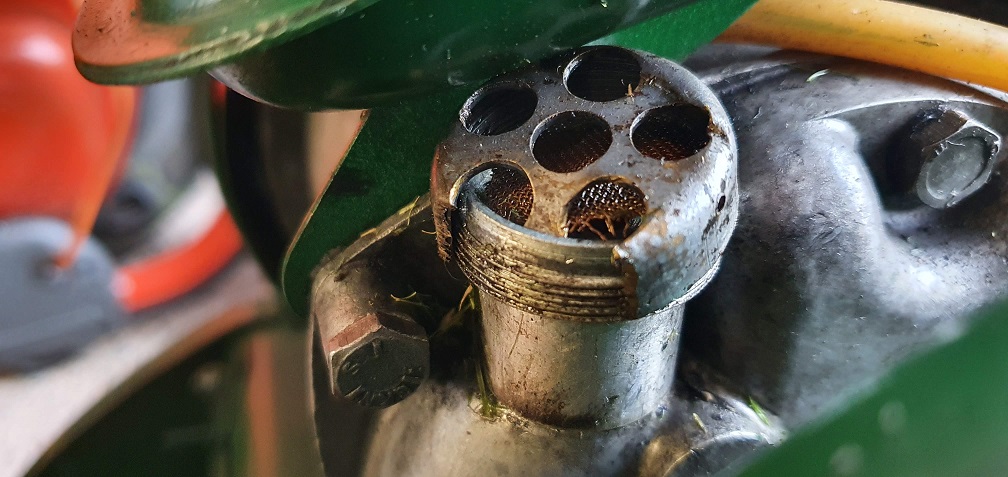
Your top shaft lubricator blocked with dried out grease. That’s why Ransomes recommend oiling and not greasing, particularly the two lubrication points for the two landroll sections, accessed through a hole in each roller.
The chain cover has the paint
The chain cover has the paint worn away on the inside, although it doesn't appear dented or caved in - could it be contact with the 3 nuts on the end of the tension springs if they haven't been tightened up enough? One of the nuts does sit out further than the other 2. Is there any guidance on how far these nuts should be wound onto the threads?
Maybe the clutch has been loose at some time. When reassembling the clutch just make sure that the three spacers are correctly positioned and then do the nuts up until full tightened against them.
Going back to your concern re positioning the top shaft support bearing, there is a small upset on the shaft and winding the sprocket on tight will pull the shaft through the bearing until it abuts the upset.
Your top shaft lubricator blocked with dried out grease. That’s why Ransomes recommend oiling and not greasing, particularly the two lubrication points for the two landroll sections, accessed through a hole in each roller.
Very helpful thank you. Still
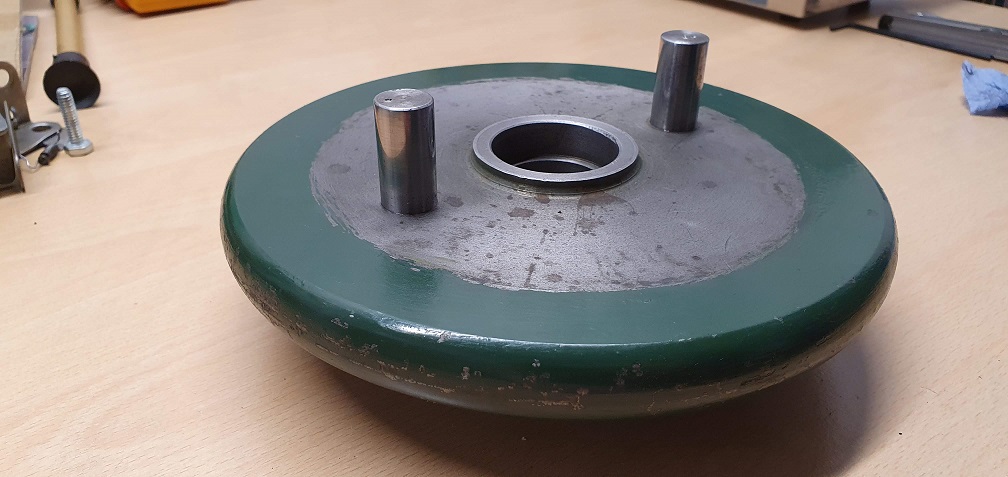
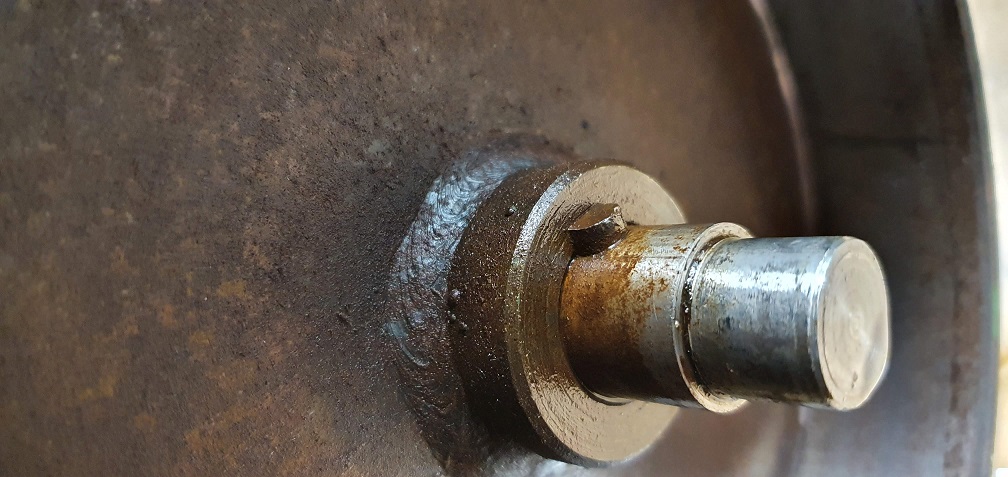
Very helpful thank you. Still no sign of any movement from the older clutch drum on the shaft, it's well and truly seized on there. The benefit of having a second mower is that I can see how it should work - after unscrewing the grub screw on that clutch drum, it easily slid off the end of the shaft and has clearly been well lubricated by a previous owner at some point, making removal nice and easy
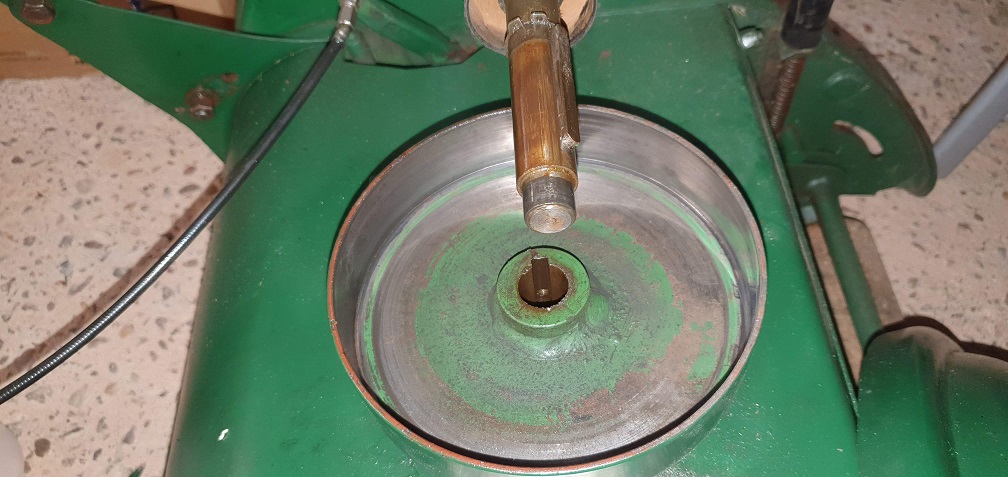
so I can now see how the grub screw bites down into the softer key material to hold the position. I couldn't pull out the key on this one, but managed to gently ease the circlip over the top and off the shaft. I wouldn't want to expand it any further than this as it felt a little stretched, so for ease of installation, any tips for removing this key? Also when ordering a replacement external circlip for the older mower, i'll measure the circlip removed here, but are they normally ordered based on the nominal diameter of the shaft, or the diameter of the groove that they fit into?
Meanwhile I'll keep soaking the older one
Having a free moving drum
Having a free moving drum makes life so much easier when it comes to refitting the engine and aligning the shaft into the spigot bearing. Sliding the circlip right up the shaft together with the drum gives you a much better view of the target.
I can certainly see the
I can certainly see the benefit of being able to move the drum come reassembly time, as you and Hortimech have pointed out.
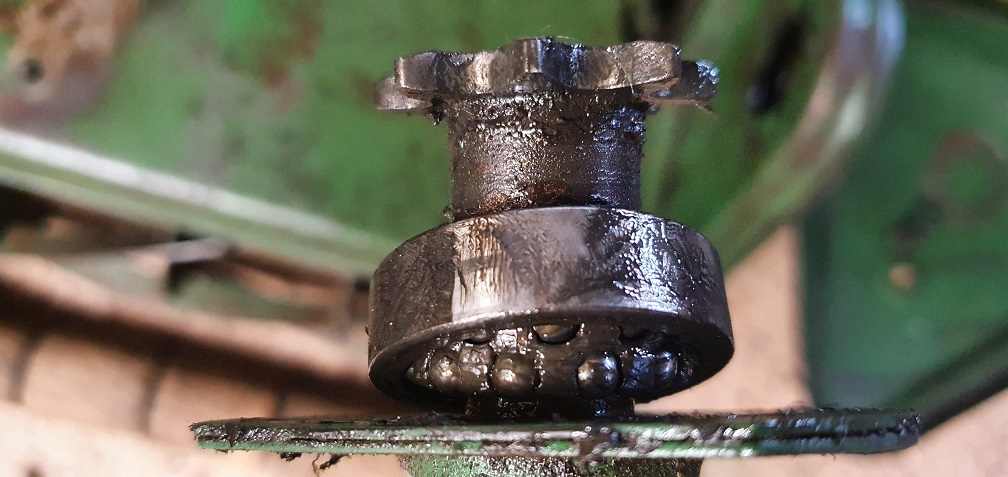
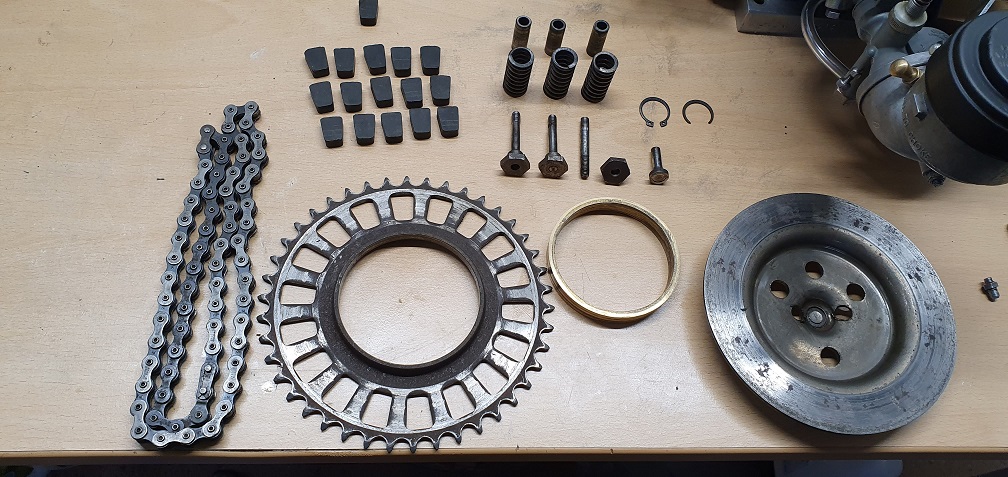
The next batch of parts getting a good clean up and check over
Lubrication nipple with hard dry grease inside flushed through and clear now
I will have to do the same for the lubrication nipple hole in the shaft as that is equally as blocked.
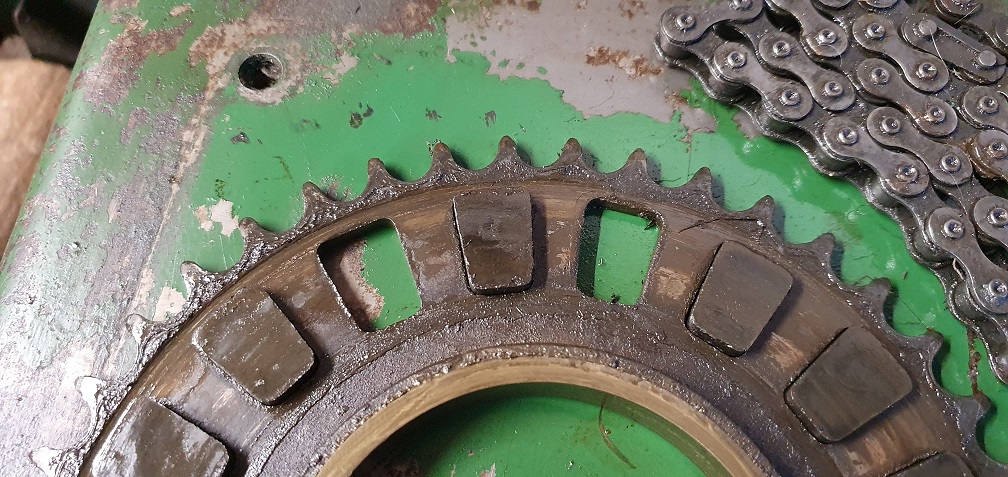

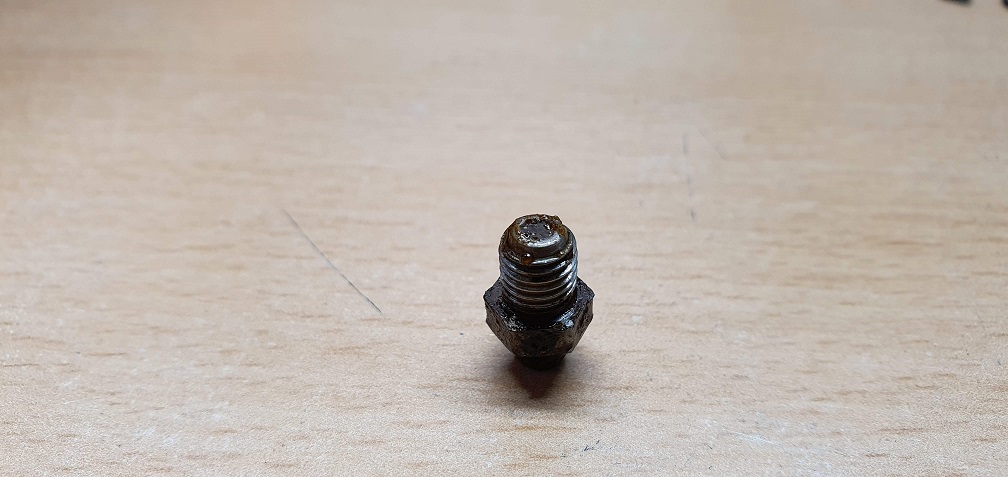
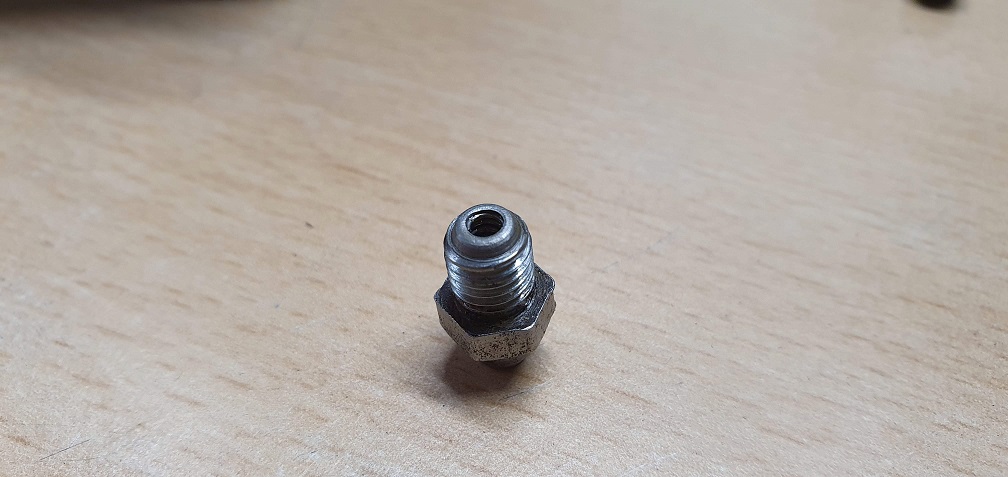
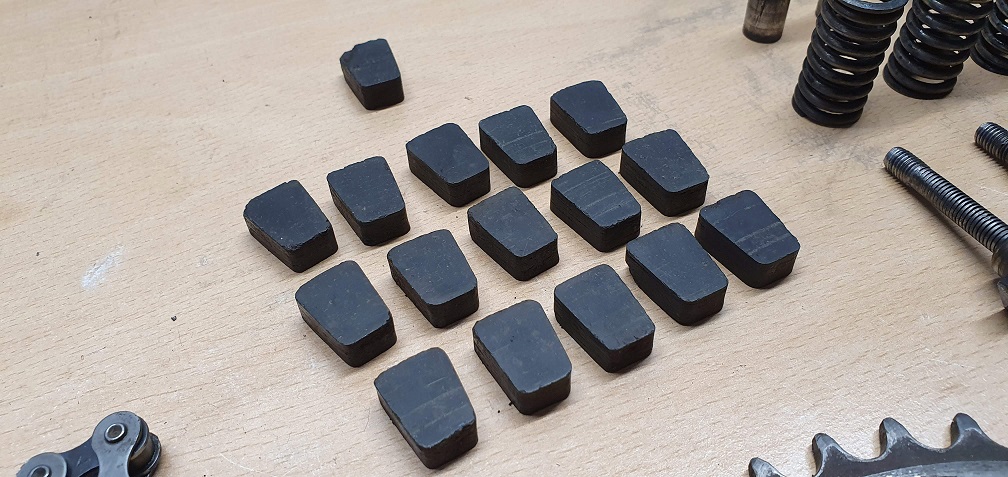
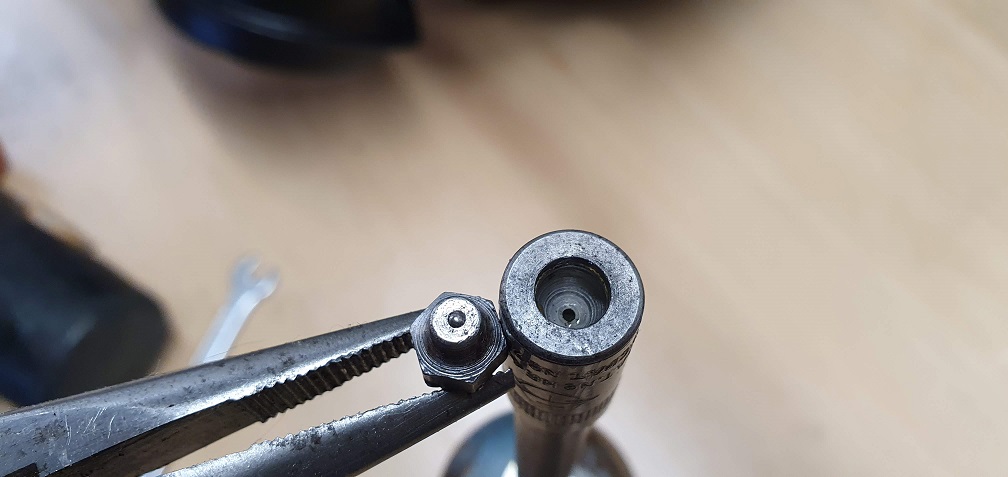
2 missing clutch pads plus another that has a corner missing, so i'll order up 3 replacements. Also the lubrication nipple has been attacked by the looks of it - the sprung ball is stuck in and the end is squashed, so an incorrect attempt using an ill fitting grease gun perhaps
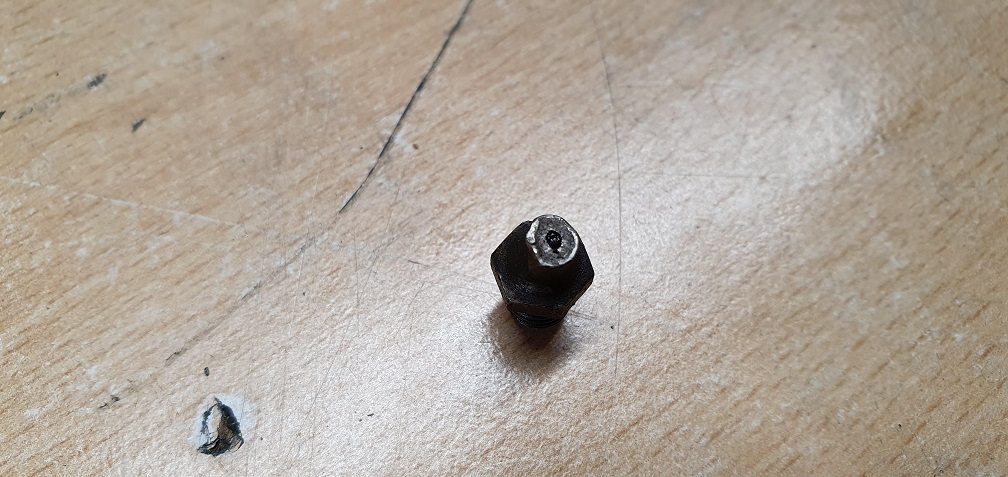
so this will get replaced too. The nipples use a 1/4" UNF thread as far as I can see, with a 5/16 hex. Hopefully I'll be able to source a replacement, or depending on minimum order numbers I may need to order a handful to replace all of them.
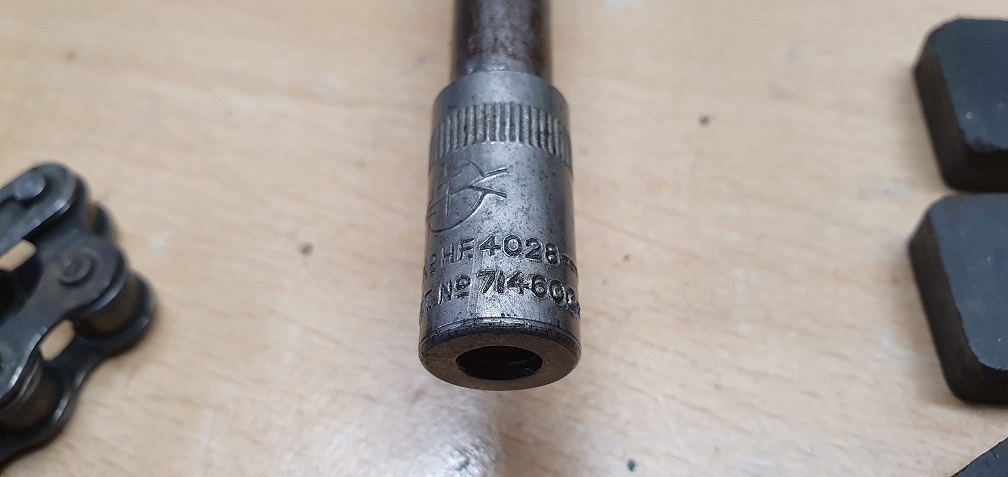
This stud was a bit stubborn about wanting to unscrew but a stud removal socket easily persuaded it out
So currently a few questions if anyone can help:
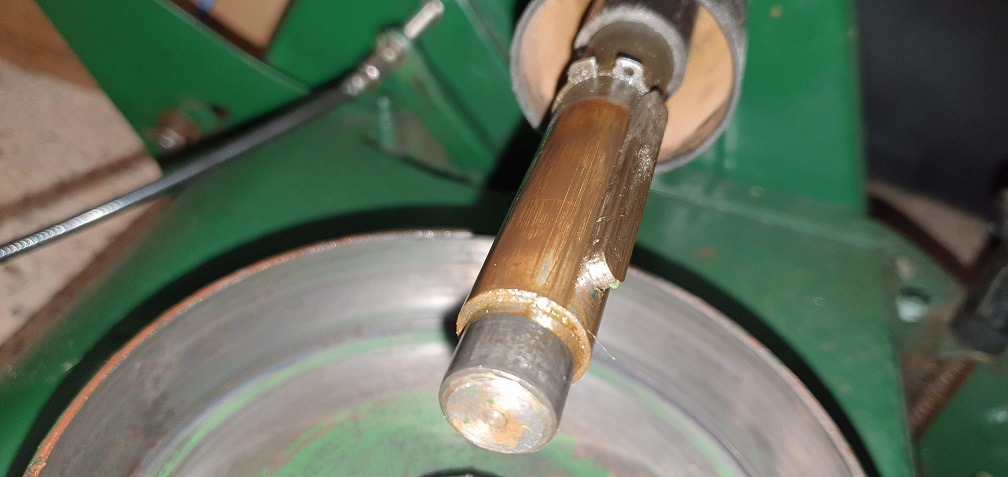
1) Any tips on removal of the long rectangular shaft key as it doesn't want to budge currently
2) The clutch drum is still seized solid on the shaft after constant soaking in plus gas. Would a 3 leg puller that can spread to 200mm+ assist in getting it to move? I've tried putting the shaft down through a vice so it's free to move, and the hub of the drum sat on top of the vice jaws, and then using a piece of hard wood on too of the shaft end, hitting the wood with some force but nothing so far
3) When ordering a new circlip, should the size ordered fit the full shaft diameter, or the groove diameter where it fits? I've read various opinions online - perhaps it depends on how the seller describes the circlip for fitment. Do the sizes normally refer to unsprung/resting diameter?
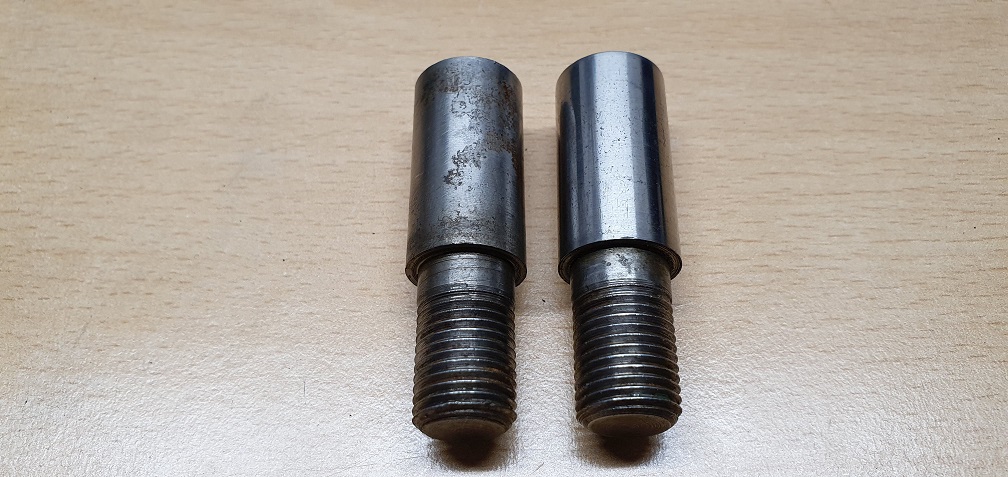
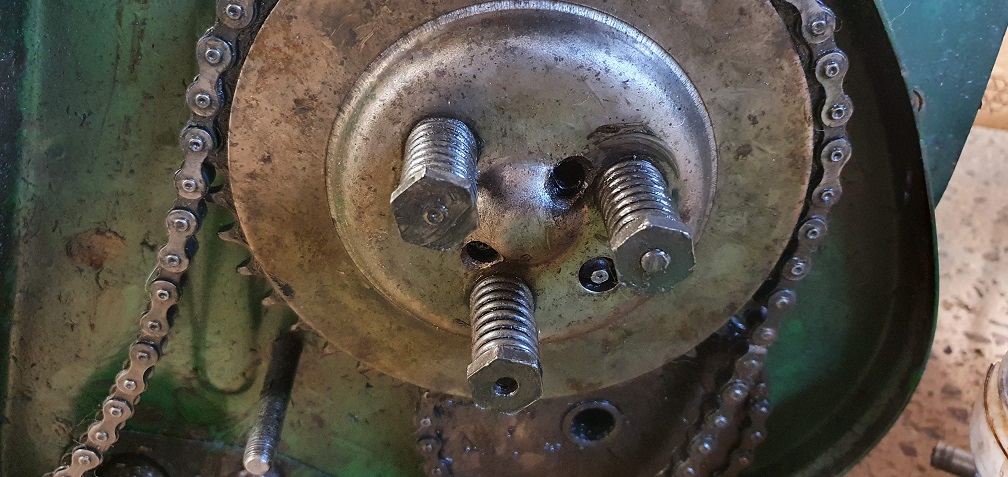
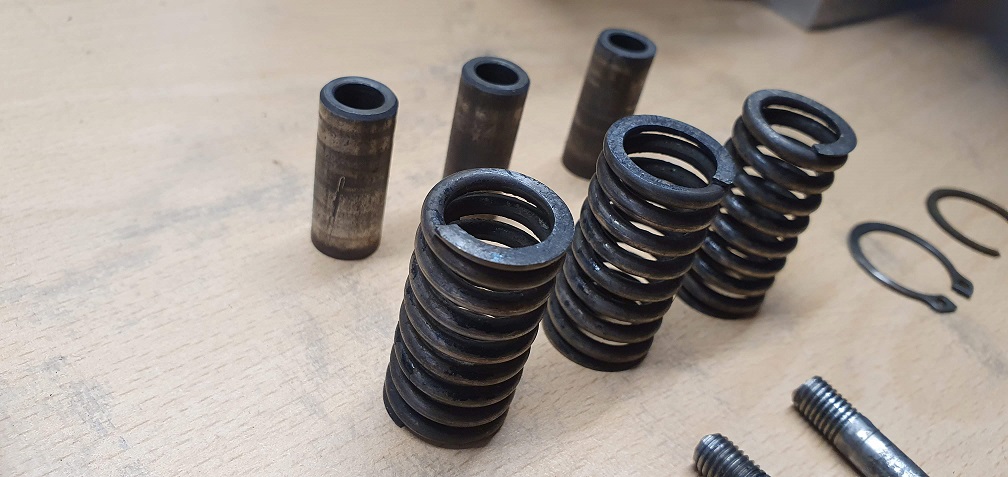
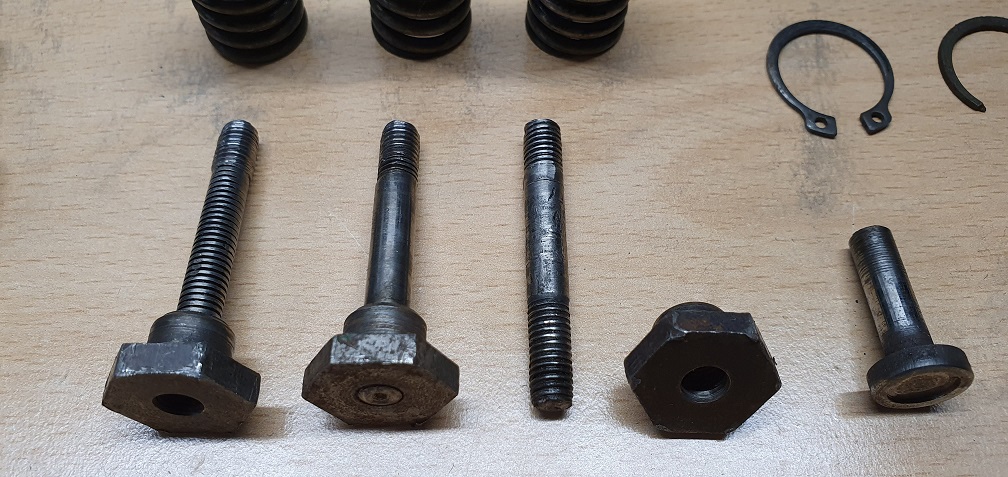
4) In the last picture, are the 3 studs that go inside the springs and spacers anything special, or simply just 1/4" UNF threaded bar cut to length? The threads seem pretty badly flattened and the are slightly bowed on 2 of them, so potentially looking at replacing these. 2 have a plain centre section but the 3rd is threaded all the way down, although the threads are very flat
5) The clutch plates and pads - I've read that a light wipe over with clean oil when reassembling is useful - should the surface of the metal plates be scored/rubbed over with medium grit paper to give the surfaces more grip, or is the spring force plenty to ensure good grip?
Don't use a puller on the
Don't use a puller on the drum - its sure to distort it .
With the shaft and drum out of the chassis put some heat on the drum boss and than rest the boss (not the drum) on the vice ans hit the spigot bearing end with a good heavy copper hammer . Or take it down the road to a friendly engineering shop / old school garage, and get them to press it out.
Clutch plates. Never found it necessary to rough them up.
Studs. Most of the studding sold today seems to be fairly poor quality but is probably adequate for the job.
Circlip. Root diameter.
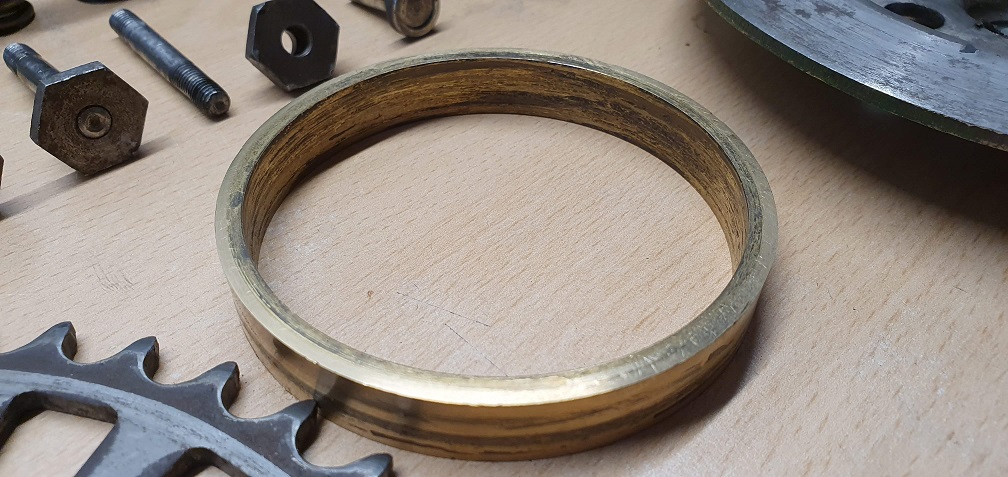
If you are tempted to renew that ring bearing or the top hat bush that lives inside the clutch plate with the fixed sprocket - check the prices before committing!!!!!!
Just about the only thing
Just about the only thing that Wristpin missed was getting the key out of the clutch shaft. Clamp the key in a vice and 'lift' the shaft, you should end up with the key in the vice and the shaft in your hand.
Thanks again to both of you
Thanks again to both of you for all the advice, that should help me move things forwards a bit. Looking into the lubrication nipples, these originals look to be Tecalemit Tecazerk P/6 types, part number NC 6100, to work with the original supplied Tecalemit oil guns. I did pick up a Tecalemit oil gun a while back and removed all the oil grease from it, in order to put some oil in. However it has the concave connector at the end, so probably not the correct connector for this application. That being said, it doesn't look like the original nipples are available anywhere on initial research, so I may have to use the newer snap-on style bulbous headed ones.
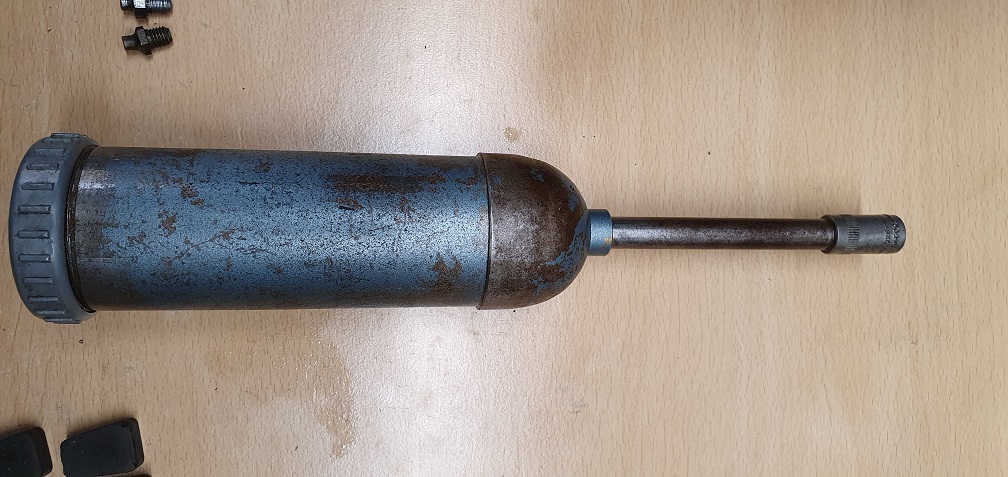
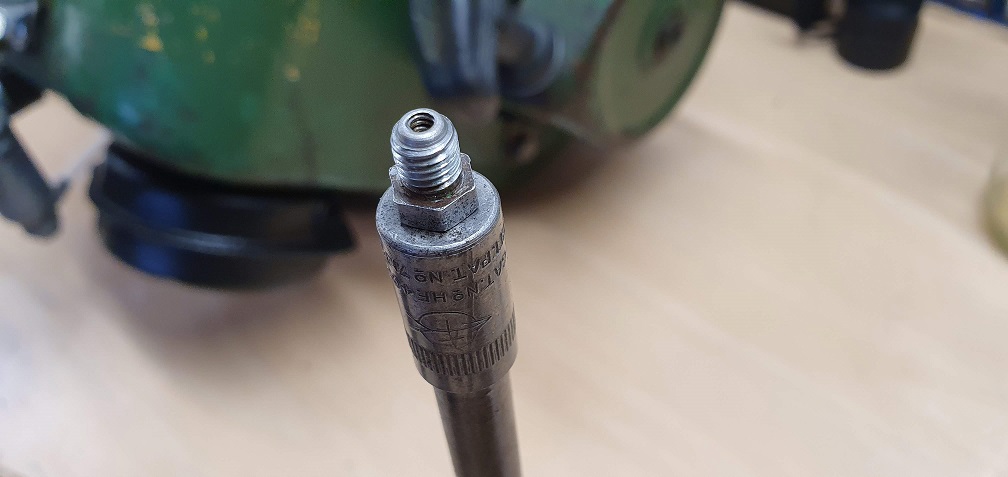
The gun head is far too wide and deep for these nipples, so the nipple head only reaches about 3/4 the way down into the concave before the hex part hits the nozzle. I wonder if anyone reading has the original oil gun that came with the Marquis or similar mower of that era, and has either the Tecalemit oil gun number or nozzle number that they can provide? A bit of reading online shows a Tecalemit 7MC brass grease gun is suitable for the P/6 nipple. Failing that, if I'm going to replace at least one nipple with the available snap-on type fitments, then it may be better to replace them all, so they all can use the same oil gun, and then find a suitable replacement oil gun that fits the snap on heads...
Very minor detail in the grand scheme of things I know but....
That being said, it doesn't
That being said, it doesn't look like the original nipples are available anywhere on initial research, so I may have to use the newer snap-on style bulbous headed ones.
I’ve found the same and make sure that I save the correct nipples from any scrapped machines: they ere also used on older Suffolks.
The problem with converting to modern nipples is that you are still left with the two originals within the rear roller which are pressed in, not screwed. I’ve never tried to remove the originals and tap the resulting hole to take modern “snap on“ ones . Ever if possible, it would then involve enlarging the access holes in the rollers to allow the entry of the larger connector.
OK I may need to wait until I
OK I may need to wait until I check the condition of the roller nipples before deciding the best way forward. Having 2 different oil guns isn't a bad thing I suppose. I don't think I can rescue the damaged original nipple from the clutch so that one will have to be replaced regardless. Out of interest, what oil gun and nozzle size do you use for these nipples? I read an older post on here about the use of a Wanner 300-2 so assume one of those has the correct size nozzle, but not many/any around that I can see currently.
The 3 1/4" clutch spring/spacer studs are all different, so perhaps replaced at some point
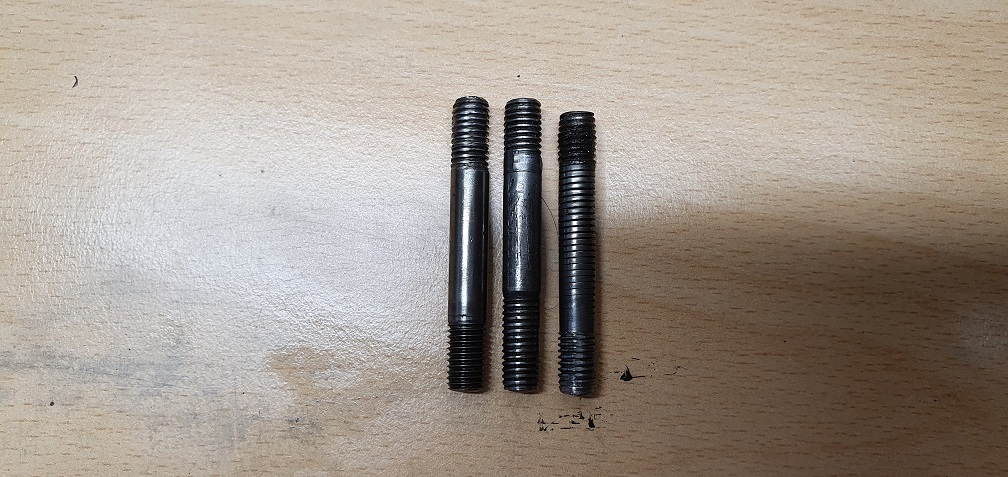

I may have found a source for replacement 1/4" BSF studs of the correct, or near enough to be trimmed, length. The threads seem to be the same at either end - although due to the damage it's not totally clear, so I'll try removing the 3 from the other mower and check before ordering
may have found a source for
may have found a source for replacement 1/4" BSF studs
Are you sure about BSF? The ones on the clutch that I’ve just dug out are UNF.
Ah yes, the usable remains of
Ah yes, the usable remains of my studs are UNF - what I meant was that I had found some studs online to buy which are BSF - given the 1/4" diameter I didn't know if they would be ok to use if I can't find the equivalent UNF studs. Actually having double checked, there is a difference of 2 threads per inch and with the difference in thread angle, they might not work. I'll keep looking for UNF studs.
Are the threads different at either end on your clutch studs? Wondering if they are UNC on the 'fixed' end and UNF on the nut end perhaps?
Actually having double
Actually having double checked, there is a difference of 2 threads per inch and with the difference in thread angle, they might not work. I'll keep looking for UNF studs.
UNF at both ends. No way would they "work". Theres a danger in "publishing" inaccurate information on an open forum where things have a habit of becoming fact. As far as I know, the threads on that era of Marquis chassis are either UNF or Whitworth (bottom blade screws).
Thanks for checking - that
Thanks for checking - that makes it easier to find what I need now. Having grown up in a metric era, I'm still learning about BSF, BSW, UNC and UNF having never had any real prior experience with them. I'm going to get hold of some thread checking gauges to help make identification easier, and after further reading, I can clearly see the difference and realise that BSF studs would not fit these UNF threads. I'll be careful not so spout thoughts on here when learning about things, or at least word them more accurately, as I can see how someone could take such things as fact.
There's still many tons of
There's still many tons of old studs, nuts, bolts, screws and washers on ebay for folk with old lawnmowers and bikes that use outdated threads, I have a few hundredweights myself! UNF, BSF Whitworth, BA, Pipe etc, buying some decent thread gauges is a good idea.
Just to go way back to your
Just to go way back to your question re throttle levers, I believe the 4a should have the same type as your 4 but often they weren't chrome plated by then - just grey metal - zinc alloy?