Villiers VI-A bottom end
After much fiddling with the fuel and ignition system of my non-running ATCO 22" (there's a great spark that stays lit under compression, and somewhere near the right amount of fuel getting into the cylinder), I decided there was nothing for it but to take a peek inside the engine as while the was a reasonable amount of compression, it wasn't the best I've ever felt. After pulling the cylinder off (with the aid of a wooden dowel down the plug hole to gently persuade the piston out!) It's as I'd suspected, a partially stuck ring, and the grooves were pretty packed-in with coal-like deposits. which made getting the rings past the bottom of the cylinder require the dowel treatment! nothing harmed or broken, and i'm confident i can get her to make some compression again! It's the bottom-end that worries me!
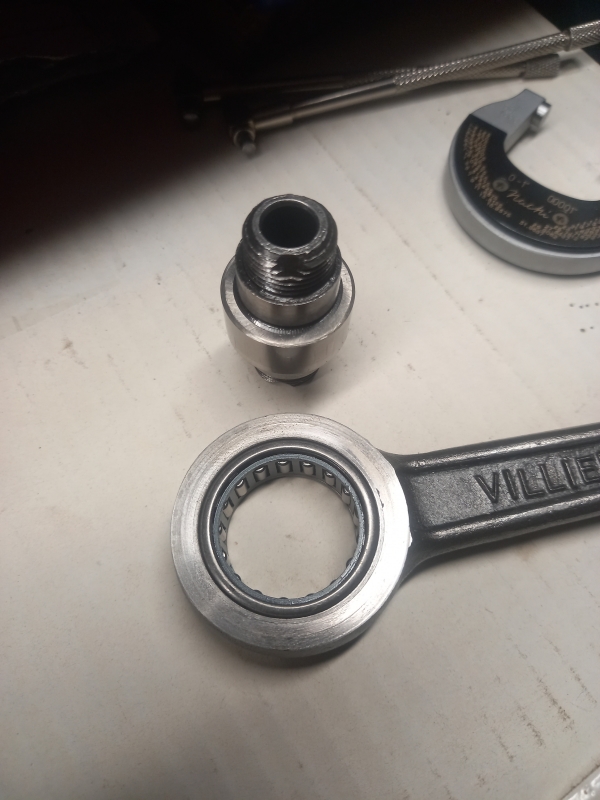
There was enough slack in the conrod (both ends) to warrant splitting the crank for a proper inspection, it seems that the Little-end bush was installed incorrectly with the oil-hole misaligned (or maybe it spun in service?) but I'm happy to make one of those up and take up any wear, at least the gudgeon-pin is unworn!
The Big-end is the problem though, there's some nasty wash-boarding on both the crank-pin and conrod, the crank-pin being the worse of the two. It looks like I may have to regrind my crank-pin and hone out the conrod to suit some oversize rollers (hopefully i can find something suitable). Alternatively, Steve at VS stocks a 2 thou oversize crankpin but that would not solve the problem with the rod.
Does anybody have any other recommendations? I'm a reasonably competent machininst that's not afraid of a challenge!

Forums

I think it was this one
I think it was this one Adrian...
https://www.oldlawnmowerclub.co.uk/forum/history-and-technical/technica…
Yes, I'd read and digested
Yes, I'd read and digested that before posting my own Query! It's a Mk VI-A (6A) like mine, although Mike's engine looks to be a fair bit less worn out than mine, I seem to attract the basket-cases!
I've spent quite a few hours pondering the problem and searching for solutions, it's quite educational when you've got to re-engineer something designed 100ish years ago! I even went to the extent of writing a quick python program to do the maths for me to work out how many rollers i could fit around a given pin diameter. and how much clearance that would give. then spent a while trying every combination of available rollers, pin dia, and conrod race dia. There don't seem to be many combinations that will actually fit in the given space, apart from the original spec (or very close to it). It turns out that Villiers had got it just about bang-on (no shock there) with 1/4" rollers around a 7/8" pin, which gives incredibly little wiggle room between the rollers, according to my rather ropey trigonometry, less than 0.0002" (2 tenthousandths). I can see why so many applications use caged rollers now!
I couldn't find a combination that would allow for a simple regrind of the original crankpin, or even one from VS measuring 0.002" oversize (0.877"). As the con-rod measured between 1.378 and 1.382, with some washboarding too, so i'd probably have to hone/lap it out to at least 1.385"-1.390" to get a decent surface. Bugger!
I decided to look at commercially available needle/cylindrical bearing options, and found a couple of options there.
One scheme involves making up a new crank-pin (very undersize), and pressing on a new hardened inner race. (also a good option for the standard set-up, but requires some patient lathe-work/grinding). And making a press-fit adaptor-ring to fit the new bearing shell to the (bored/lapped) conrod. this has the benefit of not modifying/destroying any original parts, beyond the damage/wear that's already there. and would leave other options open later should it fail.
Another option is a little riskier, using a motorcycle crankpin bearing unit. although the only one that i could find to fit in the 1/2" available width need a 19.3mm hardened pin to run on, and the conrod big-end boring to 38mm, so there's not a lot of meat left in the conrod to stop it all coming apart!
I've ordered the bits for the first option (not too expensive either) so i'll see how that goes, I'll report back with news of success or faliure when I've had a chance to spend some quality time at the lathe cobbling it all together.
Well, The operation seemes to
Well, The operation seemes to have been a success! I lapped out the rod to remove the remains of the nasty dings, only had to take it out to 1.383" in the end, and nice and round too! I made a thin (1.2ish mm walled) sleeve to adapt the rod to take a proprietary roller bearing, all of this was pressed together to form a complete re-habilitated connecting rod.
The crank pin needed to be turned down for the new inner race to be pressed on to, after the inner race was first ground to length (I hate grinding in the lathe, it makes such a nasty abrasive mess!)
It all seems to fit together rather splendidly, let's find out if it holds up to the stunningly high stresses found inside a 1920s 2-stroke!
The next job on the list is the gudgeon pin and bush, the pin bosses in the piston were badly worn (as was the pin) so i've reamed them out to a gnat's whatsit under a half-inch and have started to make a nice new gudgeon-pin from EN24 that's been turned to very slightly over-size and drilled appropriately. It'll get heat-treated during the week as I'll have the forge running anyway working on customer stuff. Then lapped-down to exactly the required size afterwards to ensure a really nice surface-finish.
A big chunk of meehanite bar arrived yesterday too so i may even knock-up the new rings if i'm feeling especially productive, although there's a fair bit of real work to do this week so i may not get around to it.
I hope nobody minds my ramblings about a clapped out old engine, but i find it's quite motivating to have an audience, even a small one!
I certainly enjoy hearing
I certainly enjoy hearing about such things, especially from people who know what they are on about. I reckon I know just about enough to know when I'm out of my depth (it's not very deep!), but I've learnt more of that than I'd care to think by having "Oh Sh*t!" moments when something vital sails past my lug 'ole into the countryside, or just plain snaps. Plus I have it's baby brother in my Atco.
I've not got a scooby-doo
I've not got a scooby-doo what i'm doing, I'm just very good at pretending that i do!
The Gudgeon-pin is now finished, I'm hoping my amateur heat-treatment is good enough, a quick file test showed it to be somewhat harder than the raw EN24 and after a carfully calibrated whack-test with a hammer on a dummy gudgeon pin (knocked up at the same time, just a 1/2dia bar with a 1/4 hole down the middle), I'm fairly confident the new pin is well-tempered and won't shatter like glass the first time the thing starts.
I shall be making up a nice new bush for the little-end this evening, i've still got to work out how i'll put the oiling groove into the inner surface but it's problems like that, that make things interesting!
I've also ordered a big chunk of phosphor bronze for making the new crankcase bushes, after measuring the radial play at about 15 thou and the end-float at a rather excessive 40 thou, I decided i'd best tighten things up a little lest I ruin the work i've done upstairs with a sloppy bottom end. while i might have let that go if the thing actually ran when i got it, i'd be mad not to do it all properly now i've come this far!
I'm enjoying reading about
I'm enjoying reading about your machining efforts, I have a couple of metalwork lathes myself and often use them to help me out on workshop type jobs, making bushes is harder than it sounds, a good mandrel is the thing to find, buy or make firstly I find. Otherwise the thin tube can be marked or crushes out of shape otherwise, etc. I often wonder if brass will suffice on a mower, but bronze is needed on a motorbike engine for instance of course. Good luck with it.
I'm glad others are enjoying
I'm glad others are enjoying my efforts, while it's personally satisfying to know what I've done to get something running again, most of the work is usually hidden from sight inside the machinery, so it's nice to show it all off a little, and maybe help others in the future too! Mine can't be the only clapped-out villiers 2-stroke out there, and much of this can be applied to other engines too.
As for the lathe, it is the single most important tool in my workshop (except possibly the welder) and i would probably have to get a real job somewhere if it wasn't for the things it enables me to do with old machinery (I repair reed-cutter's equipment for a living). I've only owned the thing for about 3 years so i've still got a lot to learn, and it's not exactly a 1/2 ton cast-iron monster, only a (heavily upgraded) chinese 7x14, but it's enough for knocking-up otherwise unobtainable (or extremely expensive) spare parts.
I'd better stop writing and get back down the shed, these piston-rings aren't going to make themselves!
Machine work on the rings is
Machine work on the rings is now complete, I still need to file the notches for the locating pegs and split the rings (always the nerve-wracking bit, hence the spare). I'll polish up the surfaces once i've set the free gap with a blowtorch. I don't usually have the opportunity to make rings, so I'm enjoying the excuse to make these ones.

.Note the wear on the old rings, 2mm has gone missing from the outside!
There's a young man named Mr
There's a young man named Mr Crispin on YouTube who works for Rolls Royce whose been making piston rings for a locomotive a few months ago, if you're interested.
I'll have to have a look,
I'll have to have a look, Youtube is where i get all my best bad ideas from!
The rings are now fitted! Although I'm glad I made 3 of them, as i managed to break one of them in the process of getting it on! these are relatively thick rings for the bore size (at least compared to modern engines) and i was a little more forcefull than i should have been. lesson learned!
Preparing to make the crankcase bushes now, I treated myself to a nice new 3/4" adjustable reamer to replace the nasty imported one that lurks in my tool cabinet, And I've made a start making some press dies (just bits of pipe really) to help press-out the old bushes without doing nasty things to the casings. I just need to stump up the courage to start hacking at the big expensive piece of phosphor-bronze I bought for the porpose.
There was a thread here a
There was a thread here a few months ago regarding the VI-A engine - I have to say that a brief search isn't finding it, and I couldn't tell you now whether anything in it would help you, but maybe worth a rummage round the forums? I remember it clearly because I'd never heard of a VI-A!