Ransomes Marquis mk4 18"
I've just commenced the restoration of this 1960's mower and am in the process of dismantling it piece by piece. I've read several posts relating to the removal of the more difficult parts and haven't had any joy in progressing.
The first is the cylinder sprocket which I understand is left threaded but I have jammed the cylinder and clobbered the sprocket clockwise to no avail - even after applying a bit of heat. The sprocket is a pretty tough piece of metal but I'm scared to hit any harder for fear of ruining the teeth. Any tips and are replacement sprockets still available!?
The second is the drive sprocket on the end of the clutch. Again, I have read a post confirming this is right hand thread but, as I've already taken the engine off, does anyone have a tip for clamping the clutch housing and removing the sprocket?
Lastly, (and again, I've read a post already) I want to take the flywheel off the engine. Is this really just a case of hitting it as hard as possible or is there a better technique? I saw the post about an anvil and boss but didn't understand that - are there any videos out there to help??
Thanks in advance to everyone that contributes to this great website. Comforting to know there are kindred spirits out there.
Mowermad.....
Forums


Wristpin, you are clearly a
Wristpin, you are clearly a legend in this forum! Thanks for your prompt reply. I think I'll leave the clutch flywheel as you recommend. The only reason to remove it was to re spray which I'll do by masking the engine casing.
Thanks for the advice on the sprockets. I'll try to make up a tool with some old chain.
Don't go anywhere - I might be back.....!
Just to expand on my
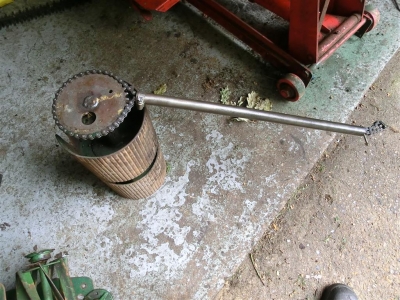
Just to expand on my suggestions for removing / undoing sprockets etc, here are some images of home made tools for a variety of jobs. Some fixed for specific applications and some adjustable for different sized sprockets and flywheels etc.; all made from odds and ends and some not requiring access to welding equipment.
Adjustable chain wrench. Piece of pipe, length of scrap chain and a Jubilee clip to reinforce the end of the pipe and act as a fulcrum.
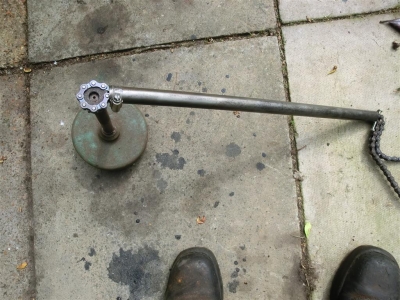
Flyweel puller, Villiers F12 Sloper and F15. Scrap steel plate, 3 x 5/16 UNC hex head screws and nuts and an old Flymo blade bolt. This does have a nut welded under the centre to increase the threaded area for the centre bolt to push on.

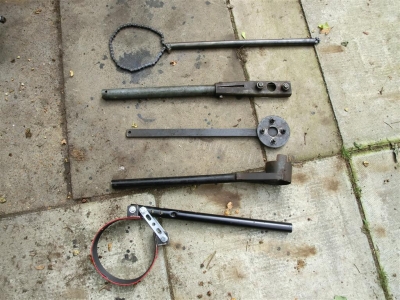
Collection of "special tools" made over the years including an "adjustable band wrench" made last week to hold a Villiers Midget two stroke flywheel with a very tight self extracting centre nut. No welding required and all bits and pieces that were "in stock".
Clearly a genius! Thanks so
Clearly a genius! Thanks so much. I'll post progress reports and the finished article when it's done.
Dear Wristpin,
Dear Wristpin,
So, I've made myself a chain wrench tool and successfully removed the small sprocket to the clutch (the cylinder sprocket is another story but I'll persevere there a bit more!)
To remove the clutch drive shaft, do I have to remove the bearing from the outer casing? It seems reluctant to pop out and I don't want to force it. I did take a photo to show you but can't size it to fit
Thanks!
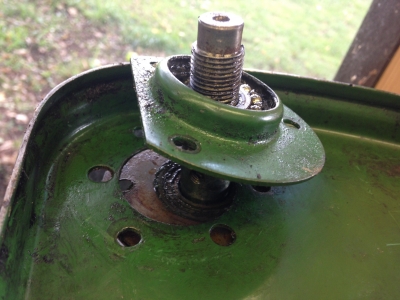
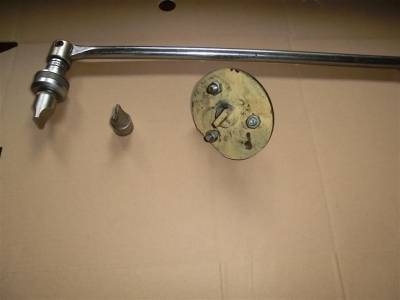
Sorted photo - as you can see
Sorted photo - as you can see.
I would be tempted to
I would be tempted to reassemble the bearing and carrier to the side plate and then give the shaft a sharp tap with a SOFT faced hammer or via a block of hard wood. As it is at present you could try removing the bearing carrier from the bearing with a puller and the removing the bearing using the puller again but if the carrier is tight onto the bearing there is a danger that it will distort rather than release the bearing.
If the cylinder sprocket is really tight , lock the cylinder with a bar and tip the mower back so that the handle bars rest on the bench or on the ground so that you can apply controlled clockwise pressure to the sprocket without having to hang on to the mower at the same time..
Ok that's brilliant. Just
Ok that's brilliant. Just needed the confidence to know how it releases so I'll reassemble and do as you suggest. Thanks for tip on cylinder sprocket. I applied a bit of heat again and got it into a good position to lever it which did the trick. They're tough aren't they!? Is the roller sprocket straight forward?
Mowermad
The difficulty with the rear
The difficulty with the rear roller sprocket ( again left hand thread) is holding the shaft still while applying considerable force to the sprocket.
On the opposite ( right hand) side of the mower is a hole to access the end of the shaft which may still be sealed with a large rubber grommet. The end of the shaft has a slot to be engaged with a tool to stop it rotating. Hopefully this slot has not already been chewed up by a previous attempt to remove the sprocket.
At this stage stop and consider what method/tool you are going to use as damaging the slot could leave you in deep mire! I don't know whether in the day Ransomes offered a special tool ; I've never seen one. In the past I've used a " track rod adjusting socket bit" on a long breaker bar to offer sufficient resistance to the force applied to the sprocket - ideally with the help of an assistant, but I have done it single handed with the machine clamped to the bench and the breaker bar also secured . However, a while ago, fed up with struggling single handed I made a tool that bolts to the side of the machine using the existing bearing carrier bolts and engaging the slot in the shaft. Should have done it years ago!

Just a couple of points re
Just a couple of points re locking the cylinder, place the locking bar close to a support web to avoid bending a blade, also placing the bar at the end closest to the drive sprocket limits twist in the shaft allowing greater torque/shock to be applied to undoing the sprocket.
Thanks Hillsider (sound
Thanks Hillsider (sound advice) and thanks to Wristpin as always. I'm hoping the roller sprocket won't be as jammed as the others but we'll see. It's all progressing well thanks to your help - I'd be lost without it. Promise to buy you a beer at next year's rally!
You can hope but I've never
You can hope but I've never had one that's given up without a fight!
Welcome!
Welcome!
Cylinder sprocket. Yes, left hand thread, ie turn clockwise to remove. Avoid hitting it ; what is needed is the controlled application of steady force. Those of us doing it regularly will have made some sort of gripping device or chain wrench with a long handle. For a one off job you can improvise with a length of chain and a bit of pipe.
Top sprocket. Conventional thread, anti clockwise to undo. Two issues here, one to grip the sprocket without damaging it and the other to grip the shaft. Unless you have some sort of band or strap wrench to grip the drum it's probably easier to grip the shaft with a Stillson wrench. Ok, you will mark it but it will be covered up by the telescopic plastic guard.
The sprocket itself is probably best removed by a chain wrench but you can improvise by wrapping some chain round it to protect it and the gripping that with Stillsons.
Flywheel. Assuming that you are referring to the engine's flywheel that encloses the magneto. It is provided with three tapped holes threaded 5/16 UNC so it's best to make up a puller to put tension on it and then give the puller a sharp tap. Some people don't bother with a puller and just give the side of the flywheel a smack with a hammer. Not too keen on that myself !
Centrifugal clutch flywheel. The only reason to remove it is for internal engine work or a leaking crankshaft oil seal - otherwise leave it alone. If it does have to come off, remove the centre spigot bearing and slacken , but don't fully remove the large hex head screw. Then support the boss on something firm and solid and then hit the opposite side of the boss with a substantial drift and a lump hammer. This will fractionally and temporally deform the boss and shock it off its taper. Leaving the screw in place prevents the loosed flywheel landing on your toes!